Cabinet Painting Aftercare: Ottawa Homeowner's Guide
- Axcell Painting

- 4 hours ago
- 9 min read
TL;DR:
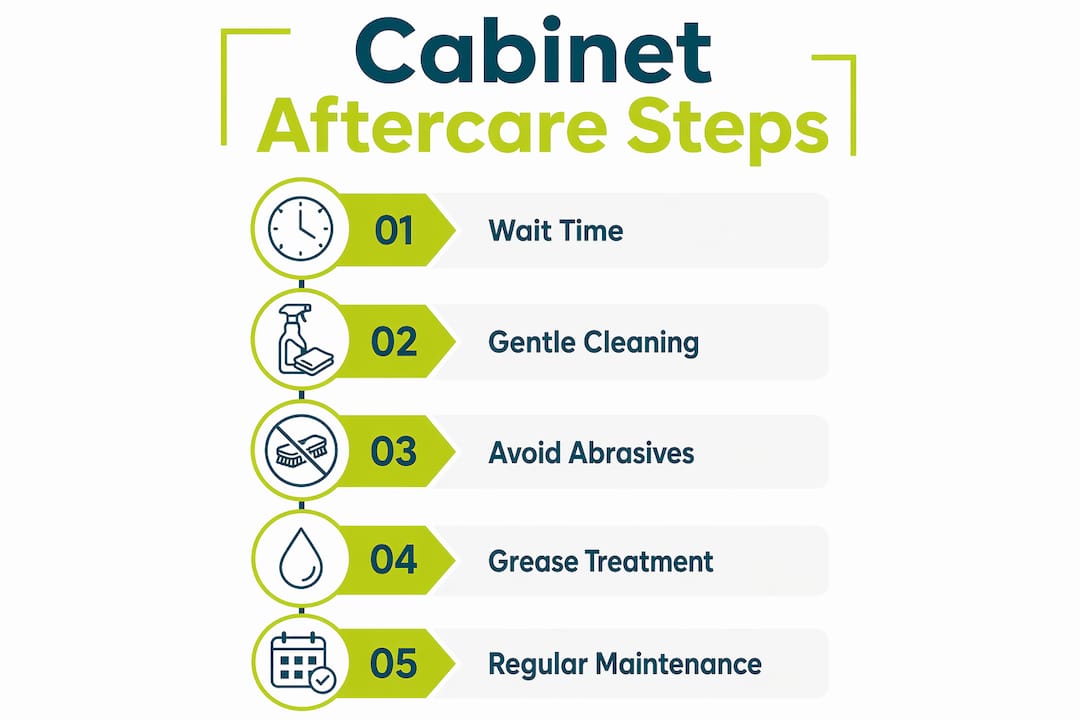
Proper aftercare involves gentle cleaning, controlling indoor humidity, and timely minor repairs to preserve painted kitchen cabinets in Ottawa. Full curing takes 3 to 6 weeks, during which impact and moisture exposure should be minimized to prevent damage. Consistent habits like using handles, avoiding abrasive products, and promptly fixing chips ensure long-lasting, durable finishes.
Cabinet painting aftercare is the practice of protecting and maintaining freshly painted kitchen cabinets to preserve their finish and extend their lifespan. For Ottawa homeowners, this means accounting for seasonal humidity swings, heavy daily kitchen use, and the specific curing requirements of professional-grade paint systems. Get aftercare right, and your cabinets will hold their factory-smooth finish for years. Get it wrong, and you risk peeling, dulling, and staining within months. This guide covers everything you need: safe cleaning methods, curing timelines, daily habits, and how to fix minor damage before it becomes a costly problem.
What is cabinet painting aftercare for Ottawa kitchens?
Cabinet painting aftercare refers to the full set of cleaning, protection, and maintenance practices that keep a painted finish in top condition after the job is complete. The industry term for this broader discipline is finish maintenance, and it applies equally to factory-finished cabinetry and professionally painted surfaces. For Ottawa homeowners specifically, aftercare is not a one-size-fits-all routine. Ottawa’s winters bring dry indoor air that can cause paint to cure unevenly, while humid summers slow drying times and increase the risk of surface damage during the curing window. A finish that looks perfect on day one can show wear within weeks if the right habits are not in place from the start.
The good news is that caring for kitchen cabinets does not require expensive products or hours of effort. Most of the work comes down to a few consistent habits: gentle cleaning, controlled kitchen humidity, and treating your cabinets with the same care you would give any high-quality painted surface. The sections below break each of those habits down into specific, practical steps.
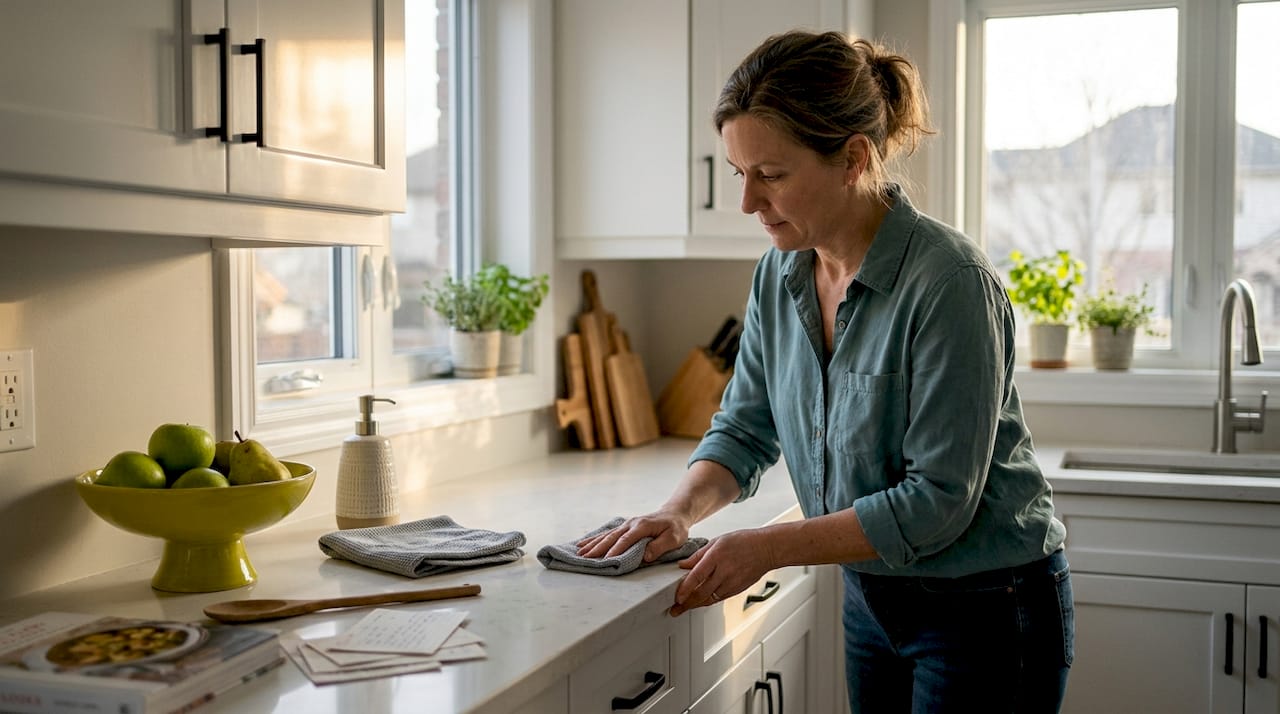
How to clean painted cabinets safely in Ottawa homes
Cleaning is the most frequent aftercare task you will perform, and it is also the most common source of accidental damage. The right method protects the finish. The wrong method strips it.
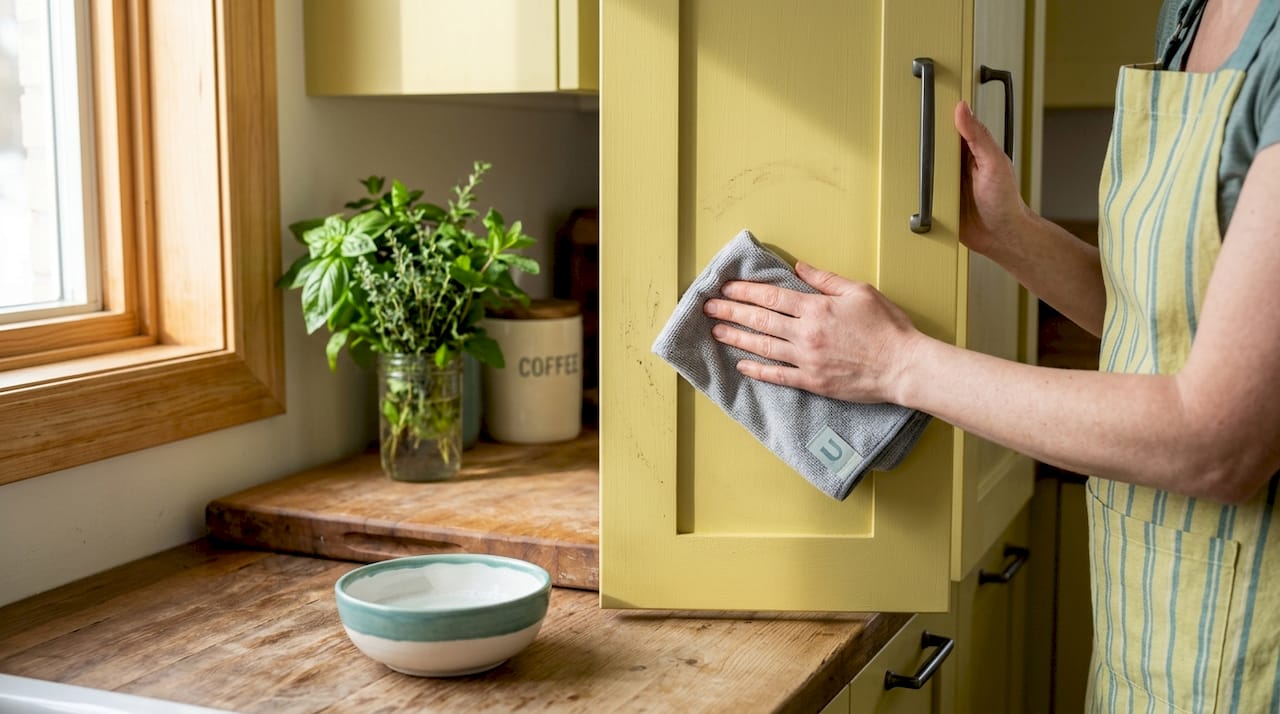
The safe cleaning method, step by step
Dampen a microfiber cloth with warm water and a small amount of mild dish soap. Never apply liquid directly to the cabinet surface. Excess moisture is one of the fastest ways to damage a painted finish, especially near seams and edges.
Wipe in the direction of the wood grain, using light, even pressure. Circular scrubbing motions create micro-scratches that dull the finish over time.
Target high-touch areas first. Grease buildup near cooking areas accumulates faster than anywhere else in the kitchen, so focused attention there gives you the most return for your effort.
Rinse the cloth and wipe again with clean water to remove any soap residue. Soap left on the surface attracts more dirt and can cause a hazy buildup.
Dry immediately with a second clean microfiber cloth. Standing moisture, even from cleaning, can work into the paint film and cause lifting or staining.
Weekly gentle wiping prevents the kind of stubborn grease buildup that forces you into aggressive scrubbing later. That scrubbing is where real damage happens. A consistent routine takes only 5 to 10 minutes per week and dramatically reduces the need for heavy cleaning sessions.
Pro Tip: Never use Magic Erasers or abrasive scrub pads on painted cabinets. These products act like fine sandpaper and permanently dull the finish, even on a single use. Stick to microfiber cloths and mild soap for every cleaning session.
For grease smudges that mild soap cannot shift, diluted white vinegar applied to a cloth (never directly to the surface) is a safe and effective option. Microfiber cloths and diluted vinegar remove smudges and grease without dulling the paint. Paper towels are not a safe substitute. Their texture is coarser than it looks and will scratch a high-gloss or satin finish over repeated use.
How does Ottawa’s climate affect paint curing time?
Paint curing and paint drying are not the same thing. Drying means the surface is no longer tacky. Curing means the paint film has fully hardened and bonded to the substrate. You can touch a dry surface without leaving a mark. You cannot scrub, stack items against, or expose a dry-but-not-cured surface to moisture without risking permanent damage.
Stage | Timeframe | What it means for use |
Dry to touch | 1 to 4 hours | Surface feels dry but is extremely fragile |
Light use | 24 to 48 hours | Gentle closing only, no cleaning or contact |
Normal use | 7 to 14 days | Regular opening and closing, still avoid harsh cleaning |
Full cure | 3 to 6 weeks | Surface fully hardened, normal cleaning safe |
Full curing can take 3 to 6 weeks, with extended time needed for oil-based and thick coatings. That timeline is not a suggestion. Rushing normal use before full cure is a recipe for scuffs, dents, and finish failure that no amount of touch-up work can fully correct.
Ottawa’s seasonal climate adds a layer of complexity here. Winter indoor air tends to be drier, which can speed surface drying but cause uneven curing through the paint film. Summer humidity slows the entire process and increases the risk of surface damage during the curing window. Indoor humidity between 30% and 55% with good ventilation gives paint the best conditions to cure properly. A simple hygrometer from any hardware store lets you monitor this without guesswork.
Pro Tip: Not sure if your cabinets have fully cured? Press a fingernail gently into a hidden area, like the inside corner of a door. If it leaves a mark, curing is not complete. Check the cabinet painting timeline your painter provided and give it more time.
Best practices for daily use in Ottawa kitchens
How you use your cabinets every day matters as much as how you clean them. Small habits compound over months and years into either a finish that still looks great or one that shows its age prematurely.
Always use handles. Using handles rather than pulling on doors preserves the paint at contact points and prevents chipping. This is especially critical during the first few weeks after painting, when the finish is still curing and most vulnerable to impact.
Avoid slamming cabinet doors. Impact stress causes micro-fractures in the paint film at hinges and edges. Soft-close hinges are worth installing if your cabinets do not already have them.
Control kitchen steam. Run your range hood every time you cook. Steam and moisture from boiling water or a busy stovetop settle on cabinet surfaces and work into the paint over time, particularly on upper cabinets directly above the stove.
Line cabinet tops with disposable liners. Disposable parchment or paper towel liners on top of upper cabinets catch grease and dust before they bond to the painted surface. Replace them about twice per year for effective protection.
Dust regularly. A dry microfiber cloth run over cabinet surfaces once a week removes fine dust before it mixes with kitchen grease and forms a sticky film. This is one of the simplest and most overlooked cabinet maintenance tips in any Ottawa home.
Keep sharp objects away from cabinet edges. Knives, pot handles, and baking sheets are common culprits for edge chips. Store them so they do not contact cabinet surfaces when you open drawers or doors.
These habits take almost no extra time once they become routine. The payoff is a finish that holds up through years of daily kitchen activity without looking worn.
How to troubleshoot and repair common issues on painted cabinets
Even with careful aftercare, painted cabinets in a working Ottawa kitchen will occasionally show minor damage. Catching problems early and responding correctly prevents small issues from becoming expensive ones.
Identifying what you are dealing with
Not all surface problems are the same, and treating them incorrectly makes things worse. Grease buildup feels slightly tacky and has a yellowish tint. Sticky residue from cleaning products or food splatter feels uniformly tacky across a larger area. True stains have penetrated the paint film and will not wipe off with a damp cloth.
Step-by-step approach to common problems
For grease buildup, apply diluted dish soap with a microfiber cloth and let it sit for 60 seconds before wiping. Repeat if needed. Do not scrub. Patience removes grease. Pressure removes paint.
For sticky residue, try warm water first. If that fails, a small amount of rubbing alcohol on a cloth will dissolve most adhesive residues without damaging a fully cured finish. Test in a hidden area first.
For stains that have penetrated the surface, a touch-up with the original paint is often the only reliable fix. Small chips should be repaired quickly using original paint to prevent moisture from working into the substrate and causing the damage to spread.
For chips at door edges or corners, clean the area, let it dry fully, then apply a thin layer of matching paint with a fine artist’s brush. Feather the edges so the repair blends into the surrounding finish. Two thin coats always look better than one thick one.
For peeling or widespread finish failure, stop and call a professional. Peeling that covers more than a small area usually signals a prep or adhesion failure that touch-up paint will not fix. A professional refinishing consultation will tell you whether a spot repair or a full refinish is the right call.
Pro Tip: Always keep a small amount of your original cabinet paint stored in a sealed container. Label it with the color name, sheen level, and the date it was applied. Touch-ups done with the exact original paint are nearly invisible. Touch-ups done with a close-but-not-exact match will always show.
Key takeaways
Proper cabinet painting aftercare protects your finish through consistent gentle cleaning, controlled curing conditions, and daily habits that prevent impact and moisture damage.
Point | Details |
Clean gently and consistently | Use microfiber cloths and mild soap weekly to prevent grease buildup and avoid abrasive damage. |
Respect the curing timeline | Full cure takes 3 to 6 weeks; avoid heavy cleaning or impact during this window. |
Control kitchen humidity | Keep indoor humidity between 30% and 55% to support proper curing and long-term finish health. |
Use handles, not bare hands | Opening cabinets by their hardware prevents chipping and preserves paint at high-contact points. |
Repair chips immediately | Quick touch-ups with original paint stop moisture damage before it spreads beneath the finish. |
What we have learned from Ottawa kitchens over the years
We have painted hundreds of kitchens across Ottawa, and the aftercare mistakes we see most often are not dramatic. They are small. A homeowner uses a Magic Eraser on a sticky spot and dulls a $4,000 finish in 30 seconds. Someone stacks a cutting board against a cabinet door for a week during curing and leaves a permanent impression. These are not careless people. They just did not know what the curing window meant in practice.
The one thing we would tell every Ottawa homeowner is this: the first six weeks after painting are the most important six weeks your cabinets will ever have. What you do or do not do during that window sets the baseline for how the finish ages. After full cure, painted cabinets are genuinely durable. Before full cure, they are surprisingly fragile.
Ottawa’s climate makes this more complicated than it would be in a city with stable year-round humidity. If your cabinets were painted in January, your furnace is running constantly and the indoor air is dry. If they were painted in July, humidity is working against the curing process. Neither situation is a problem if you know about it and adjust accordingly. That is what local experience gives you.
The homeowners whose cabinets still look great five years later are not doing anything complicated. They clean weekly with a damp microfiber cloth, they use their handles, and they fix chips the week they appear. That is the whole system.
— Ottawa
Get professional support for your cabinet finish in Ottawa
If you want a finish that is built to last through Ottawa’s climate and daily kitchen life, the quality of the original paint job matters as much as the aftercare. At Ottawacabinetpainting, we use premium paint systems and thorough prep work specifically chosen for durability in Ottawa homes. Our interior cabinet painting service includes guidance on aftercare from day one, so you know exactly how to protect your investment from the moment we finish. We back our work with a 6-year warranty and are always available to answer aftercare questions. Ready to see what a professional finish looks like? Request a free quote and we will walk you through the full process.
FAQ
How soon can I clean my painted cabinets after painting?
Wait at least 7 to 14 days before any cleaning, and use only a lightly damp microfiber cloth. Full cure takes 3 to 6 weeks, so avoid soap or any cleaning products until that window has passed.
What is the safest way to remove grease from painted cabinets?
Apply diluted mild dish soap to a microfiber cloth and wipe gently, then follow with a clean damp cloth and dry immediately. Never use abrasive pads or Magic Erasers, which permanently dull painted finishes.
Does Ottawa’s humidity affect how long cabinet paint takes to cure?
Yes. High summer humidity slows curing and increases damage risk, while dry winter air can cause uneven curing through the paint film. Keeping indoor humidity between 30% and 55% gives paint the best conditions to cure properly.
How do I fix a small chip in my painted cabinet?
Clean the chipped area, let it dry completely, then apply a thin coat of the original paint with a fine brush. Two thin coats feathered at the edges will blend better than one thick application.
How often should I clean my painted kitchen cabinets?
A light wipe-down with a damp microfiber cloth once per week is enough for most Ottawa kitchens. This 5 to 10 minute routine prevents grease buildup and reduces the need for any heavy scrubbing that could damage the finish.
Recommended
Comments