Refinishing Wooden Cabinets: Achieve a Modern, Durable Finish
- demoore5506
- Oct 28, 2025
- 8 min read

Did you know that over 60 percent of kitchen remodels involve cabinet refinishing rather than replacement? Saving money while transforming the heart of your home begins with careful preparation. Safety and organization are just as important as painting skills when working with chemicals and tools. This guide breaks down the crucial steps for refinishing wood cabinets, so you can achieve smooth results and protect both your workspace and your health.
Table of Contents
Quick Summary
Key Point | Explanation |
1. Clear workspace before starting | Removing clutter enhances safety and ensures an organized area for efficient work on your cabinets. |
2. Use protective gear for safety | Wearing safety glasses, gloves, and an apron protects you from harmful chemicals and potential injuries during the refinishing process. |
3. Sand surfaces for better paint adhesion | Proper sanding creates a smooth texture that improves the bond between the wood and the new paint, ensuring a professional finish. |
4. Apply primer before painting | Using a high-quality primer ensures even paint application and enhances adhesion, resulting in a longer-lasting finish. |
5. Inspect and reinstall hardware carefully | Confirm that all hardware is reinstalled accurately to maintain the functionality and aesthetic of your newly painted cabinets. |
Step 1: Prepare and Protect Your Workspace
Getting ready to refinish your wooden cabinets requires strategic workspace preparation to ensure safety and efficiency. Your workspace setup determines the quality and success of your entire cabinet painting project.
Start by clearing everything away from your work area. According to workplace safety guidelines from OSHA, creating a clean and organized environment is critical when handling chemical finishes. Remove any unnecessary items and create a dedicated space with excellent ventilation. Open windows and set up fans to ensure proper air circulation and minimize chemical exposure.
Gather all your protective equipment before beginning. As recommended by safety experts, wear impact resistant safety glasses that completely cover your eye area. Protect your skin by using work gloves and an apron when handling paint removers or strong chemical solutions. Always work in a well-ventilated area and label all chemical containers clearly to prevent accidental misuse.
Prepare your tools and materials in advance. Arrange sandpaper, primers, brushes, drop cloths and cleaning supplies within easy reach. Having everything organized prevents interruptions and helps you work efficiently. Check out our guide on prepping cabinets for paint for additional preparation tips.
Pro Tip: Keep a fire extinguisher nearby and ensure you have adequate first aid supplies in case of unexpected accidents.
Your carefully prepared workspace sets the foundation for a successful cabinet refinishing project.
Here’s a quick overview of essential workspace preparation tasks and their purposes:
Task | Purpose |
Remove clutter | Enhance safety and efficiency |
Ensure ventilation | Minimize chemical exposure |
Gather protective equipment | Protect eyes, skin, and lungs |
Arrange tools and supplies | Prevent interruptions |
Label chemical containers | Prevent accidental misuse |
Keep fire extinguisher ready | Prepare for emergencies |
Step 2: Remove Hardware and Clean Cabinets
Now that your workspace is prepared, you will carefully remove hardware and thoroughly clean your wooden cabinets. This critical step ensures a smooth painting surface and helps your new finish adhere perfectly.
Begin by removing all hardware like knobs, handles and hinges. Consult our guide on removing cabinet doors for detailed instructions. Place each piece of hardware in labeled plastic bags to prevent losing small parts. Work systematically removing hardware from each cabinet door and drawer front.
Cleaning requires careful attention. According to technical preservation guidelines, use a soft cotton cloth dampened with warm water for initial cleaning. For more thorough cleaning, mix a mild dishwashing liquid with warm water. Gently wipe all surfaces ensuring you remove grease, dirt and kitchen grime. As recommended by home maintenance experts, after cleaning wipe all surfaces with a clean damp cloth and immediately dry using another soft cloth.
For metal hardware like bronze or stainless steel, use a mild soap solution. Stubborn dirt can be addressed with a soft bristle brush or Scotch-Brite pad. Rinse thoroughly and buff dry with a clean cotton cloth.
Pro Tip: Take photos of hardware placement before removal to ensure correct reinstallation after painting.
Your cabinets are now ready for the next stage of refinishing preparation.
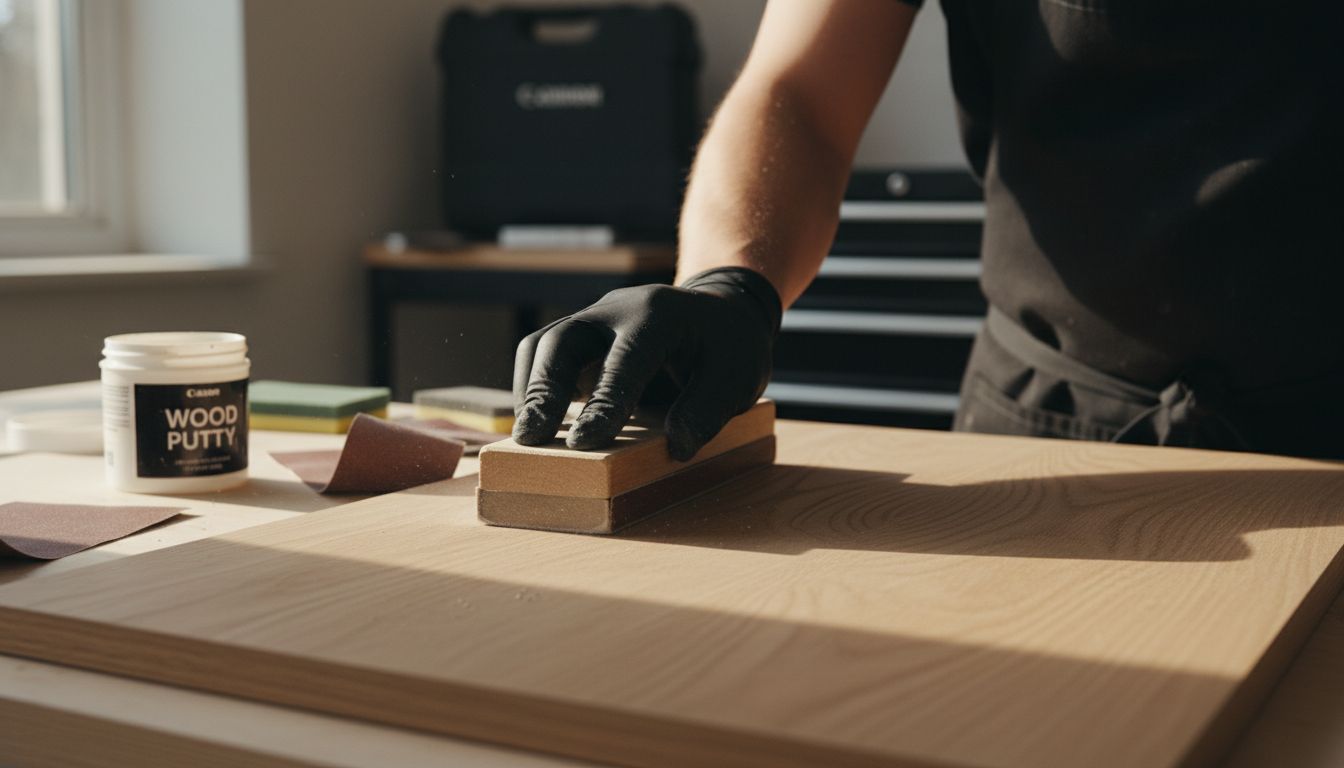
Step 3: Sand Surfaces for Optimal Paint Adhesion
Sanding is a critical step in preparing your wooden cabinets for a flawless paint finish. Your goal is to create a smooth surface that allows paint to adhere perfectly and create a professional looking result.
Explore our guide on sanding cabinets for paint to understand the nuances of this crucial preparation stage. Begin with medium grit sandpaper around 120 to 150 grit to remove the existing finish and create a slightly rough texture. Work systematically across each cabinet surface using light circular motions.
According to historic preservation technical guidelines, your objective is achieving a smooth uniform appearance without being too aggressive. Fill any nail holes, voids or surface defects using wood putty or spackle before sanding. For small seasoned knots, apply a thin coat of white shellac as a sealer before filling surface imperfections.
Pay special attention to detailed areas like edges and corners. Use a sanding block to maintain consistent pressure and avoid creating uneven spots. After initial sanding, switch to a finer grit sandpaper around 220 to create an ultra smooth surface that will help your new paint finish look professional.
Pro Tip: Always sand in the direction of the wood grain to prevent visible scratches and ensure a uniform surface.
Your cabinets are now expertly prepared for priming and painting.
Step 4: Apply High-Quality Primer Evenly
Priming is the foundation for a stunning cabinet paint finish that will look professional and last for years. This critical step ensures your paint adheres perfectly and creates a smooth uniform surface.
Learn more about choosing the right paint finish to complement your primer selection. Select a shellac based or bonding primer specifically designed for kitchen cabinets. According to preservation technical guidelines, it is crucial to use compatible products from the same manufacturer to ensure optimal results.
Recondition the wood surface before priming to guarantee a tight bond. As recommended by restoration experts, you can create a custom preparation solution by mixing two parts boiled linseed oil with one part pure steam distilled turpentine. Apply this mixture liberally with a brush and allow it to dry completely. Repeat until the surface develops a slight sheen.
Apply primer using long smooth strokes with a high quality foam roller or professional grade brush. Work in the direction of the wood grain to prevent visible lines or streaks. Ensure even coverage and avoid overloading your brush or roller to prevent drips and uneven application. Allow the primer to dry completely between coats according to manufacturer instructions.
Pro Tip: Lightly sand the primer coat with fine grit sandpaper after it dries to create an ultra smooth surface for painting.
Your cabinets are now perfectly primed and ready for the final paint application.
Step 5: Paint Cabinets for a Smooth, Lasting Finish
Painting your cabinets is the transformative moment where your kitchen gets its fresh new look. Your goal is to create a uniform smooth finish that looks professional and withstands daily wear and tear.
Explore our guide to cabinet paint finish options to understand the nuances of selecting the right paint. Choose a high quality cabinet paint designed for kitchen environments. According to historic preservation guidelines, your objective is achieving a smooth uniform appearance without splotches streaks or uneven coverage.
Apply paint using long smooth strokes with a high quality foam roller or professional grade brush. Work systematically in thin even coats to prevent drips and buildup. As preservation experts recommend, apply three coats of paint allowing at least four hours drying time between each coat. Lightly sand with fine grit sandpaper between coats to ensure an ultra smooth surface.
Between each paint application vacuum the surface and wipe with a dry tack rag to remove any dust or grit. This ensures a pristine finish without imperfections. Use consistent pressure and maintain a wet edge to prevent visible brush or roller marks.
Pro Tip: Paint in a well ventilated area with consistent temperature to help paint dry evenly and prevent bubbling or streaking.
Your cabinets are now beautifully transformed with a professional grade finish.
Step 6: Inspect Results and Reinstall Hardware
The final stage of your cabinet refinishing project involves carefully examining your work and meticulously reinstalling the hardware. This step transforms your freshly painted cabinets from a project to a professional looking installation.
Start by allowing the paint to fully cure for at least 24 hours. Review our guide for understanding paint finish details to ensure proper drying and curing times. Once cured, lightly rub the surface with fine steel wool to achieve a smooth factory like finish.
Carefully clean your original hardware before reinstallation. According to historic preservation guidelines, use mild soap and water for bronze or stainless steel hardware. For stubborn dirt, apply a gentle detergent using a soft bristle brush or Scotch-Brite pad. Rinse thoroughly and buff dry with a soft cotton cloth. Remove any paint drips from hardware using a non metallic spatula.
Refer to the photos you took during disassembly to ensure correct hardware placement. Work systematically replacing each piece and tightening screws evenly. Check that handles and knobs are aligned perfectly and operate smoothly.
Pro Tip: Use a level to guarantee your hardware is perfectly straight during reinstallation.
Your cabinets are now completely transformed with a professional grade finish and reinstalled hardware.
Transform Your Cabinets with Confidence and Care
Refinishing wooden cabinets to achieve a modern durable finish can feel overwhelming from workspace setup to the final paint coat. You want that smooth silk-like surface and the assurance your cabinets will stand the test of time without the chaos of a full renovation. The challenges of protecting your home, perfecting sanding and priming, and reinstalling hardware correctly require expert knowledge and detailed preparation. With Ottawa Cabinet Painting, you get a trusted local partner who specializes in this exact process to bring your kitchen back to life efficiently and beautifully.
Avoid disruption and costly replacements while enjoying the comfort of a refreshed kitchen. Our proven refinishing approach follows meticulous prep work and premium paint application to create a lasting high-end look you can trust. Want to understand more about prepping your cabinets or see how sanding is done for that flawless surface before the painting starts? Visit Ottawa Cabinet Painting now to request your personalized quote and begin your kitchen transformation today. Your dream cabinets are just a few steps away.
Frequently Asked Questions
How do I prepare my workspace for refinishing wooden cabinets?
To prepare your workspace, start by removing all clutter and ensuring excellent ventilation by opening windows and using fans. Gather protective equipment like safety glasses and gloves, and organize your tools within easy reach to promote efficiency throughout the project.
What steps should I take to remove hardware from my cabinets?
Begin by carefully unscrewing knobs, handles, and hinges from your cabinets and placing each piece in labeled plastic bags. Working systematically will help you avoid losing small parts, making reinstallation much easier after painting.
Why is sanding important when refinishing wooden cabinets?
Sanding is crucial for creating a smooth surface that allows paint to adhere properly, ensuring a professional finish. Use medium grit sandpaper to remove existing finishes, followed by finer grit sandpaper to achieve an ultra-smooth surface before priming.
How can I apply primer evenly on my cabinets?
For even primer application, use a high-quality foam roller or brush and apply it in long, smooth strokes following the direction of the wood grain. Make sure to allow sufficient drying time between coats and sand lightly after drying to enhance the surface for painting.
What techniques help achieve a smooth paint finish on cabinets?
To achieve a smooth paint finish, apply paint in thin, even coats using consistent pressure with a foam roller or brush. Lightly sand between each coat and ensure you’re painting in a well-ventilated area to prevent bubbling and streaking, applying up to three coats for best results.
How do I reattach the hardware correctly after painting my cabinets?
Refer to the photos taken during disassembly to ensure accurate hardware placement. Tighten screws evenly and use a level to guarantee that all handles and knobs are aligned perfectly for a polished final look.
Recommended
Comments