Refinish, Not Replace: Ottawa Kitchen Cabinet Layout Planner in 10 Days

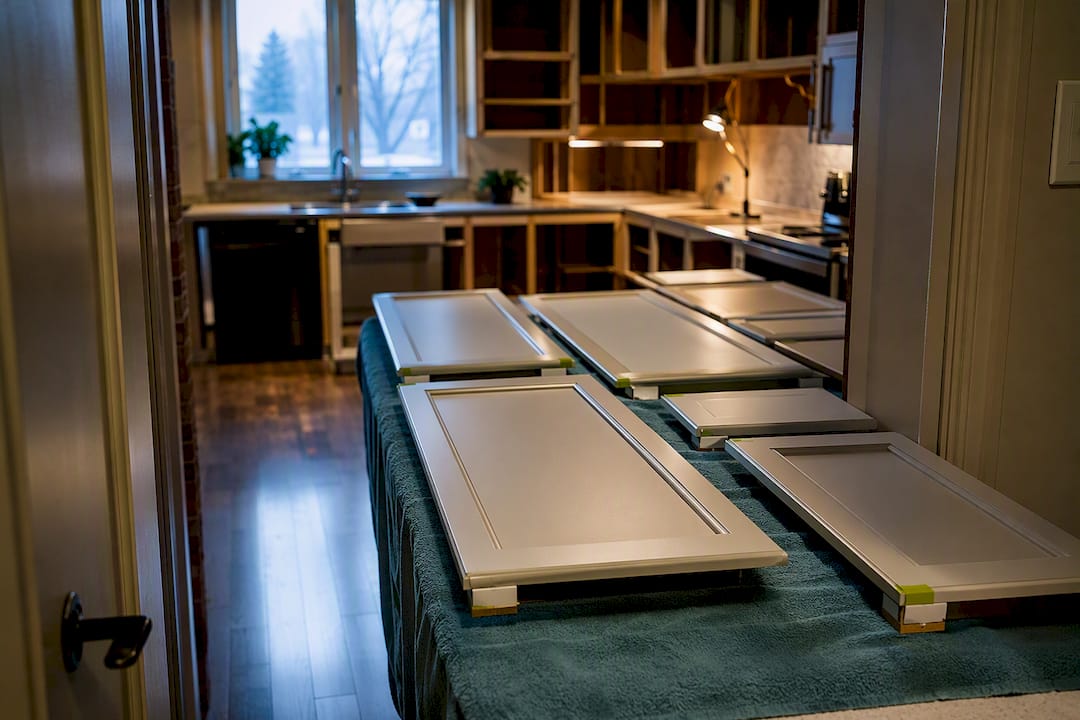
Searching for a “kitchen cabinet layout planner” usually means one thing for Ottawa homeowners: a clear plan for refreshing the cabinets you already have, not new layout software. If your cabinet boxes and layout are structurally sound, professional refinishing is almost always the smarter move, both on cost and on the chaos it saves your household. Expect a real project timeline of roughly seven to ten business days, including cure time, when you hire a professional painter instead of tearing out and rebuilding.
TL;DR:
Refinishing costs between 40 and 60 percent of full replacement in Ottawa, with typical project prices ranging from $2,500 to $7,500 depending on kitchen size.
Proper prep work, including degreasing, sanding, and controlled-shop spraying, is essential for a durable, smooth finish that resists peeling and bubbling.
Most refinishing projects take 5 to 7 days of active work, with an additional 7 to 10 days for curing before cabinets can be loaded again.
Homeowners should verify cabinet condition first by checking for water damage, hardware function, and moisture issues before choosing refinishing over replacement.
Carefully plan color, hardware, and storage upgrades beforehand, and ask contractors specific questions about their process, warranty, and experience to ensure quality results.
Table of Contents
What a Kitchen Cabinet Layout Planner Means for Your Cabinets
What Actually Happens During Professional Cabinet Refinishing
Planning Colors, Hardware, and Small Upgrades That Amplify the Refinish
Common Design Mistakes to Avoid When Planning a Kitchen Cabinet Layout
How to Maximize Storage and Functionality Through Layout Planning
Popular Kitchen Cabinet Layout Styles and Their Pros and Cons
Integration Considerations With Appliances and Kitchen Workflow
Tips for Measuring and Creating an Accurate Floor Plan Before Planning
Using Digital or Software Tools to Visualize and Modify Cabinet Layouts
Why Ottawa Homeowners Increasingly Choose Refinishing Over Replacement
Get an Estimate for Your Kitchen Cabinet Refinishing Project
What a Kitchen Cabinet Layout Planner Means for Your Cabinets
This planner is not about rearranging your kitchen or redesigning where the sink and stove sit. It is about mapping out how to modernize the cabinets already bolted into your existing layout, through professional painting and refinishing rather than a full teardown.
That distinction matters because “refinishing,” “refacing,” and “replacing” get used interchangeably online, and they are not the same project.
Refinishing strips, repairs, and repaints your existing boxes and doors, keeping your current layout completely intact.
Refacing replaces door and drawer fronts while keeping the boxes, often at a higher cost than paint alone.
Replacing tears out everything, including the boxes, and usually means new plumbing and electrical adjustments too.
For homeowners whose cabinets are square, solid, and functioning, refinishing delivers a modernized, showroom look at a fraction of the disruption. You keep your drawers where your hands already know to find them. You keep your weekend free of a demolition crew. And you get a finish that looks factory new, without the six-figure kitchen renovation invoice.
Is Painting or Refinishing Right for Your Ottawa Kitchen?
Before you call anyone for an estimate, walk your kitchen with a critical eye. Here is the checklist we recommend to every homeowner who reaches out to us:
Check the boxes. Are the cabinet frames square, solid, and free of water damage or swelling, especially under the sink?
Test the doors and drawers. Do they close flush, or do they stick, sag, or rattle on worn hinges?
Look for moisture damage. Bubbled laminate or soft, spongy particleboard near the dishwasher or sink is a signal that refinishing alone will not fix the underlying problem.
Confirm hinge and slide function. Hardware issues are usually a quick fix, not a reason to replace the whole kitchen.
Consider your timeline for staying. If you plan to sell within a few years, painting delivers strong visual return without tying up capital in cabinets a buyer might redesign anyway.
If your cabinets pass that checklist, refinishing costs a fraction of what full replacement runs. Professional refinishing typically costs 40 to 60 percent of full replacement when the underlying boxes and layout are sound. In the Ottawa market specifically, professional painting projects commonly land between $2,500 and $7,500, depending on kitchen size and cabinet condition, while refacing and full replacement cost substantially more.
What pushes a paint job toward the higher end of that range? MDF edges that need extra sealing, veneer surfaces that require different primer chemistry, and simply the number of doors and drawers in your kitchen. A ten-door galley kitchen and a thirty-piece island kitchen are not the same invoice, even with identical finish quality.
What Actually Happens During Professional Cabinet Refinishing
A rushed cabinet paint job is a recipe for disaster. Peeling, bubbling, and that cheap “orange peel” texture almost always trace back to skipped prep steps, not bad paint. Prep work accounts for a large share of a cabinet finish’s long-term success, which is why the sequence below matters more than the paint can label.
Here is the process, step by step:
Disassembly and labeling. Doors and drawer fronts come off and get numbered so every piece returns to its exact spot.
Degreasing. Years of cooking residue get stripped from every surface, since paint will not bond to grease no matter how good the primer is.
Sanding and scuffing. This creates the microscopic texture that gives primer something to grip.
Spot priming. Stains, knots, and repairs get sealed with a bonding primer before the main coats go on.
Shop spraying. Doors and drawers travel to a controlled spray environment for their coats.
On-site box work. Frames stay in your kitchen, carefully masked and sprayed or finished in place.
Micro-sanding between coats. Each layer gets lightly scuffed before the next, which is what produces that seamless, glass-smooth surface.
Curing and rehanging. Hardware and doors go back on only after the finish has fully hardened.
Why bother sending doors to a shop instead of just painting everything in your kitchen? Controlled-shop spraying reduces dust contamination and allows temperature and humidity control that a busy household simply cannot offer. That combination of shop-sprayed doors and carefully finished on-site boxes is what produces a durable, factory-smooth result instead of visible brush strokes.
A standard project runs 5 to 7 business days of active work, followed by a 7 to 10 day cure window before hardware goes back on and the kitchen returns to heavy use. Kitchens with extensive water damage, dark-to-light color changes, or oversized islands can push past that window.
Pro Tip: Resist the urge to load your cabinets back up the day paint feels dry to the touch. Paint can feel cured on the surface while still hardening underneath for a week or more. Loading heavy dishes too early is how coatings scuff and chip within the first month.
Planning Colors, Hardware, and Small Upgrades That Amplify the Refinish
A fresh coat of paint is the headline, but the choices around it decide whether your kitchen looks pulled together or half finished.
For color, warm whites and soft greiges tend to make small Ottawa kitchens feel larger and brighter, especially in homes without a lot of south-facing window light. If you want a bolder statement, deep navy or forest green on a lower cabinet run or a single island, paired with a lighter upper cabinet color, gives contrast without overwhelming the room. These combinations also tend to hold broad resale appeal, since they read as intentional design rather than a passing trend.
Hardware deserves just as much attention as paint color. New hardware is often called the jewelry of the kitchen for good reason: it is one of the cheapest upgrades with the most visible payoff. A few rules of thumb:
Match your new hardware’s hole spacing to your existing holes, or budget for filling and redrilling if you are switching styles.
Pulls generally read as more modern than knobs, but knobs still suit traditional or shaker-style doors well.
Reuse hinges only if they operate smoothly. A $4 hinge that sticks will bother you every day for years.
If your budget allows for more, sequence smart. Refinish the cabinets first, then layer in updated lighting, a new backsplash, or countertops. Pairing refinishing with hardware, lighting, or a backsplash update delivers high visual impact for relatively low additional cost, and doing the cabinets first means you are not protecting a brand-new counter from paint overspray.
Questions to Ask an Ottawa Cabinet Painter Before You Hire
A confident contractor answers these questions without hesitation. A vague answer to any of them is worth noting.
What is my cabinet substrate, and does it change your process? Laminate, MDF, and solid wood all need different prep and primer approaches.
What primer and paint brands do you use, and why? You want specifics, not “a good one.”
Do doors get sprayed in a shop, or brushed on-site? Ask specifically whether they run a dedicated cabinet finishing setup, since general house painters often lack the spray equipment and containment that prevent finish failures.
What is the full timeline in writing, including cure time? A verbal estimate is not a commitment.
What does your warranty cover, and for how long? The industry standard sits around one to two years, but top contractors often offer three to six year guarantees on their work.
Red flags to walk away from: no mention of degreasing or sanding, no proof of a spray shop or dust containment, a rock-bottom quote with a rushed one-day timeline, or a refusal to put the warranty in writing. For a deeper walkthrough of vetting questions specific to the Ottawa market, our contractor vetting checklist covers additional scenarios worth asking about.
Pro Tip: Ask to see photos of a project at the 48-hour mark, not just the finished reveal. A contractor who is proud of mid-process containment and masking is usually the one doing the job right.
Common Design Mistakes to Avoid When Planning a Kitchen Cabinet Layout
Even when you are not touching the layout itself, a few planning mistakes show up again and again in Ottawa kitchens.
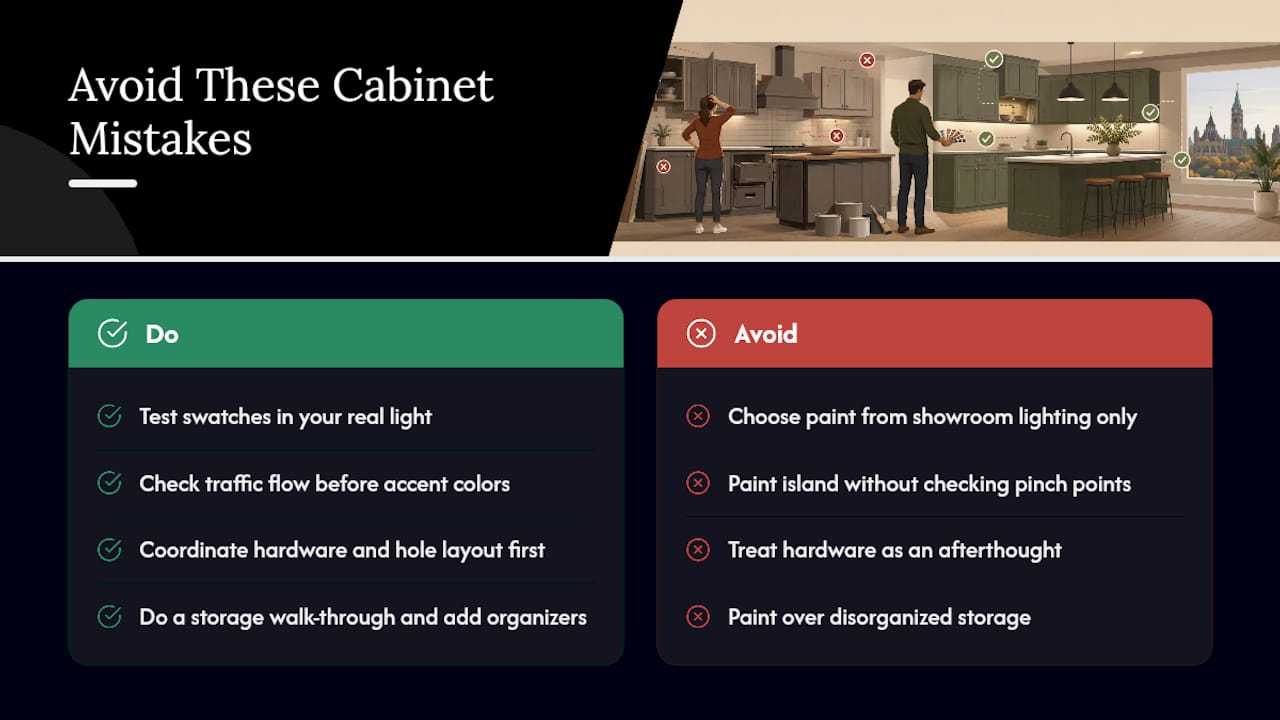
The first is choosing paint color in isolation from lighting. A greige that looks warm under your showroom’s fluorescent bulbs can turn muddy under your kitchen’s north-facing window. Test swatches on your actual cabinets, in your actual light, morning and evening, before committing.
The second is ignoring traffic flow when picking accent placement. Painting your island a dramatically different color from the perimeter can look striking in photos, but if the island sits in a tight walkway, that bold color draws attention to a pinch point rather than a feature.
The third mistake is treating hardware as an afterthought instead of part of the plan. Homeowners often paint first and shop for hardware later, only to discover their new pulls do not match the drilled holes, forcing a compromise they did not want.
The fourth is skipping a real walk-through of storage before refinishing begins. Painting over disorganized cabinets just gives you a better-looking version of the same clutter problem. A few pull-out trays or a lazy Susan insert during the same project window costs far less than adding them later.
Finally, homeowners sometimes underestimate how a single sheen choice affects the whole room. High-gloss finishes show fingerprints and imperfections far more than a satin or low-sheen finish, especially on lower cabinets that get touched constantly.
How to Maximize Storage and Functionality Through Layout Planning
You do not need to rip out your cabinets to get more usable storage from them. Refinishing projects are a natural moment to address storage gaps, since the doors are already off and the boxes are already exposed.
Deep corner cabinets are the most commonly wasted space in Ottawa kitchens built before the 2000s. A lazy Susan or a swing-out shelf system installed during your refinishing project reclaims that dead corner without any layout change.
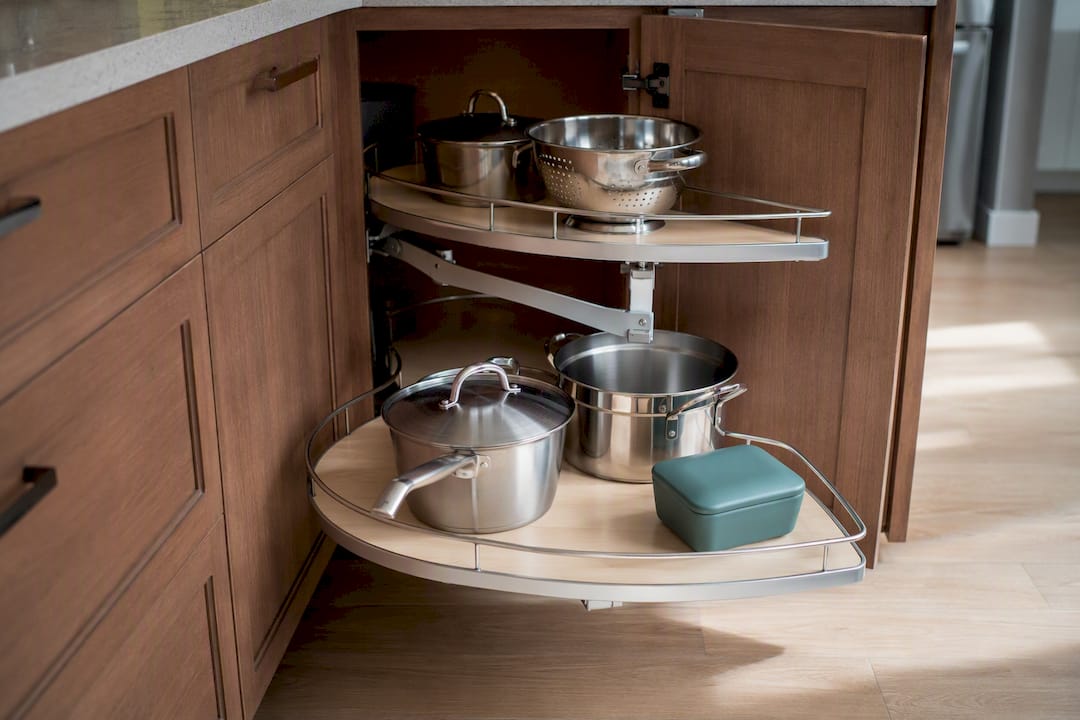
Drawer organizers matter more than most homeowners expect. Standard cabinet drawers waste vertical space when everything is piled loosely. Adding dividers for utensils, cutting boards, or spice jars turns one drawer into three functional zones.
Consider also whether a cabinet currently used for rarely accessed items, like large serving platters, could swap places with one holding daily-use dishware. This kind of internal reshuffle costs nothing and often solves the “everything is in the wrong place” feeling that homeowners blame on their layout when the real issue is organization.
Pull-out trash and recycling bins, often retrofitted into an existing base cabinet, are another upgrade that fits neatly into a refinishing timeline. Since the cabinet is already open for prep work, adding the hardware for a pull-out system adds minimal extra time to the project.
The goal is simple: get more function out of the boxes you already have, at the same time you are getting a better-looking finish on them.
Popular Kitchen Cabinet Layout Styles and Their Pros and Cons
Most Ottawa homes fall into one of four common kitchen layouts, and understanding yours helps you plan color and finish choices that work with the space rather than against it.
Galley kitchens, with cabinets running along two parallel walls, are efficient for cooking but can feel closed in. Lighter paint colors and glossier sheens help bounce light down a narrow galley run.
L-shaped kitchens wrap cabinets around two adjoining walls, leaving an open corner for a table or island. This layout gives flexibility for a two-tone paint scheme, since one wall can carry a bolder color without overwhelming the whole room.
U-shaped kitchens enclose three walls with cabinets and counters, maximizing storage and counter space at the cost of open floor area. These benefit from careful color planning, since a dark color on all three walls can make the room feel boxed in.
Island kitchens, whether L-shaped or U-shaped with a center island added, are the most popular request we hear from Ottawa homeowners planning a refinish. The island is a natural place for a contrast color, since it reads as a piece of furniture rather than part of the surrounding walls.
None of these layouts require replacement to look current. A dated galley kitchen and a dated island kitchen both respond the same way to professional refinishing: the bones stay, the surface transforms.
Integration Considerations With Appliances and Kitchen Workflow
Refinishing an existing layout means working carefully around appliances that are staying put, and that takes planning most homeowners do not think about until estimate day.
Built-in appliances like a wall oven, microwave drawer, or panel-ready refrigerator often sit flush against cabinet frames, which means masking and containment need to be precise to avoid overspray on stainless steel or appliance panels. A professional crew will typically remove appliance faces where possible or mask them thoroughly rather than working around them loosely.
Workflow also matters when you are deciding what to prioritize. The classic “work triangle” between sink, stove, and refrigerator does not change just because cabinets get repainted, but the finish you choose can support or work against that flow. High-traffic zones near the stove benefit from a more durable, scrubbable topcoat, since grease splatter and daily wear concentrate there more than on a pantry door across the room.
If you are considering swapping an appliance during the same project window, such as upgrading to a slightly larger range or a different refrigerator style, tell your contractor before prep work begins. A half-inch size difference can affect which cabinet panels need trimming or filler strips, and that is far easier to plan for than to fix after the fact.
Tips for Measuring and Creating an Accurate Floor Plan Before Planning
Even a layout-preserving refinish benefits from an accurate floor plan, especially if you are adding storage inserts or considering any hardware changes that affect spacing.
Start by measuring each cabinet run wall to wall, noting the width and depth of every base and upper cabinet section. Record door and drawer counts too, since that number drives your project quote more than almost any other factor.
Measure appliance openings separately from cabinet openings, and double check clearances around the dishwasher and refrigerator doors when open. It is common for homeowners to discover, mid-project, that a drawer they wanted upgraded with a soft-close slide does not have enough clearance because of an adjacent appliance handle.
Note ceiling height and the gap above your upper cabinets. This affects decisions like whether crown molding gets refinished along with the cabinets or treated as a separate line item.
A simple sketch, even hand-drawn with measurements noted, gives your contractor what they need to quote accurately and gives you a reference point for hardware and organizer shopping. You do not need architectural software for this. A tape measure, a notepad, and fifteen careful minutes cover most refinishing projects completely.
Using Digital or Software Tools to Visualize and Modify Cabinet Layouts
Once you have accurate measurements, a simple visualization tool can help you settle on a color before a single drop of paint goes on your cabinets. Many paint manufacturers offer online color visualizers where you upload a photo of your kitchen and preview different shades on your actual cabinet doors, which is far more reliable than judging a paint chip under store lighting.
These tools are genuinely useful for narrowing down a shortlist of two or three colors before your contractor walk-through. What they are not useful for, in this context, is redesigning where your cabinets sit or how your kitchen is laid out. That is a different exercise entirely, and one most homeowners refinishing existing cabinets do not need.
If you are also weighing small functional additions, like a pull-out organizer or a corner lazy Susan, some contractors can show you photos or spec sheets of specific hardware options during your quote visit, which serves the same purpose as software visualization without requiring you to learn a new program. Ask your contractor if they have before-and-after examples of similar layouts and finish combinations. Seeing a real project that resembles your kitchen tells you more than any rendering does.
Why Ottawa Homeowners Increasingly Choose Refinishing Over Replacement
The pattern we see across Ottawa neighborhoods is consistent: homeowners underestimate how much of their kitchen’s “dated” feeling comes purely from finish, not structure. Meticulous prep work, doors sprayed in a controlled shop environment, and a realistic ten-day timeline consistently outperform rushed jobs that skip steps to hit a lower price. A written warranty of several years, rather than the one-year industry minimum, tells you a contractor stands behind their prep as much as their paint.
Local conditions matter too. Ottawa’s humidity swings between seasons put real stress on coatings, which is exactly why cure time and primer choice cannot be shortcuts. Ask for a written timeline, a clear scope of work, and before-and-after photos of comparable projects before you sign anything.
— Ottawa
Get an Estimate for Your Kitchen Cabinet Refinishing Project
A local alternative to a full kitchen renovation offers homeowners a modern look without a six-figure invoice or weeks of living out of a hotel. Such services handle the entire process end to end: thorough degreasing and sanding, shop-sprayed doors and drawers for a seamless factory finish, and careful on-site work on cabinet boxes so kitchens stay functional throughout. Most projects wrap in about ten days, backed by a warranty that goes beyond the one-year standard you will find elsewhere.
If your cabinet boxes are solid and you are ready to see what a professional finish looks like in your own kitchen, request a free estimate through our cabinet painting quote page. Have your door and drawer count handy, along with a few photos of your current cabinets, and we will walk you through timeline and cost specifics for your space. You can also browse our before-and-after gallery to see comparable Ottawa kitchens before you commit.
Sources
For deeper vetting guidance, see World Pro Painting’s contractor selection criteria and BLUE Painting’s production process breakdown. For Ottawa-specific cost context, review our guide on why homeowners choose refinishing over replacement.
FAQ
How Long Does Cabinet Refinishing Take in Ottawa?
Most professional projects take 5 to 7 business days of active work, plus a 7 to 10 day cure window before cabinets return to heavy daily use.
Is Refinishing Cheaper Than Replacing Cabinets?
Yes. Professional refinishing typically costs 40 to 60 percent of full replacement, and Ottawa painting projects commonly range from $2,500 to $7,500 depending on kitchen size and condition.
Can You Change Cabinet Color Without Changing the Layout?
Yes, refinishing repaints and repairs your existing boxes and doors without altering where cabinets sit or how your kitchen flows.
What Warranty Should I Expect From a Cabinet Painter?
Industry standard sits around one to two years, though contractors like Ottawacabinetpainting offer a six-year warranty backed by thorough prep and shop-sprayed finishes.
Do I Need Software to Plan a Cabinet Refinishing Project?
No. A tape measure, an accurate sketch of your cabinet runs, and a color visualizer from a paint manufacturer cover most planning needs before a contractor walk-through.
Recommended

Comments