Easy Ottawa Kitchen Updates: Transform Cabinets Easily at Home
- demoore5506
- Oct 16, 2025
- 8 min read
Updated: Oct 24, 2025
Did you know a fresh coat of paint can increase your kitchen’s appeal by up to 60 percent, according to recent homeowner surveys? Giving your cabinets a makeover not only changes how the space looks, it can make your kitchen feel brighter and more welcoming. With just a little planning and effort, you can achieve a stunning transformation that stands up to daily use and enhances your home’s value.
Quick Summary
Key Point | Explanation |
1. Thoroughly assess your cabinets first | Remove doors and drawers, then label and diagram to ensure easy reassembly of components after painting. |
2. Prepare surfaces for optimal paint adhesion | Clean, sand, and inspect surfaces carefully to ensure a smooth finish and longevity of the paint. |
3. Use quality paint for best results | Apply high-quality primer and paint, using thin coats and maintaining a wet edge for a professional finish. |
4. Allow proper curing time after painting | Wait at least 24 hours to dry and up to 30 days for full hardening before thorough cleaning or heavy use. |
5. Reinstall hardware using an organized method | Refer back to numbered labels to ensure proper alignment of doors and drawers for a seamless final look. |
Table of Contents
Step 1: Assess Existing Cabinets and Kitchen Layout
Before diving into your kitchen cabinet transformation, you need a clear understanding of your current setup. This initial assessment will help you plan your painting project strategically and avoid potential pitfalls.
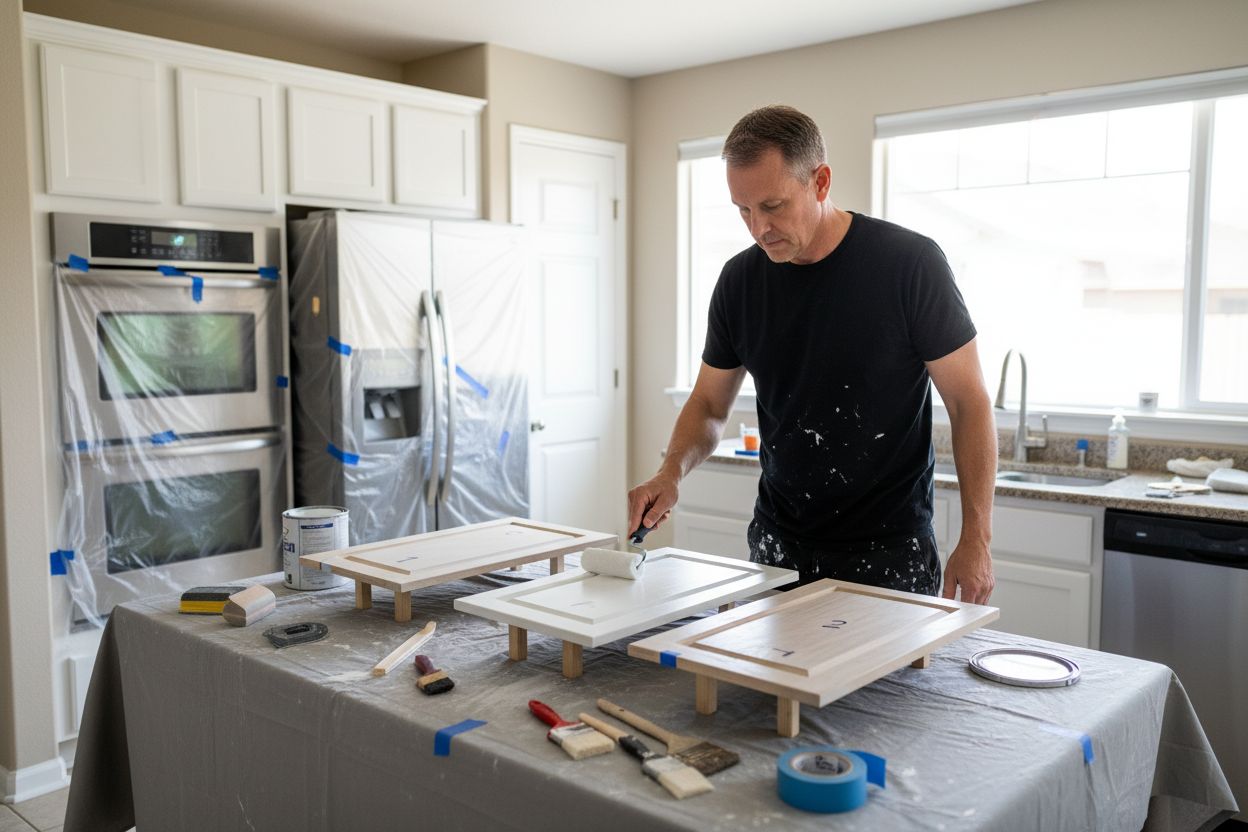
Start by completely removing all cabinet doors and drawer fronts. Check out our guide on measuring cabinets to understand precise removal techniques. As recommended by Canadian Living, carefully label each door and drawer with its corresponding location. A simple numbering system works wonders—use painter’s tape or masking tape and mark each piece so you can easily reinstall them later.
Take a moment to create a quick diagram of your kitchen. According to Wayfair Canada, drawing a layout and numbering each cabinet helps you track placement during reassembly. This step might seem tedious, but trust me—future you will be grateful for this organizational approach.
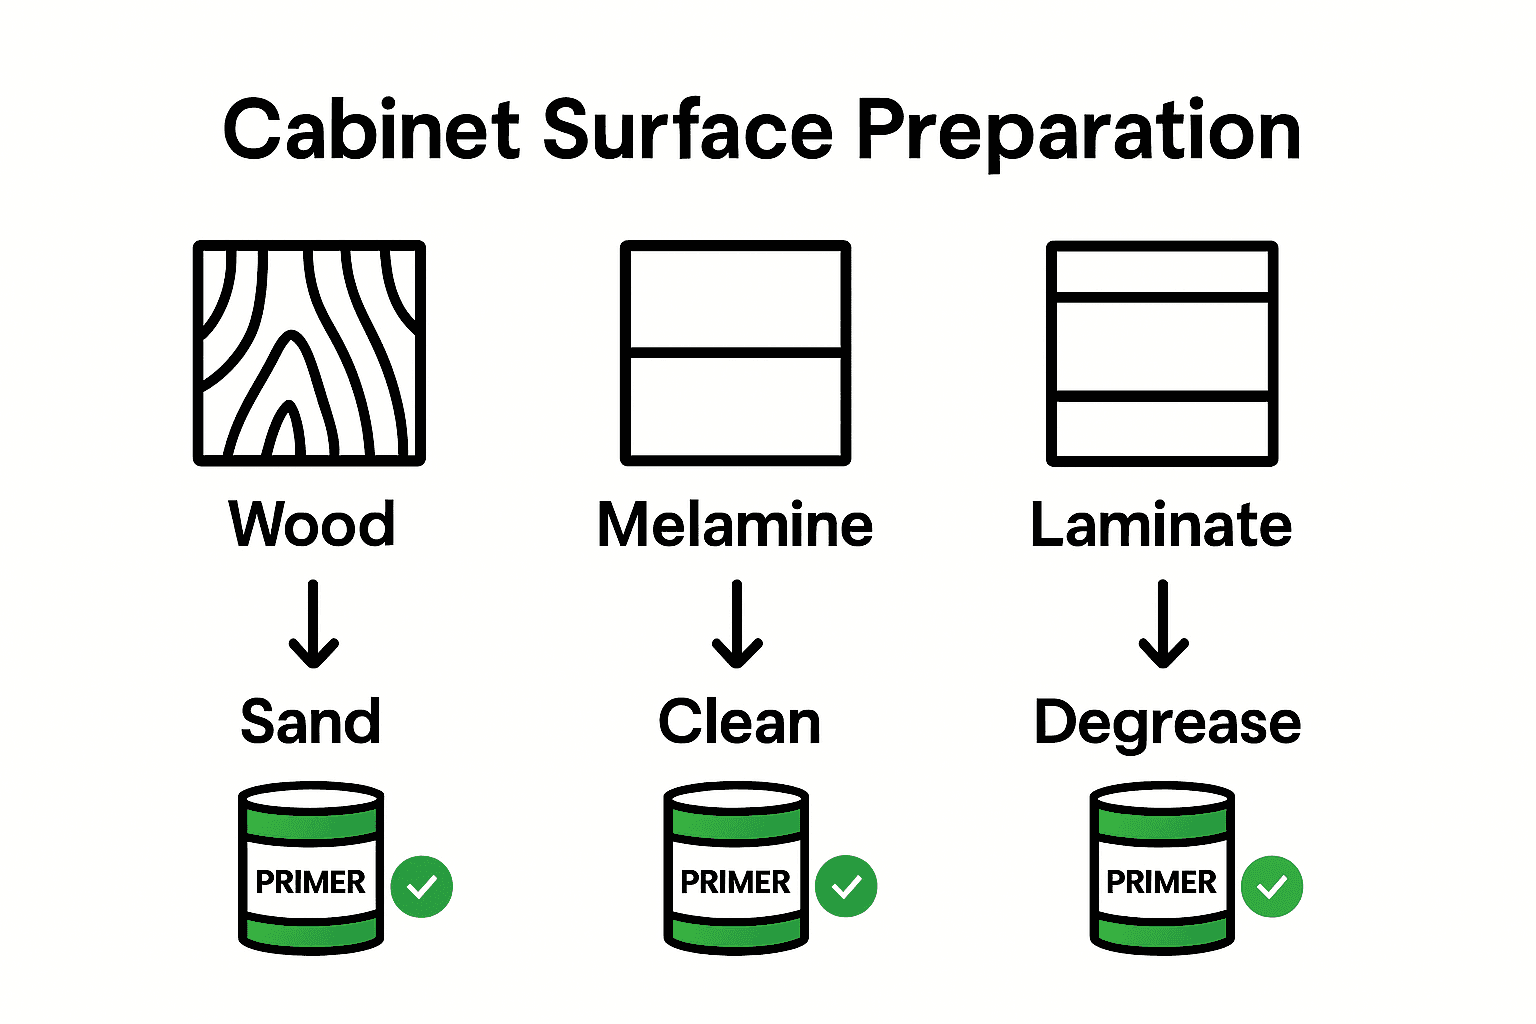
Next, inspect the surface material carefully. Different cabinet materials require different preparation techniques. Wood surfaces will need different primer treatment compared to melamine or laminate. Look for signs of wear such as:
Here’s a comparison of common kitchen cabinet surface types and their prep requirements:
Surface Type | Prep Requirements | Primer Recommendation |
Natural Wood | Sand thoroughly Fill imperfections Clean/degrease | Stain-blocking or high-adhesion |
Melamine | Light sanding Clean thoroughly | Bonding primer |
Laminate | Light scuff sanding Degrease completely | Special laminate primer |
Previously Painted | Remove peeling paint Sand rough spots Clean | High-hiding or bonding primer |
Scratches or deep gouges
Peeling existing paint or finish
Areas of moisture damage
Loose hardware or structural issues
Pro Tip: Natural wood surfaces typically need more extensive prep work than manufactured surfaces like melamine.
Your thorough assessment now sets the stage for a smooth painting process.
By understanding your kitchen’s unique characteristics, you’re already ahead of the game and ready to move forward with confidence.
Step 2: Prepare Surfaces for Cabinet Painting
With your cabinets assessed and labeled, it is time to transform those surfaces into a perfect canvas for painting. Learn our detailed cabinet painting prep techniques to ensure a professional finish that lasts.
According to Pavlo Construction, your first critical step is removing all hardware and doors. Place screws and handles in labeled plastic bags to keep everything organized. Clean every surface thoroughly using a strong degreaser or soap solution. As RONA Canada recommends, TSP cleaner works wonders for cutting through years of kitchen grime and grease buildup.
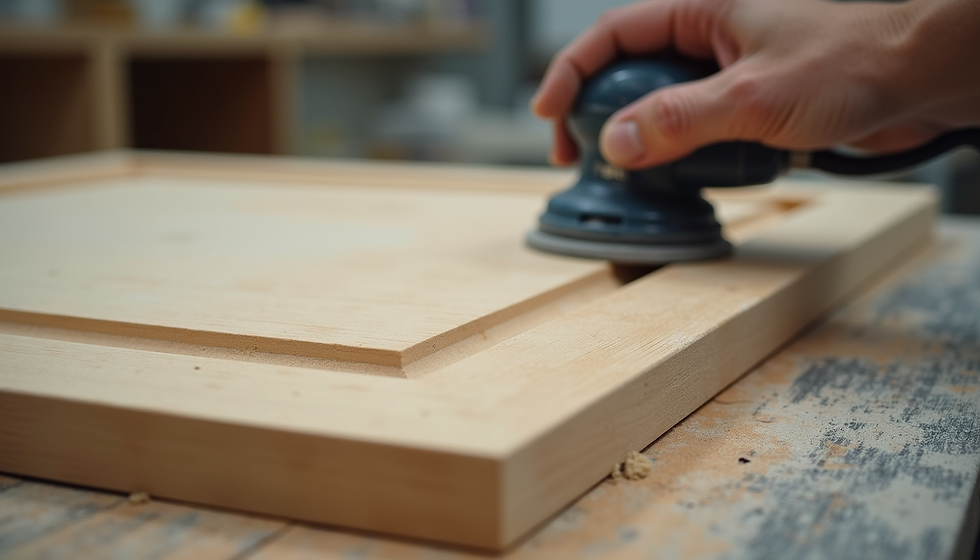
Rinse the surfaces completely and let them dry entirely. Moisture is the enemy of a smooth paint job. Next comes sanding. Select medium or fine grit sandpaper to create a slightly rough texture that helps paint adhere perfectly. Pavlo Construction suggests using consistent circular motions to ensure even preparation.
Inspect your cabinet surfaces carefully during sanding. Look for:
Small dents or imperfections
Old hardware holes
Uneven areas that need wood filler
Pro Tip: Always sand in the direction of the wood grain to maintain a professional finish.
After sanding, use a tack cloth or vacuum with a soft brush attachment to remove all dust. A clean surface guarantees better paint adhesion and a smoother final result.

You are now ready to move forward with priming your newly prepared cabinet surfaces. Each careful step brings you closer to your dream kitchen transformation.
Step 3: Apply Premium Paints for a Smooth Finish
Now comes the most exciting part of your cabinet transformation: applying paint that will make your kitchen look professionally refinished. Discover the best paint finishes for kitchen cabinets to achieve a stunning result.
Benjamin Moore Canada recommends starting with a high quality primer like Fresh Start High Hiding All Purpose Primer. This crucial first layer creates a smooth foundation and helps your topcoat adhere perfectly. According to Behr Pro Canada, use a stain blocking primer to prevent any existing discoloration from bleeding through your beautiful new paint.
Choose a premium cabinet and trim enamel paint designed for durability. Professional painters suggest using rollers for large flat surfaces and high quality brushes for detailed areas and edges. The key is applying thin even coats that build up gradually.
When painting remember these critical techniques:
Keep a wet edge while painting to prevent lap marks
Use long smooth strokes in the same direction- Allow sufficient drying time between coats
Sand lightly with fine grit sandpaper between coats for extra smoothness
Pro Tip: Work in a well ventilated area with consistent temperature to ensure optimal paint performance.
Plan for at least two coats of paint. As Benjamin Moore suggests, multiple thin coats develop a more furniture like durable finish compared to one thick application. Patience during this process guarantees professional looking results that will transform your kitchen.
Step 4: Check Quality and Ensure Durability
Congratulations on completing your cabinet painting project. Now it is time to ensure your beautiful new finish stands the test of time. Learn more about maintaining your newly painted cabinets and protecting your investment.
Benjamin Moore offers critical guidance about the curing process. While your cabinets might look complete after painting, they are not immediately ready for regular use. According to their experts, the paint needs a full 24 hours to dry initially. However the complete hardening and adhesion process takes several days.
Elite Trade Painting in Calgary recommends treating your newly painted surfaces with extra care during the first few weeks. This means avoiding heavy cleaning or aggressive handling. Think of your cabinets like a fresh paint job on a car they need time to settle and fully cure.
Here are some key durability checks:
Ensure no paint drips or uneven areas
Check that all surfaces are smooth and consistent
Verify hardware is correctly reattached
Test cabinet doors and drawers for smooth operation
Pro Tip: Wait at least 30 days before doing a thorough cleaning to protect your new paint finish.
Pay attention to how the paint feels and looks as it cures. A professional finish will gradually become harder and more resilient. Your patience during this waiting period guarantees a long lasting beautiful result that will make your kitchen feel brand new.
Step 5: Reinstall Hardware and Enjoy Your Updated Kitchen
With your cabinets beautifully painted and fully cured, it is time to bring everything back together. Explore more kitchen upgrade ideas to complement your newly refreshed space.
According to RONA Canada, reinstalling hardware requires careful preparation. Start by cleaning your original hardware or considering a stylish update. If reusing existing hardware, gently clean and scuff the pieces. For a truly professional look, spray prime and paint knobs and handles to match your new cabinet color.
Remember those numbered labels from the beginning of your project? Canadian Living emphasizes the importance of using these to ensure each door and drawer front returns to its exact original location. Carefully align and reattach hardware using your original markings. This prevents misalignment and guarantees a seamless finished appearance.
Consider these final touches:
Check that all hardware is tightened securely
Verify smooth opening and closing of doors
Wipe down surfaces with a soft clean cloth
Step back and admire your transformation
Pro Tip: Use a power drill with a soft touch to quickly and evenly reinstall hardware without damaging your new paint finish.
Your kitchen has just undergone a remarkable transformation. Those simple painted cabinets have breathed new life into your entire space. Take a moment to appreciate the professional result you have achieved through careful preparation and patient execution.
Ready to Experience a Truly Stress-Free Kitchen Makeover?
Dreaming of modern kitchen cabinets without chaos or a massive bill? You have just learned how detailed planning, careful prep, and premium painting can completely transform your space. But tackling everything alone can feel overwhelming. Concerns about durability, the mess of sanding and painting, or even just getting a flawless finish are common worries for homeowners like you.
Let the experts at Ottawa Cabinet Painting handle every step. Our professional team ensures meticulous prep, smooth premium finishes, and lasting durability with a careful process that guides you from start to finish. You benefit from cost savings, a beautiful kitchen, and none of the stress. Don’t wait to enjoy the heart of your home. Request your free quote today and see how our trusted, local service delivers effortless cabinet refinishing. Your upgraded kitchen is just a click away.
Frequently Asked Questions
How do I assess my existing cabinets before painting?
Start by completely removing all cabinet doors and drawer fronts. Label each piece with a numbering system, and create a diagram of your kitchen layout to help keep track of their placement during reassembly.
What preparation steps do I need to take before painting kitchen cabinets?
Thoroughly clean each cabinet surface using a strong degreaser, then sand them based on the material type to create a good texture for paint adhesion. Ensure you inspect for imperfections and fix them with wood filler as needed.
What type of primer should I use for kitchen cabinets?
Choose a stain-blocking or high-adhesion primer based on your cabinet material. For example, natural wood requires a stain-blocking primer, while melamine needs a bonding primer for the best results.
How many coats of paint should I apply to my cabinets?
Plan for at least two thin coats of paint to achieve a durable and professional-looking finish. Allow sufficient drying time between coats and lightly sand between applications for added smoothness.
What should I check after painting my kitchen cabinets?
Inspect for any uneven areas, ensure all hardware is correctly reattached, and test that cabinet doors and drawers operate smoothly. Allow your cabinets to cure for a few days before handling them as this helps enhance the finish durability.
How do I reattach hardware after painting my cabinets?
Carefully clean and align the hardware using the original markings you created earlier in your project. Make sure everything is tightened securely to avoid misalignment and guarantee a seamless appearance.
Recommended
Comments