How to care for newly painted cabinets and keep them flawless
- Axcell Painting

- May 11
- 11 min read
TL;DR:
Proper care, gentle cleaning, and patience during the curing period are essential to maintaining painted cabinets in Ottawa’s variable climate. Using the right tools and avoiding harsh chemicals help preserve the finish long-term, while environmental factors like humidity can delay curing and cause tackiness. Following advised timelines and consulting professionals when issues arise ensures your cabinets remain smooth and durable for years.
You just invested real time and money into having your kitchen cabinets painted, and the last thing you want is to watch that beautiful, smooth finish start to chip, scuff, or yellow within a few months. It’s a frustration we hear about regularly from Ottawa homeowners who unknowingly used the wrong cleaner or loaded the shelves back too soon. The good news is that keeping painted cabinets looking showroom-fresh is absolutely doable. You just need to know the right steps, the right timeline, and a few habits that make all the difference long-term.
Table of Contents
Key Takeaways
Point | Details |
Gentle cleaning is vital | Always use mild soap with a soft cloth and avoid harsh chemicals to preserve cabinet finishes. |
First month matters most | Protect cabinets from impact and avoid deep cleaning for at least 2–4 weeks while paint fully cures. |
Climate impacts curing | Humidity and temperature in Ottawa can delay curing and create sticky surfaces, so monitor your indoor environment closely. |
Handle tackiness with care | Never scrub tacky paint—adjust climate and wait for full curing before cleaning or using heavily. |
Routine care extends life | Weekly gentle maintenance and quick response to spills will keep your cabinets looking new for years. |
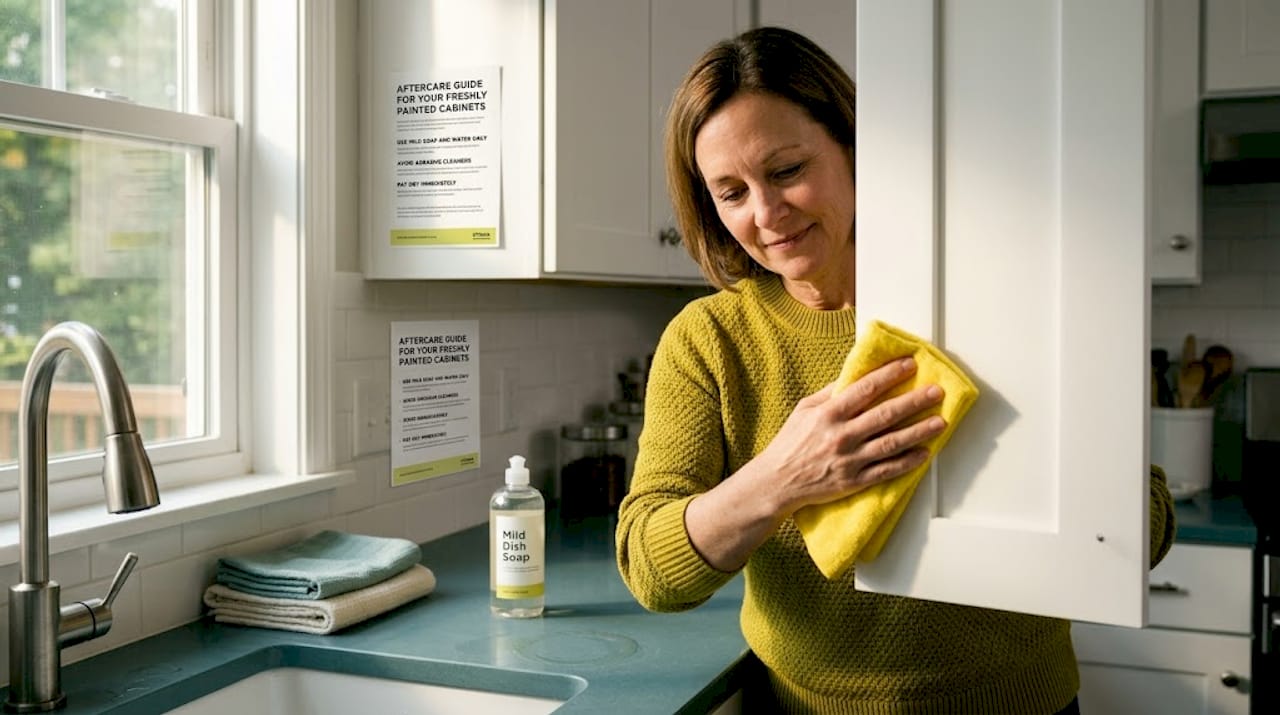
Essential tools and products for cabinet care
Before you start cleaning or maintaining, make sure you have the right materials on hand to avoid causing damage from the start.
Using the wrong tools is one of the quickest ways to dull or scratch a freshly painted finish. A rough scrubbing pad or a cleaner with the wrong chemical composition can cut right through the topcoat, even when you’re only trying to wipe off a little grease. The good news is that you don’t need anything fancy.
Here’s what we recommend keeping on hand at all times:
Soft microfiber cloths (at least three or four dedicated to cabinets only)
Mild dish soap such as Dawn, diluted in warm water
Spray bottle for mixing and applying cleaning solution
Dry towels or chamois for immediate drying after cleaning
A dedicated cabinet-safe cleaner for periodic deeper cleaning (look for products labeled pH-neutral and non-abrasive)
What you should NEVER use on painted cabinets:
Bleach-based cleaners or anything containing ammonia
Magic erasers or melamine foam pads (they act as micro-sandpaper on your finish)
Steel wool or scrubbing sponges
Solvent-based cleaners like acetone or lacquer thinner
For day-to-day care, mild non-abrasive methods are essential, and avoiding harsh chemicals like bleach and ammonia is non-negotiable for preserving paint longevity.
Immediate drying after every cleaning session is just as important as the cleaner you choose. Letting water sit on a painted surface, even a well-cured one, can cause water spotting and, over time, soften the finish. Wipe, rinse gently if needed, and dry. Every time.
If you’re looking for more practical advice on keeping your kitchen surfaces spotless without damaging finishes, these kitchen cleaning hacks for busy Ottawa homes are worth bookmarking. And for a detailed breakdown of the safest approach for painted surfaces specifically, our full guide on cleaning painted cabinets covers everything step by step.
Product type | Safe to use? | Notes |
Mild dish soap + water | Yes | Dilute well; dry surface after |
pH-neutral cabinet cleaner | Yes | Best for periodic deeper cleaning |
Vinegar solution | Use cautiously | Highly diluted only; avoid on matte finishes |
Bleach-based spray | No | Breaks down paint and topcoat |
Ammonia cleaners | No | Causes yellowing and finish damage |
Magic eraser / melamine pad | No | Microscopically abrasive; removes topcoat |
Abrasive scrub pads | No | Scratches finish immediately |
For similar reasons, keeping your countertop surfaces in top condition also supports the overall look of your kitchen. These cleaner countertop tips offer practical strategies that work alongside good cabinet care habits.
First 30 days: Protecting fresh paint from damage
With your toolkit ready, the next step is understanding what special precautions matter most right after your cabinet painting is finished.
Fresh paint is not the same as cured paint. Even when the surface feels dry to the touch, the paint is still hardening at a chemical level. This process, called curing, can take anywhere from two weeks to a full month depending on the product used, the number of coats applied, and the environmental conditions in your home. During this window, the paint is significantly more vulnerable to damage.
Protecting fresh paint from physical impact and from doors or drawers sticking against each other is critical in the first period after repainting.
Here’s a practical timeline to follow after your cabinet painting is complete:
Days 1 to 3: Treat the cabinets with extreme care. Avoid touching the surfaces unless necessary. Don’t place items back inside the cabinets. Keep doors open slightly to prevent them from sticking to the frame as the paint firms up.
Days 4 to 7: Light, gentle use is acceptable. You can begin placing lightweight, non-sharp items back inside. Continue keeping doors slightly ajar overnight if possible.
Days 7 to 14: Normal light use can resume. Wipe minor spills immediately with a dry cloth only. Still avoid deep cleaning or using any liquid cleaners.
Days 14 to 30: Routine gentle cleaning with diluted mild soap is now safe. Still avoid heavy scrubbing. Curing is not yet complete.
After 30 days: The paint should be fully cured. You can now follow your regular cleaning routine using the recommended products above.
“Cabinet paint cures from the outside in. The surface may look and feel hard, but the layers underneath are still hardening. Rushing this process by loading heavy items, scrubbing, or slamming doors can leave permanent marks that no amount of cleaning will fix later.”
Pro Tip: Place a small piece of painter’s tape on the inside top edge of one cabinet door after painting. Check it after two weeks. If the tape pulls the surface at all, the paint is still curing and you should continue treating it gently.
For Ottawa homeowners specifically, our Ottawa cabinet care guide includes more localized advice on handling seasonal transitions during the curing period.
Week after painting | Recommended use level | Cleaning allowed? |
Week 1 | Minimal, doors slightly open | No |
Week 2 | Light items placed inside | Dry cloth only |
Week 3 | Normal light use | Diluted mild soap, gentle |
Week 4+ | Full normal use | Full gentle routine |
One more thing worth repeating: do not slam doors during the first 30 days. The force of a slamming door transfers vibration directly into the paint film while it’s still hardening. Over time, this causes hairline cracks or chipping along the door edges. Soft-close hinges are a smart addition to any freshly painted cabinet project for exactly this reason.
Routine cleaning without ruining the finish
After the crucial break-in period, regular cleaning becomes your best ally against dulling or scuffs.
Consistent, gentle maintenance is always easier on painted cabinets than infrequent deep cleaning sessions where you end up scrubbing harder to remove built-up grease. Think about the areas right next to your stove or above your counter. Cooking grease and steam settle on those surfaces constantly, and if you let it accumulate, removing it requires more effort and more risk of damaging the finish.
Here’s how to structure your routine cleaning:
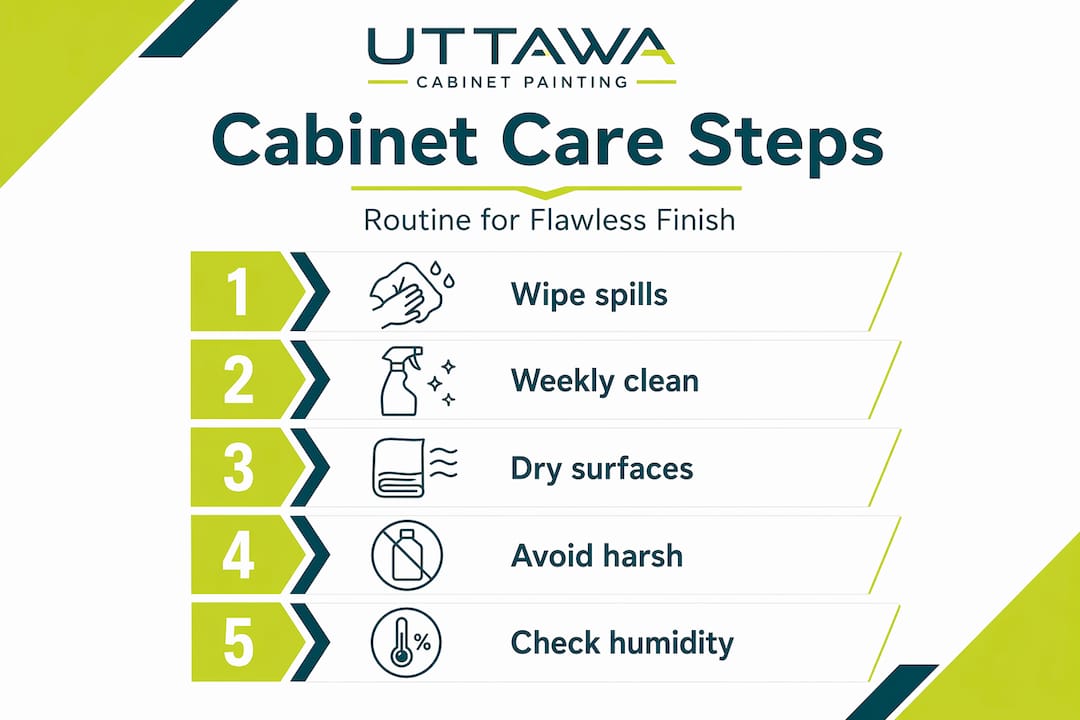
Daily: Wipe down any visible spills or splashes with a dry or barely damp microfiber cloth immediately. Don’t let moisture or food residue sit.
Weekly: Mix a few drops of mild dish soap in warm water and use a microfiber cloth to gently wipe down all cabinet faces, paying attention to high-touch areas around handles and knobs.
Monthly: Do a more thorough wipe-down that includes the tops of upper cabinets (where grease and dust collect), cabinet interiors, and the edges of door frames. Use a slightly more concentrated soap solution, but still dry thoroughly afterward.
Common cleaning mistakes Ottawa homeowners make:
Using spray-and-wipe multi-surface cleaners that contain alcohol or citrus solvents
Letting water drip down the face of the cabinet without drying it
Scrubbing handle areas hard because those spots collect the most grime
Cleaning with water that’s too hot (it can soften finishes temporarily, especially on early-cured paint)
The best resource for this is a detailed walkthrough of effective cabinet cleaning techniques that protect the finish while actually getting the job done.
Using mild cleaning methods every time, regardless of how dirty the cabinets are, preserves the topcoat and prevents the gradual wear that makes a finish look dated before its time.
Pro Tip: Keep a dedicated microfiber cloth hanging near your sink or on the inside of a cabinet door. When you see a splash, wipe it immediately. This one habit alone will extend the life of your finish by years compared to letting residue accumulate.
Never use magic erasers. We say this firmly because we’ve seen it happen. They feel gentle, they look like soft foam, and they seem like the obvious choice for a stubborn mark. But they are microscopically abrasive and will remove a thin layer of your topcoat every single time you use one. Even one or two passes can create dull patches that are noticeable in direct light.
Humidity, temperature, and troubleshooting tacky paint
Some issues, like sticky doors or surfaces that don’t seem to dry, are more common in Ottawa’s climate and need careful troubleshooting.
Ottawa’s weather is genuinely challenging for painted surfaces. Hot, humid summers and dry, cold winters create dramatically different conditions inside homes, often within weeks of each other during transitional months. Both extremes affect how paint cures and how a fully cured finish holds up over time.
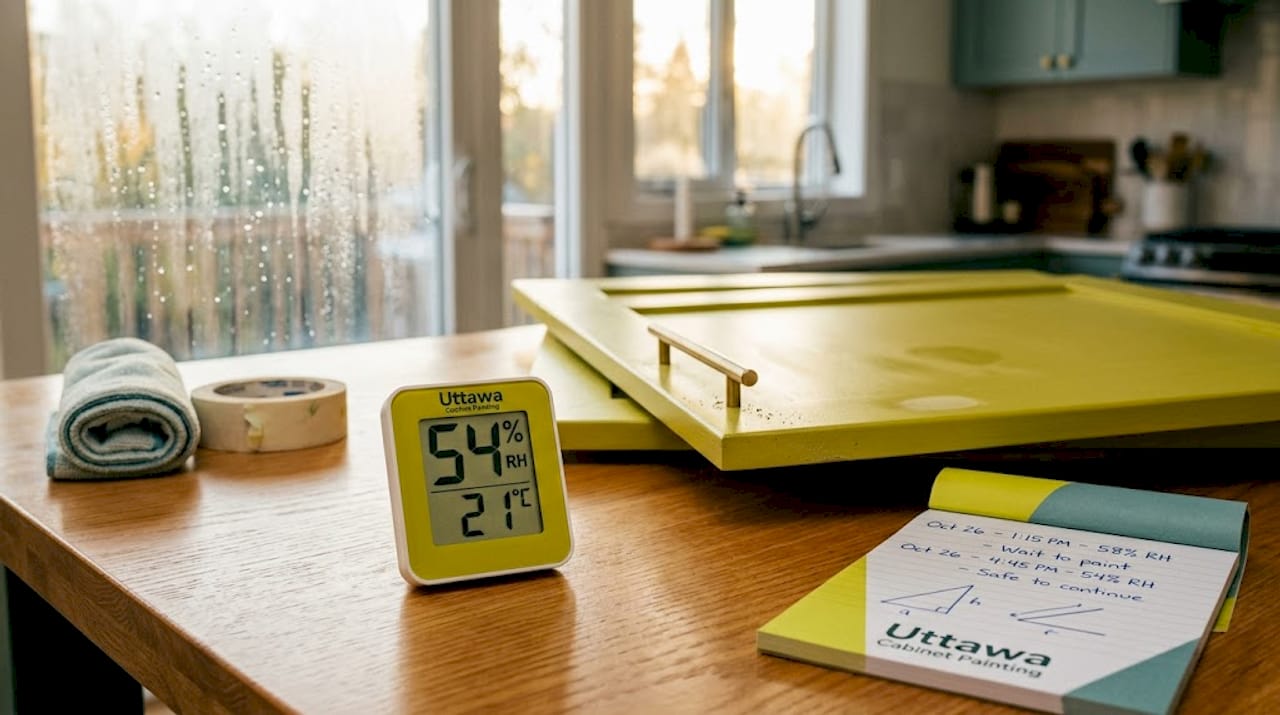
High humidity causes tackiness and defects in cabinet paint curing, and temperature fluctuations compound the problem significantly. The ideal curing environment is between 60°F and 80°F with relative humidity between 40% and 60%.
Watch for these warning signs that your environment is affecting the cure:
Tacky or sticky surfaces even after a week of drying
Doors sticking to the frame when opened
Soft spots where the finish indents slightly under light pressure
Bubbling or wrinkling on the surface (more common if paint was applied in high humidity)
Slow hardening with an almost tacky residue that doesn’t improve over several days
If you notice that your cabinets feel tacky or soft more than a week after painting, the solution is environmental, not physical. Do not scrub, sand, or apply anything to the surface. Instead:
Run a dehumidifier in the kitchen if humidity is high
Increase air circulation with a fan directed at (but not too close to) the cabinet surfaces
Keep the room temperature stable in the 65°F to 75°F range
Avoid cooking on the stove near fresh cabinets until curing is confirmed complete
Pro Tip: Pick up an inexpensive hygrometer (a device that measures humidity) and keep it in your kitchen during the first 30 days after painting. It costs less than $20 and gives you real data on whether your home environment is within the safe range for proper curing.
Understanding the properties of durable cabinet paint also helps you know what to expect from different coating types and how their curing timelines differ. Waterborne alkyd paints, for example, cure harder than standard latex but take longer to reach full hardness, making them more sensitive to Ottawa’s humidity swings early in the process.
If conditions in your home are consistently outside the ideal range and the tackiness doesn’t resolve within two to three weeks, that’s the point to call your painting professional. Continuing to use tacky cabinets will cause permanent damage to the finish that may require a full recoat to fix.
Why patience and prevention pay off in cabinet care
We’ve been doing this long enough to say something that most quick guides skip over entirely: the majority of lasting damage we see on painted cabinets didn’t happen gradually over years. It happened in the first few weeks after the job was finished.
Homeowners loaded the shelves back in on day two. They wiped down the doors with a Lysol wipe on day five because they were excited to use the kitchen again. They let a pot boil over and didn’t wipe the steam off the cabinet faces. These are completely understandable impulses. You’ve been living through the inconvenience of a painting project, and you want your kitchen back.
But the science of paint curing doesn’t negotiate. The finish needs time to reach its full hardness, and every shortcut taken during that window creates a compounding vulnerability. A small dent from a loaded shelf in week one becomes a larger chip by year two. A scuff from an abrasive cloth in week three becomes a dull patch that spreads.
The conservative handling approach is consistently the safer call when you’re unsure about timing or product compatibility. Following the paint manufacturer’s specific guidance on cure times is always our first recommendation. When that information isn’t available, default to more time, not less.
We also want to push back on one common piece of advice that circulates in homeowner forums: the idea that “light use” after a few days is fine as long as you’re careful. Technically it can be, under ideal conditions. But in the real world, especially in Ottawa’s variable climate and in households with kids or frequent cooking, what counts as “light use” is easily misjudged. The more conservative your handling in the first month, the longer your finish will look truly factory-fresh.
Exploring your paint finish options before your next project also helps set proper expectations for how each finish type responds to care and cleaning over time.
Professional help for lasting cabinet finishes
If you’re ready for an expert touch or need help handling unexpected cabinet issues, here’s how a pro can help.
Some cleaning or finish problems are beyond what any at-home remedy can fix. If you’re seeing peeling, bubbling, persistent tackiness, or widespread dullness, those are signs that the finish may need professional repair or a full touch-up coat. You don’t have to settle for a kitchen that looked great for six months and then started to deteriorate. See what’s possible with our before and after results and get a sense of the quality difference a properly applied finish makes. When you’re ready to take the next step, request a free spray painting quote and we’ll assess exactly what your cabinets need. You can also browse our full range of interior cabinet services to find the right solution for where your cabinets are right now.
Frequently asked questions
When is it safe to start using my newly painted cabinets?
Light use is typically safe after several days, but you should wait 2 to 4 weeks for full curing before deep cleaning or loading heavy items, since fresh paint remains vulnerable to impact and sticking until curing is complete.
What should I do if my painted cabinets feel sticky or tacky?
Tacky cabinets almost always mean the paint hasn’t fully cured, so focus on adjusting the room conditions rather than cleaning, since high humidity is the most common culprit and reducing it with a dehumidifier usually resolves the issue.
Can I use disinfecting wipes on freshly painted cabinets?
Avoid disinfecting wipes entirely until the paint is fully cured, and even then choose only wipes free of bleach and ammonia, as harsh chemical exposure breaks down the topcoat over time.
How often should I clean my painted cabinets?
Wipe spills immediately as they happen and do a gentle weekly cleaning with diluted mild soap, since non-abrasive routine care prevents buildup without putting unnecessary wear on the finish.
Are Ottawa’s weather conditions a real risk for new cabinet paint?
Yes, Ottawa’s humidity in summer and temperature drops in fall and spring can genuinely slow curing and create sticky surfaces, so monitoring your indoor climate matters, especially since humidity directly affects how cleanly the paint hardens and how durable the finish becomes.
Recommended
Comments