7 Inspiring Cabinet Stencil Designs for Your Home
- demoore5506
- Sep 2, 2025
- 9 min read
Cabinet stencil designs are turning plain kitchen doors into dazzling works of art for a fraction of the cost of a remodel. Think this is just about adding a few flowers or geometric borders? Not even close. The real surprise is that carefully chosen stencil patterns can even make small kitchens look bigger while letting you add a truly personal touch that standard paint cannot achieve. Get ready to rethink what paint and a little creativity can do in your space.
Table of Contents
Quick Summary
Takeaway | Explanation |
Preparation is key for stenciling | Properly clean, sand, and prime surfaces to ensure the stencil adheres correctly and produces sharp lines. |
Choose the right stencil materials | Select high-quality paints and tools suited to your cabinet material for durable, vibrant results. |
Utilize various stencil patterns thoughtfully | Experiment with geometric, botanical, or minimalist designs to create a unique kitchen aesthetic. |
Maintain stenciled cabinets properly | Regular cleaning and protective strategies can extend the life and beauty of your stenciled surfaces. |
Test color samples before commitment | Assess how colors look in different lighting to ensure the final outcome aligns with your vision. |
1: Understanding Cabinet Stencil Designs
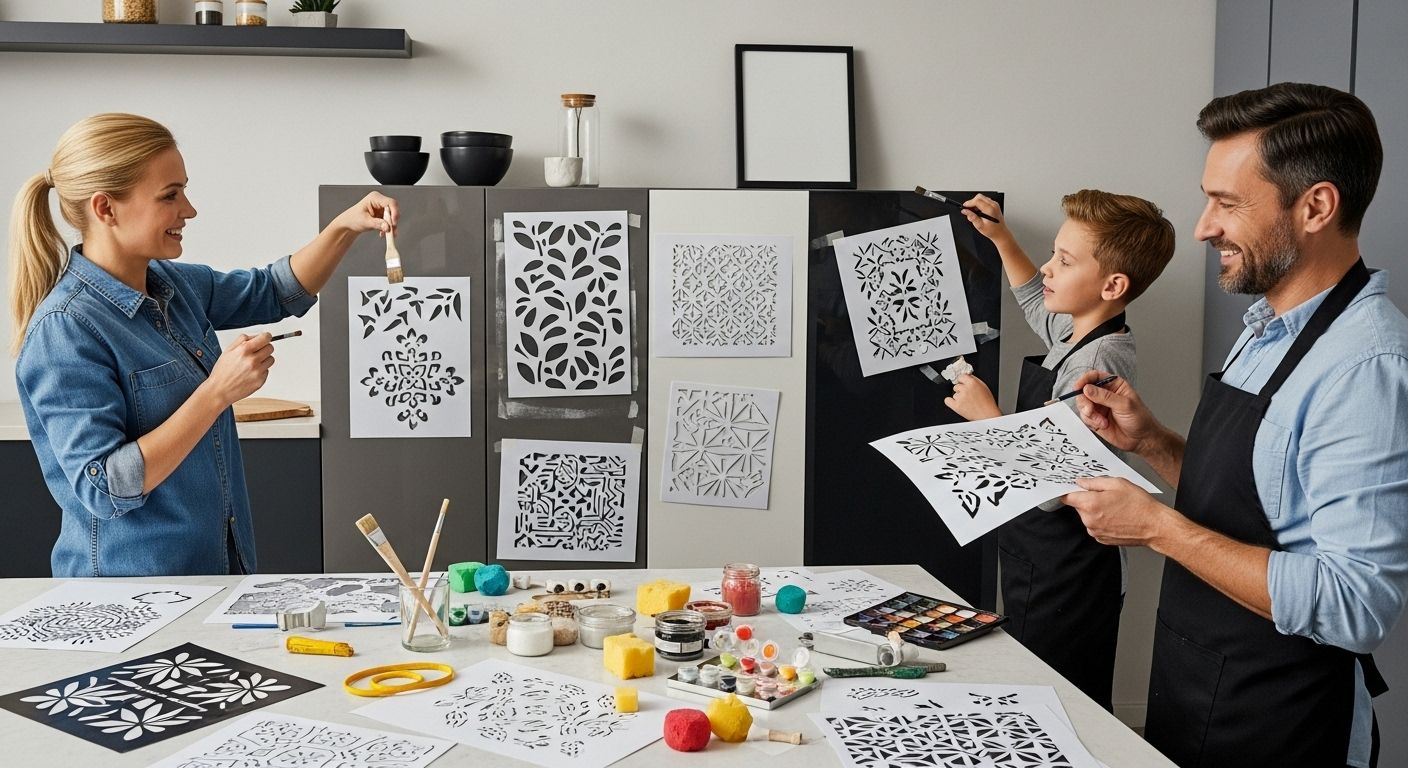
Cabinet stencil designs transform ordinary kitchen spaces into extraordinary visual experiences, offering homeowners a creative and cost effective method to personalize their cabinetry. Unlike traditional painting techniques, stenciling introduces intricate patterns, geometric shapes, and artistic elements that can dramatically elevate the aesthetic appeal of your kitchen.
Stenciling is an art form with roots deeply embedded in historical design practices. According to research from the Cooper Hewitt, Smithsonian National Museum of Art, decorative stenciling has been a sophisticated method of surface decoration for centuries, enabling individuals to create complex, repeatable designs with precision and elegance.
When considering cabinet stencil designs, homeowners have several compelling options to explore:
Geometric Patterns: Clean lines and symmetrical shapes that create modern, structured looks
Botanical Motifs: Delicate floral or leaf designs that introduce natural, organic elements
Moroccan Inspired Tiles: Intricate, detailed patterns that evoke exotic and cultural aesthetics
Minimalist Linear Designs: Simple, understated patterns that add subtle sophistication
Successful stencil application requires careful preparation and technique. Proper surface preparation is crucial, which includes thorough cleaning, sanding, and priming of cabinet surfaces to ensure the stencil adheres correctly and produces crisp, clean lines.
Beyond aesthetic enhancement, stencil designs offer practical benefits. They can make small kitchens appear larger, create visual interest in monotonous spaces, and provide a unique personalization that standard paint cannot achieve. Learn more about preparing your cabinets for a stunning transformation.
Whether you prefer bold, statement-making designs or subtle, elegant patterns, cabinet stencil designs offer an innovative approach to kitchen renovation that combines creativity, affordability, and personal expression.
2: Choosing the Right Materials for Stenciling
Selecting appropriate materials is critical for achieving professional and long lasting cabinet stencil designs. According to Canadian Kitchen Cabinet Association research, understanding your cabinet’s base material determines the success of your stenciling project.
Wood surfaces remain the most versatile and receptive to stenciling techniques. Different wood types offer unique characteristics that impact stencil application:
Solid hardwoods like oak and maple provide smooth, even surfaces
Pine and softer woods might require additional preparation
Engineered woods like MDF can create uniformly flat backgrounds
Before beginning your stenciling project, critical preparation steps include:
Thoroughly cleaning the surface
Lightly sanding to create texture for paint adhesion
Applying a high quality primer specific to your cabinet material
The type of paint you select dramatically influences your stencil design’s durability. Latex paints work well for most interior cabinet projects, offering easy cleanup and minimal odor. Oil based paints provide superior durability but require more complex application techniques.
Specialty stenciling paints and acrylic options deliver crisp edges and consistent coverage. Avoid water based paints that might bleed underneath stencil edges, compromising your design’s precision.
Discover professional paint finish techniques to ensure your stencil design remains vibrant and professional looking for years.
Consider additional factors like kitchen humidity, cabinet usage, and cleaning frequency when selecting materials. Proper material selection transforms a simple stenciling project into a stunning kitchen upgrade that reflects your personal style and creativity.
3: Essential Tools You Need for Stenciling Cabinets
Stenciling cabinets requires precision, patience, and the right set of professional tools. According to research from the International Decorative Artisans League, successful stencil application depends on selecting appropriate equipment and understanding technique.
Primary Tools for Successful Cabinet Stenciling:
High quality stencil brush with firm, dense bristles
Multiple stencil designs for complex patterns
Low tack painter’s tape
Foam roller for smooth base coat application
Spray adhesive for temporary stencil securing
Precision Painting Equipment plays a crucial role in achieving clean, crisp lines. Professional painters recommend using specialized tools that minimize paint bleeding and ensure sharp design edges. Foam daubers and stencil rollings provide controlled paint application, reducing the risk of design distortion.
Safety and preparation are equally important. Protective gear such as nitrile gloves, safety glasses, and disposable drop cloths prevent potential accidents and maintain a clean workspace. Ventilated work areas with consistent temperature help paint dry uniformly and prevent design imperfections.
Learn more about comprehensive cabinet preparation techniques to ensure your stenciling project achieves professional results.
Investing in quality tools might seem expensive initially, but these items guarantee a stunning, professional finish that transforms your kitchen cabinets into personalized works of art. Remember that technique matters as much as the tools you choose.
4: Step-by-Step Guide to Stenciling Cabinet Doors
Stenciling cabinet doors requires meticulous preparation and precise technique. According to research from the National Kitchen & Bath Association, successful application depends on careful surface preparation and systematic execution.
Preparation Phase:
Remove cabinet doors completely
Clean surfaces thoroughly with degreasing solution
Sand surfaces lightly to create paint adhesion
Apply primer appropriate for cabinet material
Stenciling Technique:
Position stencil using low tack painter’s tape
Secure stencil edges to prevent paint bleeding
Use minimal paint on brush or roller
Apply paint using stippling or gentle dabbing motion
Pro Tips for Crisp Designs:
Before beginning, test your stencil technique on a spare piece of wood to understand paint consistency and application pressure. Thin, multiple layers produce sharper results compared to single heavy application. Rotate your stencil periodically to prevent paint buildup and maintain design integrity.
Learn how to safely remove cabinet doors for your project to ensure a smooth stenciling process.
Pay special attention to paint quantity and application technique. Too much paint causes bleeding, while too little results in incomplete design transfer. Practice patience and maintain consistent pressure for professional looking results.
5: Popular Stencil Patterns and Their Styles
Stencil patterns transform ordinary cabinet surfaces into artistic statements. According to research from the RISD Museum, stencil designs have rich cultural and artistic origins that continue to inspire contemporary home decor.
Classic Stencil Pattern Categories:
Geometric Designs: Sharp lines and symmetrical shapes
Botanical Motifs: Delicate flowers and leaf patterns
Moroccan Tiles: Intricate, repeating Islamic inspired patterns
Art Deco Inspired: Bold, structured graphic elements
Pattern Style Characteristics:
Minimalist: Clean, sparse designs with neutral color palettes
Traditional: Ornate patterns with classic color combinations
Modern: Abstract and unconventional pattern layouts
Color Considerations:
Bold stencil patterns work best when complementing existing kitchen color schemes. Neutral cabinets provide excellent backgrounds for vibrant stencil designs, while darker surfaces can create dramatic visual impact.
Explore professional cabinet color selection techniques to ensure your stencil design harmonizes perfectly with your kitchen aesthetic.
Choosing the right stencil pattern involves balancing personal taste, kitchen style, and overall home decor. Experiment with sample designs and consider how different patterns can dramatically transform your cabinet appearance.
6: Tips for Customizing Your Cabinet Colors
Customizing cabinet colors requires strategic planning and thoughtful selection. According to Health Canada’s guidelines, selecting the right paint is critical for both aesthetic appeal and indoor air quality.
Color Selection Strategies:
Consider existing kitchen lighting conditions
Test color samples in multiple lighting scenarios
Evaluate color temperature and undertones
Match colors with countertop and backsplash materials
Paint Quality Considerations:
Choose low VOC paint for health safety
Select paint specifically designed for cabinet surfaces
Prioritize durability over trendy color choices
Ensure paint has excellent adhesion properties
Professional Color Customization Tips:
Bold color choices can dramatically transform kitchen spaces, but subtlety often creates more timeless designs. Neutral base colors with strategic accent stenciling provide flexibility for future design changes. Consider undertones carefully warm grays pair differently with stencil patterns compared to cool grays.
Explore professional cabinet color selection techniques to ensure your color customization achieves maximum visual impact.
Remember that color is deeply personal. What works in a magazine might not suit your unique kitchen environment. Take time to experiment, sample multiple options, and trust your aesthetic instincts when customizing cabinet colors.
7: Maintaining Your Stenciled Cabinets Over Time
Preserving the beauty of stenciled cabinets requires consistent and careful maintenance. According to the Canadian Conservation Institute, proper care can significantly extend the life of your painted surfaces.
Routine Cleaning Techniques:
Use soft microfiber cloths for dust removal
Avoid abrasive cleaning materials
Clean spills immediately to prevent staining
Use mild soap solutions for deeper cleaning
Protection Strategies:
Minimize direct sunlight exposure
Use protective mats near high traffic areas
Apply furniture wax every six months
Inspect for early signs of wear and touch up promptly
Potential Maintenance Challenges:
Environmental factors like humidity and temperature fluctuations can impact stencil durability. Wooden cabinets naturally expand and contract, which might cause subtle paint cracking over time. Regular inspection helps catch and address these issues before they become significant problems.
Discover professional techniques for protecting painted cabinets to maintain your kitchen’s aesthetic appeal.
Consistent, gentle maintenance transforms your stenciled cabinets from a one time project into a lasting design feature. Treat your cabinets with care, and they will continue to showcase your personal style for years to come.
Below is a comprehensive table summarizing the core topics, steps, and benefits from the article, providing a clear at-a-glance guide to cabinet stenciling for your home.
Section | Key Points & Steps | Benefits/Outcomes |
Understanding Cabinet Stencil Designs | Stenciling offers creative, cost-efficient cabinet personalization. Choose patterns like geometric, botanical, Moroccan, or minimalist for visual impact. | Transforms plain cabinets, adds unique style, makes small spaces feel larger. |
Choosing the Right Materials | Select cabinet-friendly surfaces, quality primers, and durable paints. Prepare surfaces by cleaning, sanding, and priming for optimal stencil adhesion. | Ensures vibrant, long-lasting designs that withstand kitchen use. |
Essential Tools for Stenciling | Use firm stencil brushes, foam rollers, painter’s tape, spray adhesive, and safety gear. Precision tools minimize paint bleeding and improve results. | Achieves crisp lines and professional stenciling finishes. |
Step-by-Step Stenciling Guide | Remove doors, clean, sand, prime, attach stencil, apply paint using stippling. Test on scrap first and work in light layers for sharp, detailed designs. | Guarantees smooth process, reduces errors, delivers sharp patterns. |
Popular Stencil Patterns & Styles | Includes geometric, botanical, Moroccan tiles, Art Deco, minimalist, traditional, and modern layouts. Select patterns and colors to match kitchen aesthetics. | Enhances decor, personalizes cabinets, complements various styles. |
Tips for Customizing Cabinet Colors | Consider lighting, color temperature, and cabinet/counter compatibility. Sample colors, choose low-VOC paint, and select durable finishes for longevity. | Tailors color to personal taste, ensures safe and lasting beauty. |
Maintaining Your Stenciled Cabinets | Dust gently, use mild cleaners, avoid abrasives, apply protective wax, and inspect for wear. Minimize sunlight and address moisture promptly. | Preserves vibrant look and extends the life of your cabinet decor. |
Bring Your Cabinet Stencil Ideas to Life Without the Stress
Are you inspired by creative cabinet stencil designs but worried about tackling all the prep work and painting on your own? Many homeowners want to upgrade their kitchen’s look with modern, personalized patterns and colors. However, concerns about messy DIY outcomes, wasted supplies, or not achieving that flawless finish can quickly turn excitement into hesitation. You deserve cabinets that reflect your personality without the chaos of a full remodel.
Let Ottawa Cabinet Painting take your vision further with expert craftsmanship and a worry-free process. Our team uses meticulous surface prep and premium paints to ensure your chosen stencil patterns look crisp and last for years. Protect your investment, keep your kitchen functional, and get a smooth, durable finish that rivals custom cabinetry. See how our professionals set the foundation for stunning results by reading our step-by-step prep guide, or find inspiration for your project with our cabinet color selection guide. Connect with Ottawa’s trusted local experts for your personalized quote today at Ottawa Cabinet Painting and transform your kitchen with zero disruption.
Frequently Asked Questions
What are the benefits of using cabinet stencil designs?
Cabinet stencil designs enhance the aesthetic appeal of your kitchen, allowing for personalized creativity. They can create visual interest, make small spaces appear larger, and offer a unique customization that standard painting cannot achieve.
How do I prepare my cabinets for stenciling?
Proper preparation includes thoroughly cleaning the cabinet surfaces, lightly sanding them to create texture for paint adhesion, and applying a high-quality primer that is suitable for the cabinet material before starting the stenciling process.
What types of paint should I use for stenciling on cabinets?
Latex paints are generally ideal for interior projects due to their easy cleanup, while oil-based paints offer superior durability. Specialty stenciling and acrylic paints also provide crisp edges, while avoiding water-based paints can prevent bleeding under stencil edges.
How can I maintain my stenciled cabinets over time?
To maintain stenciled cabinets, use soft microfiber cloths for cleaning, avoid abrasive materials, and clean spills immediately. Regularly inspect for any signs of wear and apply furniture wax every six months to protect the finish.
Recommended

Hiring experienced professionals is essential for successful Kitchen Remodeling in Tustin, CA. Skilled contractors and designers bring expertise and creativity to the project, ensuring that every detail is executed flawlessly. Their guidance helps avoid costly mistakes and ensures that the final result meets your expectations.