What Makes a Smooth Cabinet Finish in Ottawa
- Axcell Painting

- May 20
- 9 min read

TL;DR:
Achieving a smooth kitchen cabinet finish depends mostly on thorough surface preparation, including progressive sanding and dust removal.
Proper application techniques, thin coats, and careful sanding between coats help create a factory-like result without requiring spray equipment.
If you’ve ever run your hand across a freshly painted cabinet and felt something rougher than you expected, you already understand the frustration. What makes a smooth cabinet finish isn’t a single technique or a single product. It’s a combination of surface prep, the right materials, and careful application that together determine whether your cabinets look factory finished or DIY. And no, you do not need a spray rig to get there. This guide walks you through every factor that matters, tailored to real Ottawa kitchens.
Table of Contents
Key Takeaways
Point | Details |
Prep is 80% of the work | Thorough sanding and cleaning before any paint touches the surface determines your final result. |
Grit progression matters | Start at 120 grit, move to 180–220, then use 320–400 between coats for a glass-like surface. |
Semi-gloss is the smart sheen | For Ottawa kitchens, semi-gloss balances durability, moisture resistance, and easy cleaning. |
Thin coats beat thick ones | Applying multiple thin coats prevents runs, reduces texture, and cures faster than heavy single coats. |
Oak needs special treatment | Open-grain woods require grain filler or a “shock and sand” step before finishing to eliminate pore texture. |
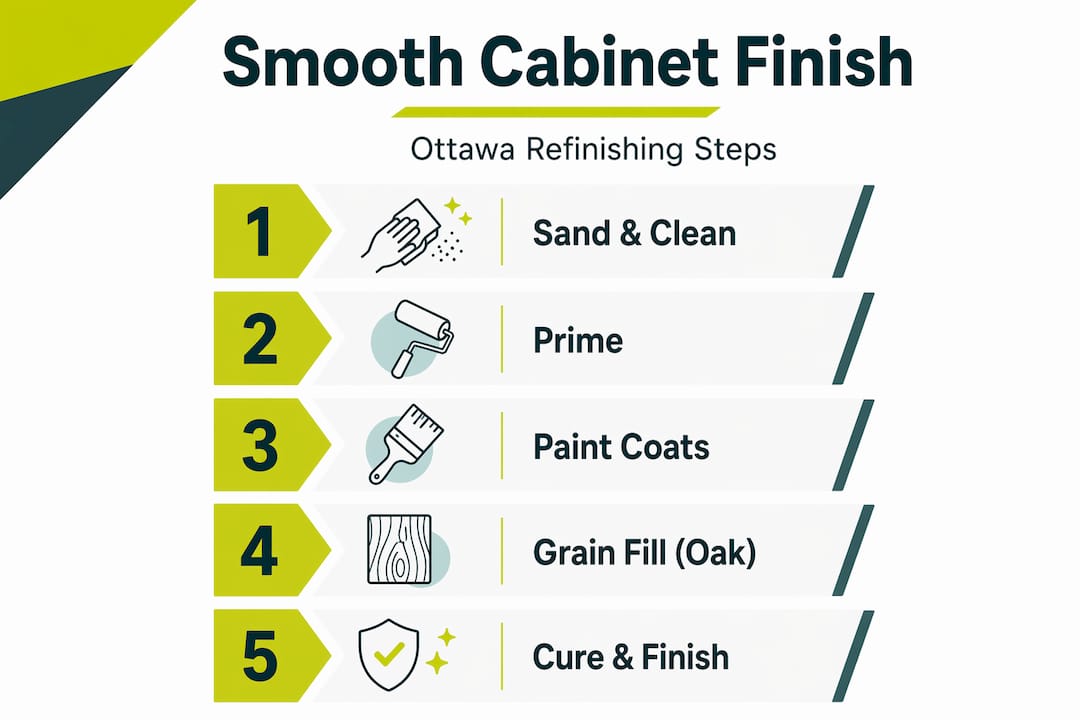
What makes a smooth cabinet finish: sanding and prep
Ask any professional what separates a showroom-quality result from a rough, uneven one, and the answer is almost always the same. Proper preparation is 80% of achieving a smooth finish. Skipping or rushing prep leads to visible flaws and uneven paint adhesion, regardless of how much you spend on paint.
Sanding is not just about scuffing the surface so primer sticks. It is a deliberate, progressive process.
Start with 120 grit to level any existing texture, old paint ridges, or surface imperfections. This is your heavy-lifting pass.
Move to 180–220 grit to refine the surface and remove the scratches left by 120. This is where the foundation gets smooth.
Finish between coats with 320–400 grit to knock down any dust nibs, brush marks, or orange peel texture that appeared after priming or painting.
Using 320-grit sandpaper between coats removes the orange peel texture that forms as paint dries, allowing each successive thin coat to level down to a glass-like surface. This is the step most homeowners skip, and it is the exact reason most DIY finishes look noticeably different from professional ones.
Surface flatness matters beyond the sanding itself. After each sanding pass, wipe down every surface with a tack cloth or a slightly damp microfiber cloth to remove all dust. Dust particles left on the surface get trapped under paint and create gritty texture you will feel and see. There is no fix for that except sanding it back down.
Pro Tip: Do not over-sand near edges and corners. These areas thin out quickly, and if you cut through the wood’s surface layer, the grain will telegraph through your topcoats no matter how many you apply.
Choosing paint and primer for Ottawa kitchens
Paint selection sounds straightforward, but sheen and formula make a real difference in how smooth your cabinets look and how long they stay that way. Here is how the main options compare for kitchen cabinet use.

Sheen | Durability | Ease of Cleaning | Best For |
Satin | Moderate | Good | Low-traffic areas, softer look |
Semi-gloss | High | Excellent | Kitchen cabinets, high moisture areas |
High gloss | Very High | Excellent | Modern, dramatic styles |
Semi-gloss provides moisture resistance and reflects light in a way that brightens Ottawa kitchens, while remaining easier to wipe clean than satin. For most homeowners, it is the right call. High gloss amplifies every surface imperfection, which makes it less forgiving if your prep was not perfect.
Beyond sheen, the formula matters. Key things to look for in a cabinet paint:
Self-leveling properties. Paint that levels as it dries eliminates brush marks without extra effort.
Alkyd or waterborne alkyd. These formulas cure harder than standard latex and hold up better to daily kitchen use.
Slow dry time. Paradoxically, paint that stays wet slightly longer has more time to flow out and flatten, which means a smoother result.
Primer is not optional. Bonding primers improve paint adhesion and create a smoother, more durable cabinet finish, especially when you are painting over older or stained wood. Choose a primer that sands easily, because you will be sanding it before your first topcoat. Ottawa’s humidity swings between seasons can affect both open times and cure times, so factor that in when planning your project timing.
Applying paint for a silky smooth finish
This is where most homeowners either pull off something they are proud of or end up frustrated. The good news is that a high-density foam roller with self-leveling paint can deliver near-factory smooth results without a sprayer. The technique matters more than the tool.
Here is a proven step-by-step approach for applying paint to achieve what is a silky smooth finish on your cabinets:
Thin your paint slightly. Add a paint conditioner such as Floetrol for latex or Penetrol for oil-based. This extends open time and improves leveling without thinning the protective layer.
Use a high-density foam roller for flat surfaces. These rollers apply paint in an extremely thin, even film with minimal stipple.
Use a quality angled brush for edges, details, and raised areas. Cheap brushes leave brush marks that will show through.
Maintain a wet edge. Work section by section and keep each new stroke overlapping the previous wet area. Lap marks happen when you go back over paint that has started to dry.
Apply thin coats. Thick coats cause runs and uneven texture. One mil of wet paint per coat is all you need. Multiple thin coats build coverage without the problems.
Let each coat dry fully before sanding. Rushing this step with still-soft paint creates gummy buildup rather than a smooth surface.
Denib between every coat. Use 320-grit paper and light, even pressure. You are not removing paint. You are removing texture.
Pro Tip: Apply your final coat in consistent lighting. Angle a work light low and raking across the cabinet surface while you apply paint. This shows you every run, brush mark, and missed spot in real time, before the paint dries.
How to achieve a smooth cabinet finish without professional equipment comes down to patience more than skill. Two thin, well-sanded coats will always outperform one thick, rushed coat.
Grain raising and pore filling for oak cabinets in Ottawa
If your Ottawa kitchen has oak cabinets, you need to understand one thing before you pick up a brush. Oak is an open-grain wood, meaning its surface is covered in tiny pores and channels that absorb paint unevenly. Standard finishing steps alone will not give you a glass-like surface on raw oak.
The core issue is that water-based finishes raise wood grain, causing fibers to stand up and create a rough texture on the first coat. If you do not address this before you start, you will spend the entire project chasing roughness that keeps coming back.
Here is how to handle it:
Shock the grain before priming. Wipe the bare wood with a diluted water and isopropyl alcohol solution. Let it dry completely. This raises and sets the grain intentionally before your finish does it uninvited.
Sand back with 220 grit after the grain-shocking step. This knocks down the raised fibers so they cannot stand up again under your first coat.
Use a grain filler on red oak especially. Red oak has larger, more visible pores than white oak. A paste-style grain filler pressed into the surface and sanded flush creates the flat base that actually makes a silky smooth, glass-like finish achievable.
Apply an extra primer coat on oak before your topcoats to seal the filled pores fully.
Pro Tip: White oak, which is trending in Ottawa kitchen design right now, has tighter pores than red oak and needs less filler work. If you are choosing cabinet species for a future refinish, white oak is more forgiving.
Sanding schedules, curing, and final touches
Getting the finish on is one thing. Getting it to stay smooth and hold up over years of kitchen use is another.
Sand with 320–400 grit between coats to maintain the smoothness you built up through application. This is called denibbing, and it is what separates a finish that looks good fresh from one that looks good for years.
Key points on timing and curing:
Dry time versus cure time are not the same thing. Paint that is dry to the touch in two hours may still be chemically curing for 30 days. Cure is when it reaches full hardness.
Oil-based and waterborne alkyd paints need longer cure times than standard latex, often 21 to 30 days before they reach full hardness.
Avoid loading cabinets with heavy items or scrubbing them during the cure period. You can damage what appears to be a hard finish because it has not fully hardened yet.
For a leveled, glass-like final surface, some professionals rub out the final cured coat with 1500-grit wet-and-dry paper followed by polishing compound. This is optional but delivers a factory finish quality level of smoothness.
Maintenance is simple. Wipe cabinets with a damp cloth and mild dish soap. Avoid abrasive scrubbers, which dull the sheen and expose the topcoat to premature wear.
Follow the cure schedule and your finish will hold up. Ignore it and you will see scuffs and scratches within weeks of finishing.
My take on what Ottawa homeowners actually get wrong
From everything I have seen working with Ottawa homeowners on their cabinets, the mistake that costs people the most time and money is underestimating prep. I have seen stunning paint applied over poorly sanded surfaces, and the result looked rough and amateur within two coats. I have also seen modest paint applied over a perfectly sanded and primed surface look like it came out of a cabinet factory.
The sprayer myth is real too. Many homeowners believe that without spray equipment, a smooth cabinet finish is not achievable. That is simply not true. What I have found actually works is the foam roller plus conditioning additive combination, applied in thin coats with deliberate denibbing in between. You can get a silky smooth finish that way, and many pros do exactly that in tight spaces where a sprayer would create overspray problems.
What I see most often missed is the connection between Ottawa’s climate and finish quality. High humidity in summer affects how paint flows and dries. Cold garages in winter change cure times significantly. Work in a conditioned space between 65 and 75 degrees Fahrenheit, and you eliminate a massive variable that trips up even experienced DIYers.
The right gloss level for your cabinets is also something most people decide on aesthetics alone without thinking about how it will telegraph surface flaws. I always say: choose your sheen after you know how good your prep is, not before.
— Ottawa
Let Ottawacabinetpainting handle the hard part
If reading this guide made you realize how much goes into a truly flawless result, you are not alone. Most homeowners who try to refinish cabinets on their own end up wishing they had called a professional from the start, not because the job is impossible, but because the details add up fast.
At Ottawacabinetpainting, we handle every step of this process, from progressive sanding and grain filling through to denibbing between coats and a properly cured topcoat. Our work is backed by a 6-year warranty because we know the process delivers lasting results. If your Ottawa kitchen deserves a smooth, durable finish that actually holds up, explore our interior cabinet painting services or request a free quote today. We would love to show you what your cabinets can look like.
FAQ
What is the most important factor for a smooth cabinet finish?
Surface preparation is the single biggest factor. Thorough cleaning, sanding, and dust removal account for roughly 80% of the final result, regardless of what paint or tools you use.
Do you need a sprayer to achieve a smooth cabinet finish?
No. High-density foam rollers used with self-leveling paint and a paint conditioner can produce near-factory smooth results without spray equipment, as long as you apply thin coats and sand between each one.
What grit sandpaper should I use between coats on cabinets?
Use 320-grit sandpaper between coats for best results. This removes dust nibs and texture without cutting into the paint layer, which is sometimes called denibbing.
Why do my cabinets feel rough after painting?
Roughness after painting is usually caused by raised grain, trapped dust, or skipped sanding between coats. On open-grain woods like oak, skipping a grain-filling step is a common cause of persistent roughness.
How long should I wait before using painted cabinets?
Paint may feel dry in a few hours, but full cure takes 21 to 30 days for oil-based and waterborne alkyd finishes. Avoid heavy use or scrubbing during this window to protect the finish from early wear.
Recommended
Comments