Renovate Kitchen Cupboard Doors: An Ottawa Homeowner's Guide
- Axcell Painting

- 1 day ago
- 12 min read
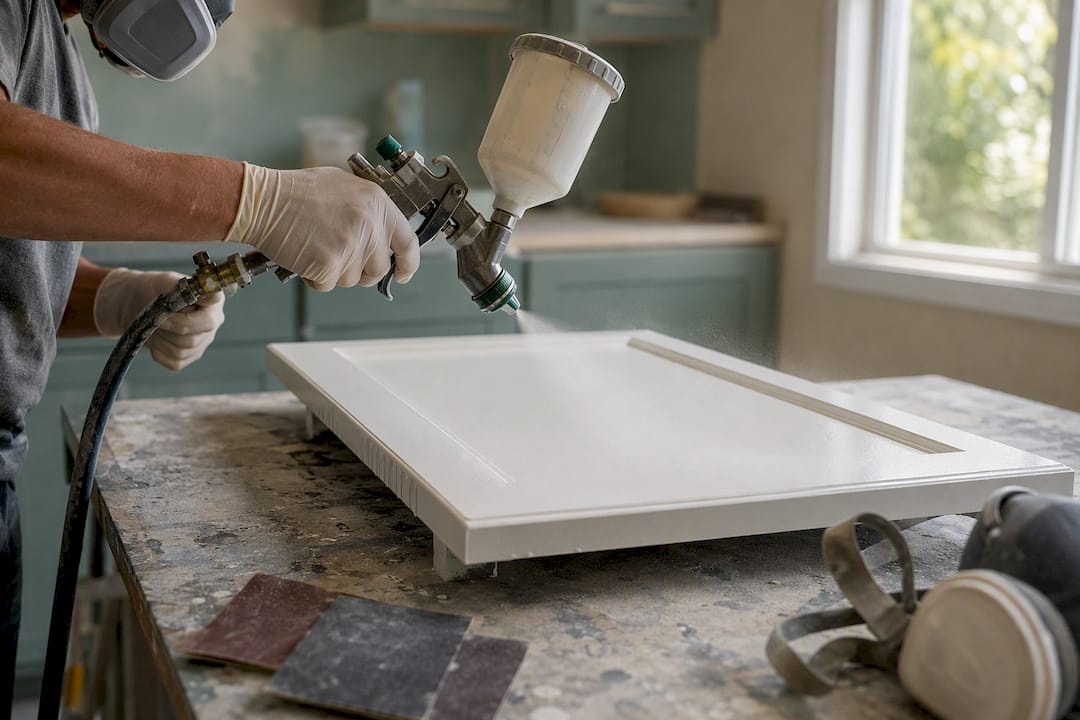
For most Ottawa homeowners, the smartest way to renovate kitchen cupboard doors is to paint or refinish the doors you already have rather than replace them outright. Full replacement only makes sense when the cabinet boxes are water damaged, warped, or you’re changing your kitchen’s layout. Painting or refinishing runs roughly $1,500 to $8,500 for a typical Canadian kitchen according to HomeStars, and most professional jobs, including ours at Ottawacabinetpainting, wrap up in about ten days from prep to reinstall.
Before you pick up a sander or call around for quotes, take these three steps:
Inspect the boxes. Check for water stains, swelling, or delamination at the corners. Damaged boxes push you toward reface or replace.
Count your doors and drawers. This number drives your material budget and tells a contractor how big the job actually is.
Choose your route. Decide between DIY paint, professional refinishing, or new door fronts based on your time, skill, and budget.
Key Takeaways
Renovating kitchen cupboard doors succeeds when homeowners match the method (paint, reface, or replace) to their cabinet box condition, budget, and timeline rather than defaulting to the most expensive option.
Point | Details |
Start with an inspection | Check cabinet boxes for damage before choosing paint, reface, or replacement. |
Paint first for most budgets | Painting or refinishing costs $1,500 to $8,500 professionally and delivers the fastest visual change. |
Measure twice before ordering | Confirm overlay vs. inset, reveal width, and hinge type before ordering replacement doors. |
Respect cure time | Cabinet paint needs one to three weeks to cure fully, not just dry to the touch. |
Hire Ottawacabinetpainting for a warrantied finish | Ottawacabinetpainting sprays doors off-site on a roughly ten-day timeline backed by a six-year warranty. |
Table of Contents
How Do You Renovate Kitchen Cupboard Doors on a Budget?
Four routes exist for updating tired cupboard doors, and each one solves a different problem. Painting or refinishing your existing doors is the cheapest and fastest way to change your kitchen’s mood without touching the cabinet boxes. Refacing keeps the boxes but swaps in new door and drawer fronts, giving you a fresh style without the mess of a full teardown. Full replacement means new boxes and doors both, which only makes sense when your layout needs to change or the boxes are structurally shot. Hardware swaps alone, meaning new handles, knobs, and hinges, can shift a kitchen’s whole personality for under $200.
Before choosing, run through this quick checklist:
Budget — how much can you spend, and does that number include labor or just materials?
Box condition — are the cabinet frames solid, square, and free of water damage?
Longevity — do you want a five-year fix or a fifteen-year one?
Timeline — can your kitchen be out of commission for two weeks, or do you need it back tomorrow?
Layout — are you happy with where things are, or do you want a different configuration?
Here’s how the trade-offs break down:
Paint/refinish: Lowest cost, fastest DIY option, but durability depends heavily on prep work and product choice.
Reface: Costs $2,500 to $8,500 according to RenoQuotes, and can save 30 to 50 percent versus full replacement while lasting longer than paint alone.
Full replacement: Highest cost and longest timeline, but the only route that lets you change your layout.
Hardware only: Cheapest option by far, though it won’t fix a dated paint color or a scratched finish.
Can You Paint or Refinish Cabinet Doors Yourself?
Yes. Repainting or refinishing your own cupboard doors is entirely doable for a patient DIYer, and it’s the project most likely to save you real money without sacrificing a good-looking result. The process takes longer than most people expect, mostly because paint needs time to cure between coats, not because the labor itself is hard.
Here’s the sequence we recommend, in order:
Remove doors and drawer fronts. Use a screwdriver or drill to back out hinge screws, supporting each door as the last screw comes free.
Label and photograph everything. Number each door and its corresponding cabinet opening with painter’s tape, and take a photo of the whole kitchen before you start. This single step prevents the puzzle-piece nightmare of rehanging doors that don’t quite fit their original spot.
Remove all hardware. Pulls, knobs, and hinges come off completely. Bag the screws separately for each piece.
Sand or deglaze the surface. A 120 to 150 grit sandpaper knocks down the factory sheen so primer has something to grip. If you’re working with laminate or a glossy factory finish, a liquid deglosser saves you hours of sanding.
Clean thoroughly. Wipe every surface with a degreaser, since kitchen doors carry cooking residue that regular soap won’t cut. Let them dry completely.
Apply primer. A bonding or shellac-based primer is worth the extra cost here, especially over laminate, oak grain, or anything previously varnished. Skipping this step is a recipe for disaster, no matter how good the paint is.
Apply your paint or finish. Two to three thin coats beat one thick one every time.
Let it cure, not just dry. Dry to the touch and fully cured are different things. Most cabinet paints need one to three weeks of cure time before they can handle daily wear.
Reinstall hinges and hardware. Match each door to its labeled opening and adjust hinges so gaps are even.
Tools and materials checklist:
Cabinet-grade acrylic-alkyd or waterborne enamel paint
Bonding or shellac-based primer
Sandpaper in 120, 150, and 220 grit
Tack cloth or microfiber rags
A quality angled brush, foam roller, or HVLP sprayer
Painter’s tape and a labeling system
Drop cloths and a well-ventilated workspace
Photograph your kitchen before disassembly, each door as it comes off, and the final hinge locations. This gives you a reference if a door goes missing or a hinge placement gets fuzzy three days into the project.
Pro Tip: If you’re using a sprayer, keep it moving in overlapping passes and never stop mid-stroke over the surface. Pausing is what creates those thick drip marks that give away a DIY job. And whatever method you choose, work in a ventilated space with a respirator rated for organic vapors. Paint fumes in an enclosed kitchen add up fast.
Should doors dry overnight before a second coat? Usually, yes, though light coats and good airflow can shorten that window. Rushing this step is the single most common reason DIY cabinet paint jobs look streaky or tacky months later.
How Do You Measure Cabinet Doors for Replacement or Overlay?
Ordering new doors without accurate measurements is one of the most expensive mistakes a homeowner can make. Measure width and height of each opening to the nearest sixteenth of an inch, not the door itself, since openings can vary slightly even within the same kitchen.
Here’s what to check before you order anything:
Overlay vs. inset. Overlay doors sit on top of the cabinet frame; inset doors sit flush inside it. Confirm which style your kitchen currently uses, since mixing them will look wrong immediately.
Reveal amount. This is the visible frame width around each door when it’s closed. Measure it on at least three doors, since older cabinets often have inconsistent reveals.
Door thickness. Most cabinet doors run 3/4 inch thick, but older builds sometimes use 5/8 inch, which changes hinge compatibility.
Hinge type. Concealed European hinges, semi-concealed, and exposed hinges all require different boring patterns. Photograph each hinge location before removing a single door, since this saves enormous headaches when the new doors arrive.
When placing your order, specify the finish, edge profile, and exact hardware hole placements up front. Ask about lead times, since custom doors can take anywhere from two to eight weeks depending on the supplier, and build in a small tolerance for sizing since factory cuts are rarely perfect to the sixteenth of an inch. Room For Tuesday’s replacement guide walks through this process with helpful photos if you want a visual reference before ordering.
Which Hardware Upgrades Make the Biggest Visual Difference?
Swapping handles, knobs, and hinges is the fastest, cheapest upgrade you can make to a kitchen, and it’s often the one that gets overlooked in favor of bigger, more expensive projects. A $150 hardware budget can modernize an entire kitchen’s look in an afternoon.
Common options and what they change:
Bar pulls give a clean, modern line and work well on shaker-style doors.
Knobs suit traditional or farmhouse styles and cost less per piece.
Soft-close hinges eliminate slamming and extend the life of your cabinet boxes.
Concealed European hinges create a sleek, hardware-free look on the door face.
Installation steps for new pulls and knobs:
Measure the center-to-center distance (backset) on your existing hardware, if you’re keeping the same holes.
Mark new hole locations with a template if you’re changing hardware style or size.
Drill pilot holes slightly smaller than the screw diameter to prevent splitting.
Attach hardware and tighten by hand first, then snug with a screwdriver to avoid stripping the wood.
Adjust hinge screws so doors hang flush and close evenly.
Pro Tip: Before you fall in love with a new pull style, measure its screw spacing against your existing holes. Matching an existing hole pattern means no wood filling, no drilling, and no touch-up paint required. It’s the difference between an hour-long project and a weekend one.
What Makes a Cabinet Paint Job Actually Last?
The gap between a DIY paint job that peels within a year and one that looks factory-finished a decade later almost always comes down to prep, not the paint brand. Cabinet doors take more daily abuse than any other painted surface in your home, from grease splatter to constant hand contact, so the finish has to be tougher than a standard wall paint.
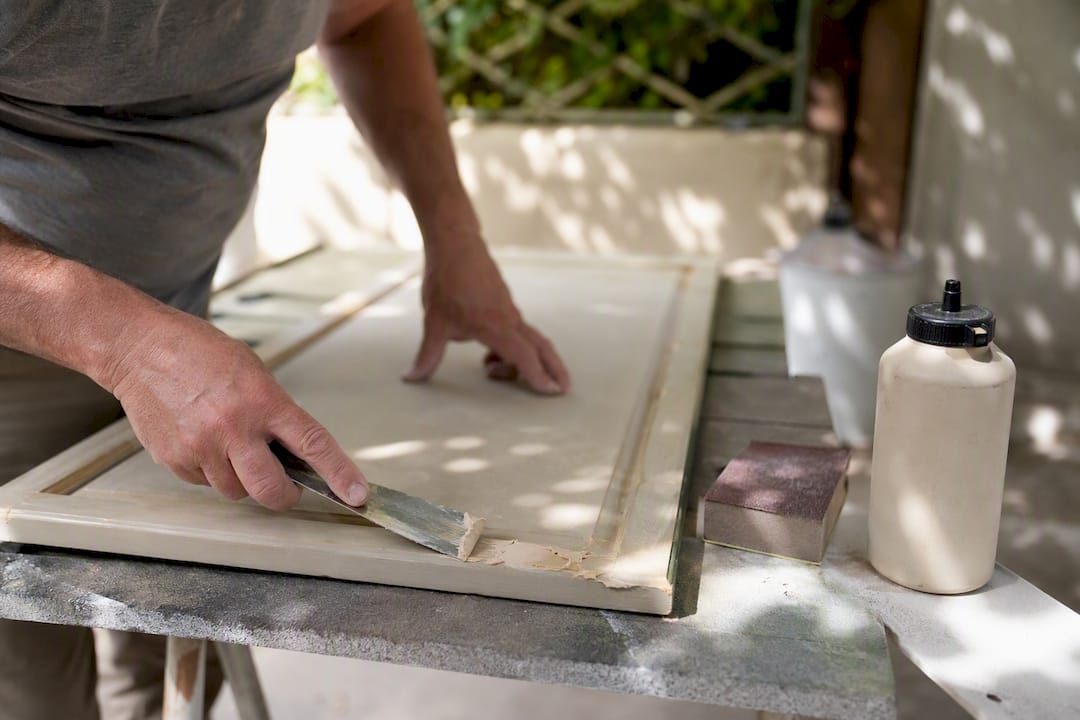
Start with the right materials. A bonding primer is non-negotiable on laminate, oak grain, or anything glossy. For the topcoat, cabinet-grade acrylic-alkyd or a waterborne enamel gives you the hardness of an oil-based paint with easier cleanup and less yellowing over time. Brushes and rollers work fine for a good result, but an HVLP sprayer produces that seamless, silky, showroom look because it lays down an ultra-thin, even coat without brush marks.
Sand between coats with 220 grit paper, wiping away dust with a tack cloth each time. Two to three coats is standard, with at least four to six hours of dry time between each and a full cure period of one to three weeks before the doors go back into daily use.
Watch the weather and your indoor climate closely:
Avoid painting when indoor humidity is above 70 percent, since it slows curing dramatically.
Cold garages or basements below 50°F prevent paint from leveling properly, leaving brush marks locked in.
Ottawa’s damp spring and humid summer months are the trickiest times to paint cabinets indoors without a dehumidifier running.
Never rehang doors before the recommended cure time, even if they feel dry to the touch.
Skipping any of these steps is how homeowners end up with peeling edges around hinges within six months, which is one of the most common calls we get for touch-up work.
What Does It Cost to Renovate Kitchen Cupboard Doors?
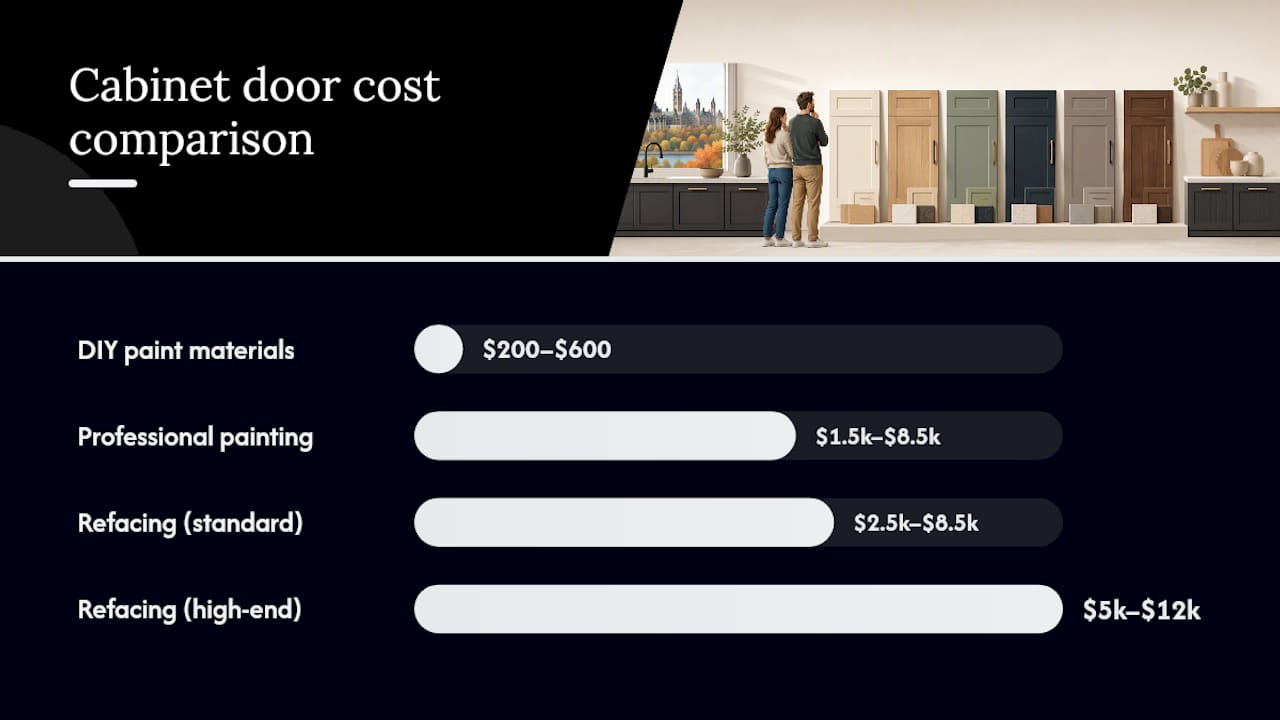
Your budget and your timeline are directly connected, since the cheaper routes generally take longer if you’re doing them yourself, and the faster professional routes cost more upfront.
Cost ranges by route:
DIY paint: Materials alone typically run $200 to $600 for an average kitchen.
Professional painting: $1,500 to $8,500 according to HomeStars, with labor making up 60 to 75 percent of that quote.
Refacing: $2,500 to $8,500 per RenoQuotes, or $5,000 to $12,000 for higher-end materials according to 180 Kitchens.
Full replacement: Typically the highest cost, often exceeding refacing by a wide margin once new boxes are included.
Timeline estimates:
DIY painting: one to two weekends, plus cure time.
Professional painting: around ten days from initial prep through reinstallation.
Refacing: often completes faster than a full paint job since new fronts arrive pre-finished.
Door count, material grade, and hardware selection are the three biggest cost drivers on any project, regardless of which route you choose.
When Should You Hire a Professional Cabinet Painter in Ottawa?
Hire a pro when your cabinet boxes show damage, you want a true factory finish, your schedule can’t absorb a multi-week DIY timeline, or you want a warranty backing the work. A professional crew also brings spray equipment and a controlled finishing space that most homeowners simply don’t have at home.
When you’re collecting quotes, ask each contractor:
What does your prep process actually include, and do you fill and sand every imperfection?
Do you spray or brush, and where does that spraying happen?
How long is your warranty, and what does it cover?
What’s your typical project timeline from start to finish?
Can I see photos or talk to past clients in my area?
At Ottawacabinetpainting, our process runs on roughly a ten-day timeline: doors and drawers come off, get sprayed off-site in a controlled environment, cure fully, then get reinstalled with adjusted hinges. We back the work with a six-year warranty, which matters more than it sounds, since a rushed two-day paint job rarely holds up the way a properly cured, sprayed finish does.
Pro Tip: A contractor who can start tomorrow and finish in two days is usually skipping cure time somewhere. Ask directly how many days your doors will be off-site, since that number tells you more about quality than the price quote does.
How Do You Fix and Maintain Renovated Cupboard Doors?
Peeling paint near hinges usually means inadequate primer or rushed cure time. Spot-sand the area, reprime, and touch up rather than repainting the whole door. Sticky or slow-closing doors almost always trace back to loose hinge screws, which take thirty seconds to retighten with a screwdriver. Delaminating edges on laminate doors can often be re-glued with contact cement before they get worse.
For ongoing care, avoid abrasive cleaners and use a soft cloth with mild dish soap instead, since harsh chemicals dull both matte and high-gloss finishes over time. Check hinge screws every six months, since kitchen humidity loosens them gradually. Keep steam from dishwashers and stovetop cooking away from door edges near the sink, since repeated moisture exposure is one of the fastest ways to break down even a well-cured finish.
What Ottawa Homeowners Get Wrong About Cabinet Renovations
The most common mistake we see isn’t a bad paint choice. It’s homeowners assuming speed and quality can coexist in a two or three day timeline. Conventional advice online treats cabinet painting like a weekend hobby project, glossing over cure times and prep work that actually determine whether a finish lasts two years or fifteen.
The research backs a simple priority order: fix what you can see is broken first, don’t skip primer to save an afternoon, and don’t rehang doors before they’ve actually cured. Homeowners who reface or replace when their boxes were perfectly fine end up spending three to five times more than they needed to. Meanwhile, homeowners who rush a DIY paint job to save a weekend often redo it within eighteen months anyway.
If there’s one thing worth prioritizing above all else, it’s patience with the timeline, whether that’s your own DIY schedule or a contractor’s. A kitchen that’s out of commission for ten extra days is a minor inconvenience. A finish that peels in a year is an expensive one.
Ready to Skip the Sanding and Get a Factory Finish?
If the idea of spending three weekends sanding, priming, and hoping your paint job cures evenly sounds like more risk than you want to take on, Ottawacabinetpainting handles the entire process for you, on roughly the same ten-day timeline outlined in this guide, but with spray equipment and a controlled finishing space you can’t replicate in a garage. We’re built for Ottawa homeowners who want the cost savings of refinishing over full replacement without gambling on DIY execution.
Every project comes backed by a six-year warranty, so you’re not left touching up peeling edges next spring. If you want to see the kind of finish this process produces, browse our before and after gallery, then request a free quote to get a timeline and price specific to your kitchen.
Frequently Asked Questions
Is it cheaper to paint or replace kitchen cupboard doors? Painting is almost always cheaper. Professional painting runs $1,500 to $8,500, while full replacement typically costs significantly more once new boxes and doors are both factored in.
How long does it take to renovate kitchen cupboard doors? A DIY paint job usually takes one to two weekends plus cure time. A professional job, including ours at Ottawacabinetpainting, typically runs about ten days from removal to reinstallation.
Can I just replace the cabinet doors and keep the boxes? Yes, this is called refacing, and it’s a popular middle ground. It typically costs $2,500 to $8,500 according to RenoQuotes and can save 30 to 50 percent compared with full replacement.
What paint should I use on kitchen cabinet doors? Cabinet-grade acrylic-alkyd or waterborne enamel paint over a bonding or shellac-based primer holds up best against daily kitchen use, grease, and moisture.
Do I need to remove doors to paint them? Yes. Removing doors and drawer fronts lets you lay them flat for even coverage and keeps hinges and hardware free of paint buildup.
Sources
For more visual inspiration and cost detail beyond what’s covered here, these resources are worth a look:
Costs and timelines in these sources vary by region, so treat them as a starting point rather than a fixed quote.
Recommended

Comments