Professional cabinet prep: enhance your Ottawa kitchen
- Axcell Painting

- Apr 27
- 9 min read

TL;DR:
Proper professional cabinet prep ensures long-lasting, durable paint finishes by creating a strong bonding surface.
The key steps include thorough cleaning, precise sanding, surface repairs, and material-specific priming.
Investing in detailed prep saves money long-term by preventing peeling, bubbling, and the need for frequent repairs.
When Ottawa homeowners think about refreshing their kitchen cabinets, most picture the final result — smooth, bright, beautiful doors that look like they just came out of a showroom. What many don’t picture is everything that happens before the first coat of paint ever touches the surface. That invisible foundation is professional cabinet prep, and it’s the single biggest factor separating a finish that lasts years from one that starts peeling before the holidays. If you’ve ever wondered why some cabinet paint jobs look flawless while others chip and bubble within months, the answer almost always comes down to how well the cabinets were prepared.
Table of Contents
Key Takeaways
Point | Details |
Thorough preparation matters | Proper cabinet prep is the foundation of long-lasting, beautiful finishes. |
DIY risks quick failures | Skipping steps or using the wrong products leads to peeling and unsightly results. |
Material-specific techniques | Laminate, oak, and wood each require unique prep methods for optimal outcomes. |
Cost-effective kitchen upgrades | Professional cabinet prep saves money compared to full replacements, with equally impressive transformations. |
Peace of mind for homeowners | Investing in expert prep means fewer repairs and a higher-quality kitchen for years. |
What is professional cabinet prep?
Professional cabinet prep is a structured, multi-step process that gets your cabinet surfaces truly ready to accept and hold paint. It goes far beyond wiping things down and brushing on a coat of primer. We’re talking about systematic cleaning, thorough degreasing, precise sanding, surface repairs, and the application of specialized primers suited to your specific cabinet material. Every single step exists for a reason, and every step that gets skipped creates a risk.
Many Ottawa homeowners who attempt a DIY cabinet refresh focus on the painting itself, treating prep as a quick warmup. That’s a recipe for disaster. Proper prep work for cabinets is what allows paint to bond firmly to the surface. Without that bond, you’ll get peeling at the edges, bubbling near the heat of the stove, and chipping around handles within the first year. Those aren’t paint failures. They’re prep failures.
What sets professional prep apart is the combination of the right products, the right sequence, and the right level of patience. Professionals use shellac-based primers, bonding primers formulated for specific surfaces, and grain fillers for porous wood like oak. They also know what not to use. For example, laminate cabinets need a special bonding primer and only light sanding to avoid delamination, while oak requires grain filler to prevent the natural wood texture from telegraphing through the finish. Even common household cleaners can be a problem. TSP (trisodium phosphate) residue and vinegar both interfere with paint adhesion, which is exactly why professionals use products specifically formulated for pre-paint cleaning.
Here’s what professional cabinet prep typically covers:
Full removal of cabinet doors, drawers, and hardware
Thorough degreasing with a paint-safe cleaner
Sanding all surfaces to the appropriate grit for the material
Filling holes, dents, and surface imperfections with the right filler
Applying a material-specific primer coat
Light sanding between primer coats for a smooth base
These are not optional extras. They are the foundation. You can use the most expensive paint on the market, but if the surface underneath isn’t properly prepped, it won’t matter. The expert cabinet prep tips we’ve developed over years of working on Ottawa kitchens all point to the same conclusion: prep is where quality is built or broken.
“The finish you see is only as good as the surface underneath it. Professional prep isn’t a step in the process — it is the process.”
Core steps in professional cabinet prep
Now that we know what professional cabinet prep means, let’s walk through each step to see how the process delivers lasting results.
Professional cabinet prep follows a deliberate sequence. Skipping around or rushing any stage compounds problems down the line. Here is how we approach it on every single project:
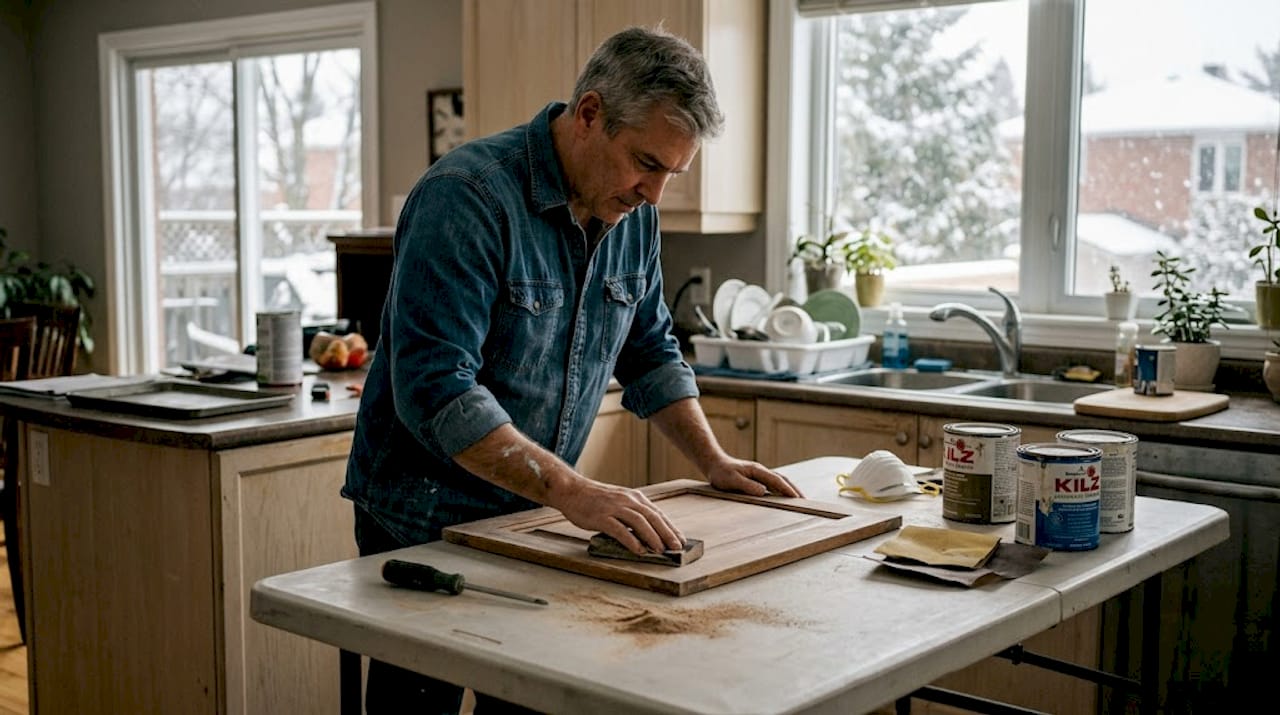
Remove all cabinet doors, drawer fronts, and hardware. Painting cabinets in place is one of the most common DIY mistakes. Hinges, handles, and brackets must come off so every inch of surface gets properly treated. We label every door and hinge so reinstallation is accurate.
Degrease all surfaces thoroughly. Kitchen cabinets accumulate years of cooking grease, fingerprint oils, and cleaning product residue. None of that is visible to the naked eye, but it absolutely prevents paint from sticking. We use a degreaser specifically formulated for painted surfaces, one that won’t leave a residue of its own.
Sand all surfaces to the correct grit. Sanding isn’t just about roughing up the surface. It’s about creating a consistent texture that primer can grip. The grit level matters. Coarser grits remove old finish; finer grits smooth the surface before priming. For laminate, only light sanding is used to open the surface without causing delamination.
Repair all surface flaws. Dents, gouges, old screw holes, and cracks all get filled with the appropriate filler and sanded flush. Skipping this step means every imperfection telegraphs through the final finish, which looks far from showroom quality.
Apply a material-specific primer. This is where professional knowledge makes the biggest difference. Oak cabinets need grain filler applied before priming to prevent the natural wood grain from showing through the topcoat. Laminate requires a bonding primer for adhesion. Standard wood benefits from a shellac-based primer that seals tannins and knots. Using the wrong primer, or skipping it entirely, leads directly to adhesion failures.
Sand lightly between coats. Even after priming, fine imperfections can appear. Light sanding between coats keeps the build-up smooth and prevents the paint from looking textured or bumpy. This step is what gives cabinets that smooth, factory-finished look that DIY jobs rarely achieve.
Following this sequence is how we ensure every cabinet painting project we complete is built to last. You can also learn more about painting cabinets economically without sacrificing quality.
Pro Tip: Never use vinegar or TSP to clean cabinets before painting. Both leave residues that prevent paint and primer from bonding properly. Use a dedicated pre-paint degreaser and rinse with clean water only.
Comparing DIY and professional cabinet prep methods
Understanding both the steps and importance of cabinet prep, let’s see how professional prep stacks up against typical DIY practices.
Most homeowners who attempt a DIY cabinet refresh do a reasonable job with the painting itself. Where things fall apart is the prep. The table below shows why the gap between DIY and professional results is so significant.
Factor | DIY approach | Professional approach |
Surface cleaning | General household cleaner | Dedicated pre-paint degreaser |
Sanding | One grit, inconsistent coverage | Multiple grits, systematic coverage |
Material-specific primer | Often skipped or wrong product | Bonding primer, shellac primer, or grain filler as needed |
Surface repairs | Minimal or skipped | All flaws filled and sanded flush |
Between-coat sanding | Rarely done | Standard practice every coat |
Tools used | Brushes and rollers | Sprayers for factory-smooth finish |
Finish durability | 1 to 3 years typical | 5 or more years with proper prep |
Risk of failure | High, especially in humid kitchens | Low when full process is followed |
Industry data consistently shows that the vast majority of painted cabinet failures, some estimates put it as high as 80%, trace back directly to inadequate surface preparation rather than paint quality. That’s a striking number. It means most of the cabinets that look bad a year after painting could have looked great if the prep had been done properly.
When you choose a professional service that takes expert refinishing methods seriously, you’re not just paying for paint. You’re paying for the knowledge, sequence, and materials that make the paint last. Compare that to even the best DIY cabinet redo where shortcuts are almost unavoidable, and the long-term value becomes clear.
There’s also the matter of resale value. Kitchens are a primary factor in home valuation, and a fresh, professionally finished cabinet set can meaningfully increase buyer interest. Cabinets that peel or show brush marks do the opposite. The long-term math strongly favors doing it right the first time.
Cabinet prep for different materials: Laminate, wood, and oak
Finally, let’s break down how professional prep adjusts for different cabinet materials, ensuring the best results for everyone.
Not all cabinets are made the same, and professional prep accounts for that. The material your cabinets are made from changes everything about how they need to be prepared. Using a one-size-fits-all approach is one of the most common mistakes we see from quick-turnaround painting services.
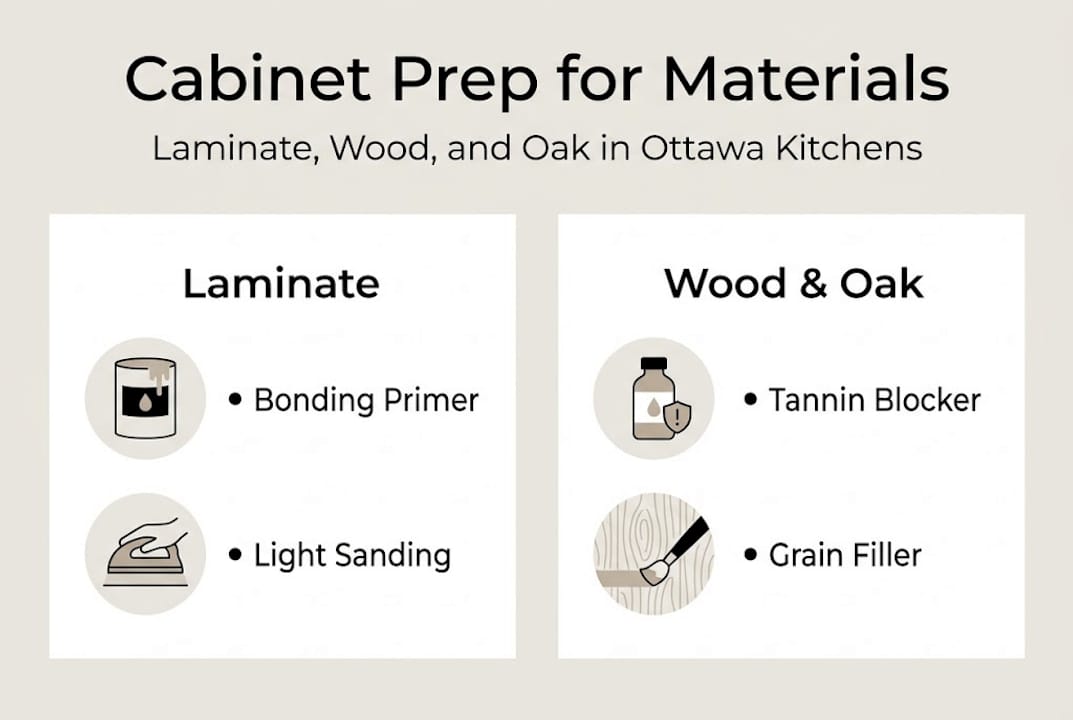
Cabinet material | Key prep requirement | Common pitfall |
Laminate | Bonding primer, light sanding only | Heavy sanding causes delamination |
Solid wood | Thorough sanding, shellac primer | Skipping tannin-blocking primer causes bleed-through |
Oak | Grain filler before primer | Skipping filler lets grain show through topcoat |
MDF (medium-density fiberboard) | Seal all edges, moisture-resistant primer | Edges absorb paint and swell if unsealed |
Painted (repaint) | Degloss, light sand, assess existing adhesion | Painting over failing old finish traps the problem |
Here’s a closer look at what each material demands:
Laminate cabinets are the trickiest. Laminate is a non-porous surface, meaning standard primers won’t bond to it without help. Laminate requires a bonding primer and light sanding just enough to scuff the surface without separating the laminate layer from the substrate underneath. Get too aggressive with the sanding, and you risk delamination, which is when the surface layer starts to peel away from the base. That kind of damage is not fixable with paint.
Solid wood cabinets offer a more forgiving surface but come with their own challenges. Wood contains natural tannins and sometimes knots that bleed through standard primers and discolor the topcoat. A shellac-based primer seals those compounds in so they never reach the surface. Thorough sanding is also essential on wood, both to remove the existing finish and to open the grain slightly for better adhesion. For refinishing wooden cabinets specifically, skipping the shellac primer almost always leads to yellowing or staining visible in the final coat.
Oak cabinets deserve special attention. Oak has a very pronounced open grain, which means without a grain filler applied before priming, that texture remains visible in the finished paint surface. It looks exactly like what it is: painted wood, not a smooth, modern finish. Grain filler is a paste-like product that is worked into the grain, sanded flush, and then primed over. The result is a surface that spraying cabinet finishes can transform into something that looks almost like a factory-built piece.
Key mistakes to avoid with material-specific prep:
Using the same primer across all cabinet types without checking compatibility
Applying grain filler only to visible areas and missing hidden surfaces
Over-sanding laminate, which risks surface delamination
Skipping edge sealing on MDF, which causes the edges to absorb moisture and swell
If you want a complete cabinet refinishing guide specific to Ottawa homes, we have that covered. The materials and climate here in Ottawa present real challenges that a professional with local experience is best positioned to handle.
Why professional cabinet prep is worth the investment
Here’s the honest truth that most quick-turnaround painters won’t tell you: the prep is where the money goes, and it’s supposed to. When we quote a cabinet painting project, a significant portion of the timeline and cost is dedicated entirely to preparation. That surprises some homeowners. They expect most of the work to happen when the sprayer comes out.
But the sprayer is fast. Prep is not. And that’s exactly how it should be. We’ve seen firsthand what happens when a company rushes through prep to offer a lower quote or faster turnaround. The finish looks fine at handover. Six months later, the homeowner is calling someone to fix it.
The real value of professional prep isn’t just aesthetic. It’s the reduction of future cost. Properly prepped cabinets that are refinished for lasting quality can go five, six, even more years before needing any attention. That’s five or more years of a kitchen that looks sharp, functions well, and holds its value. Compare that to a DIY or rushed professional job that needs touching up every year or two, and the cost difference disappears quickly.
Our perspective is clear: prioritize prep quality over paint brand every time. A mid-range paint on a perfectly prepped surface will outperform a premium paint on a poorly prepped one, every single time. Ottawa homeowners who understand this get the most value from their cabinet investment.
Explore professional cabinet prep solutions in Ottawa
Ready to transform your kitchen with results that last? Here are your next steps toward a beautiful cabinet upgrade.
At Ottawa Cabinet Painting, we built our entire process around the prep standards described in this article. Every project starts with a thorough assessment of your cabinet material, existing finish condition, and any repairs needed before we ever open a can of primer. You can browse our cabinet before and after results to see exactly what professional prep and painting looks like on real Ottawa kitchens. When you’re ready to move forward, request your free cabinet painting quotes directly through our site. We also offer a full range of interior painting solutions if you’re looking to refresh more than just your cabinets.
Frequently asked questions
What happens if you skip professional cabinet prep?
Skipping prep leads directly to poor paint adhesion, bubbling, peeling, and chipping, often within the first year, because without proper cleaning and priming the paint simply cannot bond to the surface.
How long does a professionally prepped cabinet finish last?
With full professional prep including material-specific primers and between-coat sanding, a cabinet finish can last well over 5 years in an Ottawa home, which far exceeds what typical DIY results deliver.
Do different cabinet materials need different prep methods?
Yes, absolutely. Laminate requires a bonding primer and light sanding, oak needs grain filler before priming, and solid wood benefits from a shellac-based primer to block tannins and knots from bleeding through.
Is professional cabinet prep cost-effective compared to replacing cabinets?
Professional prep and refinishing costs a fraction of full cabinet replacement while delivering a finish that looks equally fresh and modern, making it one of the smartest kitchen upgrades an Ottawa homeowner can invest in.
Recommended
Comments