How to Get Kitchen Cabinet Spraying Near Me Done Right
- demoore5506
- Jan 29
- 7 min read
Every Ottawa parent knows how quickly kitchen cabinets can lose their shine in a busy household. Juggling meals, homework, and family schedules means a full renovation just isn’t practical. Choosing an affordable cabinet painting service offers a quick and effective refresh that fits your daily routine. With a focus on thorough cleaning and preparation, this guide lays out the steps to achieve a professional look while keeping your kitchen safe and organized for your family.
Table of Contents
Quick Summary
Key Point | Explanation |
1. Thoroughly Prepare Your Kitchen | Empty and clean all cabinets and surfaces to ensure proper paint adhesion and protect your belongings. |
2. Choose Appropriate Color and Finish | Analyze existing colors and lighting; select finishes based on durability and maintenance for long-lasting beauty. |
3. Research Professional Painters | Evaluate local cabinet spraying services for experience and reviews to ensure high-quality results without disruptions. |
4. Monitor Spraying Process | Observe techniques and practices during the application to guarantee a flawless, professional finish. |
5. Conduct a Final Inspection | Check for color consistency and operational functionality after spraying; allow proper curing time before heavy use. |
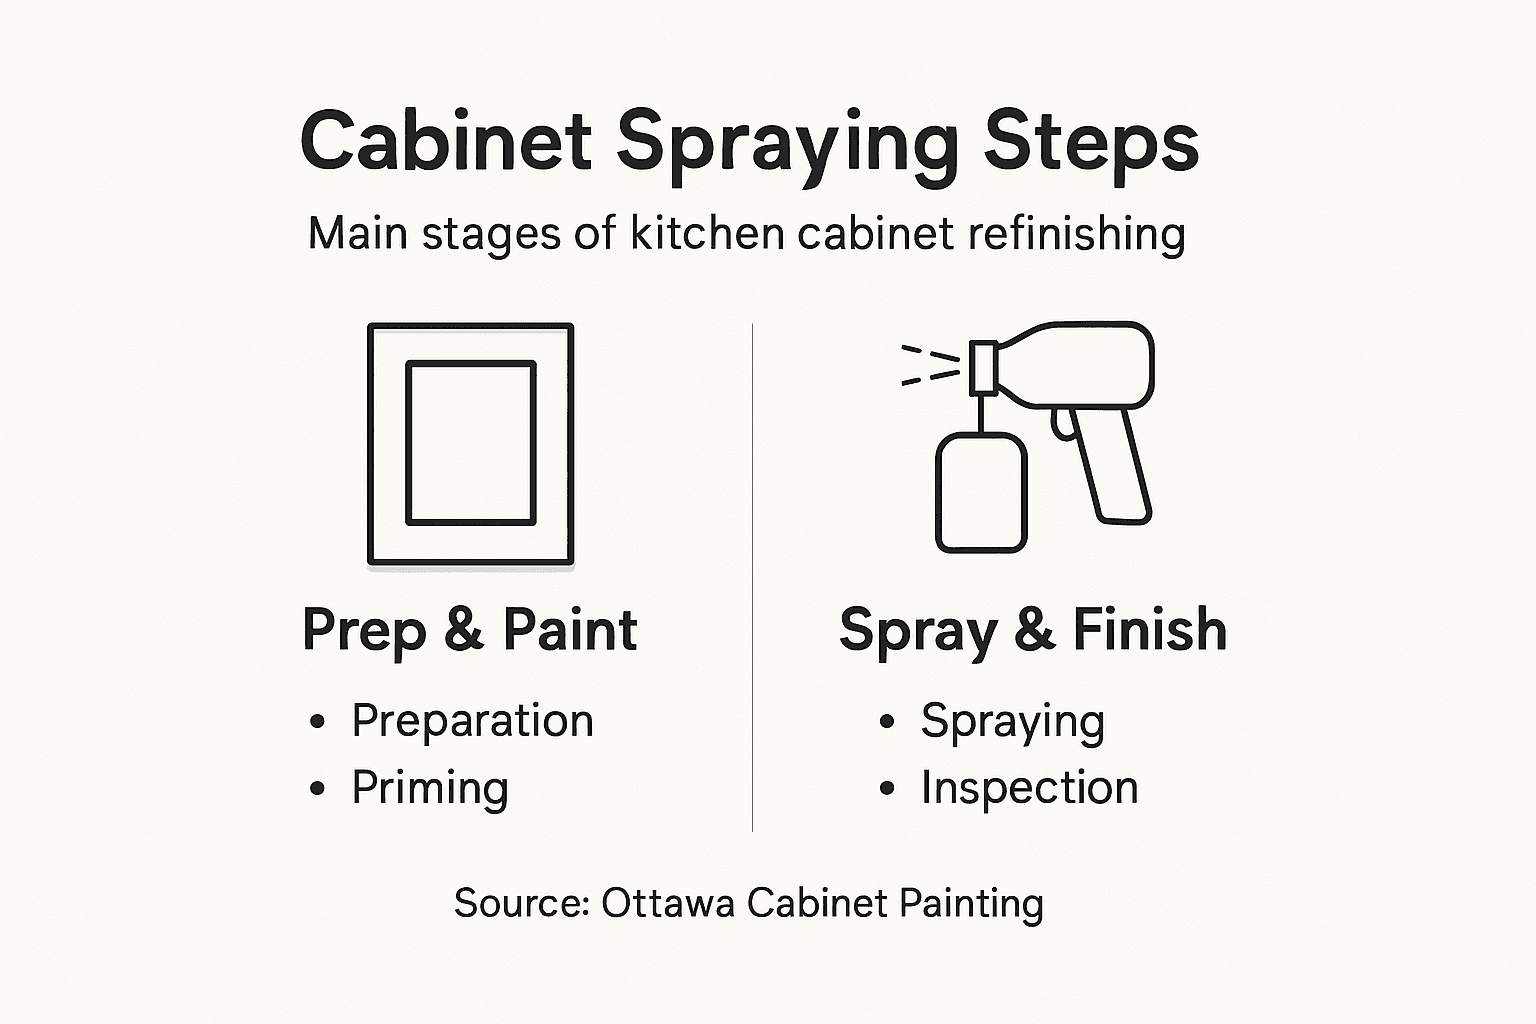
Step 1: Assess and Prepare Your Kitchen Area
Transforming your kitchen cabinets starts with a meticulous preparation process that will ensure a professional and lasting result. In this critical first step, you’ll systematically clear, clean, and ready your kitchen space for the upcoming cabinet painting project.
Begin by completely emptying your kitchen cabinets and countertops. Remove all dishes, appliances, cookware, and decorative items. This not only provides clear workspace but also protects your belongings from potential paint splatter. As you sanitize kitchen surfaces, focus on thorough cleaning to create the ideal painting environment.
Your preparation checklist should include:
Remove all cabinet hardware (handles, knobs)
Clean surfaces with a degreasing solution
Repair any minor scratches or dents
Use painter’s tape to protect adjacent surfaces
Create a dedicated workspace for painting supplies
Pay special attention to grease and grime buildup, which can prevent paint from adhering properly. Use a strong kitchen degreaser and clean rags to remove all residue from cabinet surfaces. Thorough cleaning is not optional - it’s the foundation of a smooth, professional finish.
A clean surface is the secret to a showroom-quality cabinet painting result.
Once your kitchen is fully prepped, you’ll be ready to move on to the next critical step of priming and protecting your surfaces.
Pro tip: Cover your floors with drop cloths and use plastic sheeting to create a protected painting zone that minimizes potential mess and cleanup.
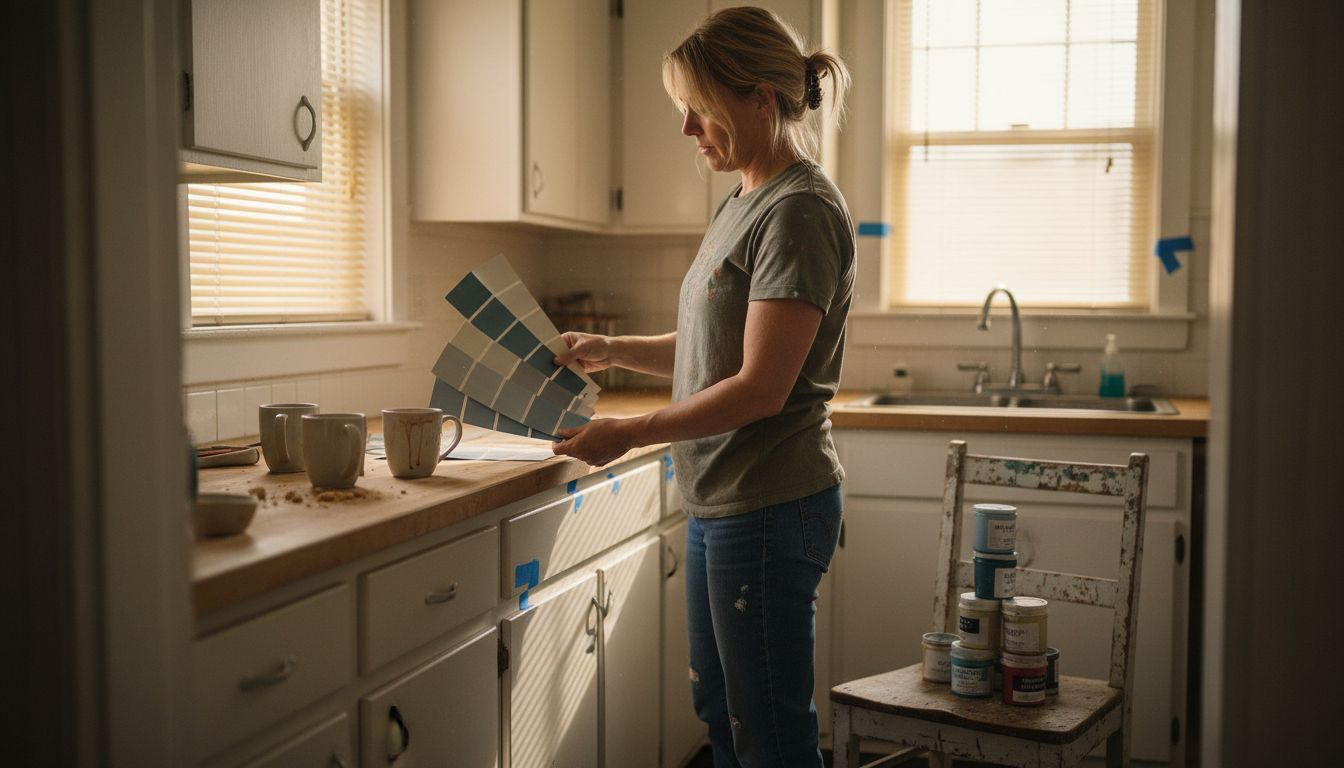
Step 2: Choose the Ideal Finish and Color
Selecting the perfect color and finish for your kitchen cabinets is a critical decision that will dramatically transform your space and reflect your personal style. The right choice goes beyond aesthetics - it impacts how your kitchen feels, functions, and ages over time.
Start by exploring your kitchen’s existing color palette and lighting conditions. Understanding color theory principles allows you to create harmonious design that enhances your space. Consider these strategic approaches:
Neutral tones for timeless elegance
Bold colors for dramatic statements
Soft whites to maximize perceived space
Dark hues for sophisticated depth
Matching colors with countertop and flooring
When selecting a finish, evaluate durability and maintenance requirements. Satin and semi-gloss finishes are popular for kitchen cabinets because they provide easy cleaning and moderate sheen. Matte finishes offer a modern look but can show fingerprints more readily, while high-gloss options create a sleek, contemporary aesthetic.
Here’s a comparison of popular cabinet paint finishes for your kitchen:
Finish Type | Appearance | Durability | Best For |
Matte | Modern, subtle | Shows fingerprints easily | Contemporary kitchens |
Satin | Soft sheen, elegant | Easy to clean, durable | Most kitchen settings |
Semi-gloss | Noticeable sheen, classic | Highly durable, washable | High-use areas |
High-gloss | Ultra shiny, reflective | Very easy to clean | Sleek, modern kitchens |
The right cabinet color and finish can transform your kitchen from ordinary to extraordinary.
Remember that paint samples and color swatches are your best friends. Test multiple options in your actual kitchen lighting to see how colors shift throughout the day.
Pro tip: Purchase small paint samples and create large test patches on poster board to move around your kitchen, observing how colors interact with different lighting conditions and times of day.
Step 3: Schedule Professional Cabinet Spraying Service
Scheduling a professional cabinet spraying service requires strategic planning and careful consideration to ensure a smooth, high-quality transformation of your kitchen. Your goal is to coordinate a seamless experience that minimizes disruption to your daily household routine while achieving exceptional results.
Begin by researching local professionals who specialize in kitchen maintenance scheduling. Look for experienced cabinet painting services with proven track records in Ottawa. When evaluating potential providers, consider these critical factors:
Years of professional experience
Portfolio of previous kitchen cabinet projects
Detailed service guarantees
Transparent pricing structures
Availability and scheduling flexibility
Request comprehensive quotes from multiple providers, ensuring they include detailed information about preparation, painting techniques, and estimated project duration. Professional cabinet sprayers typically require 3-5 days for a complete kitchen cabinet transformation, depending on the size and complexity of your project.
A meticulously planned cabinet spraying service can revolutionize your kitchen’s appearance with minimal disruption.
Prioritize communication during the scheduling process. Discuss specific timeline expectations, prepare your kitchen space according to their recommendations, and confirm all details in writing.
To help you select a cabinet spraying professional, use this quick comparison guide:
Selection Factor | Why It Matters | What to Look For |
Experience | Ensures skill and reliability | 5+ years in cabinet projects |
Portfolio | Shows previous work quality | Photos of recent kitchens |
Service Guarantee | Protects investment | Written warranty or coverage |
Scheduling Flexibility | Minimizes home disruption | Options for off-peak timing |
Pro tip: Schedule your cabinet spraying during a less busy household period, such as when family members are at work or school, to minimize inconvenience and allow painters uninterrupted access to your kitchen.
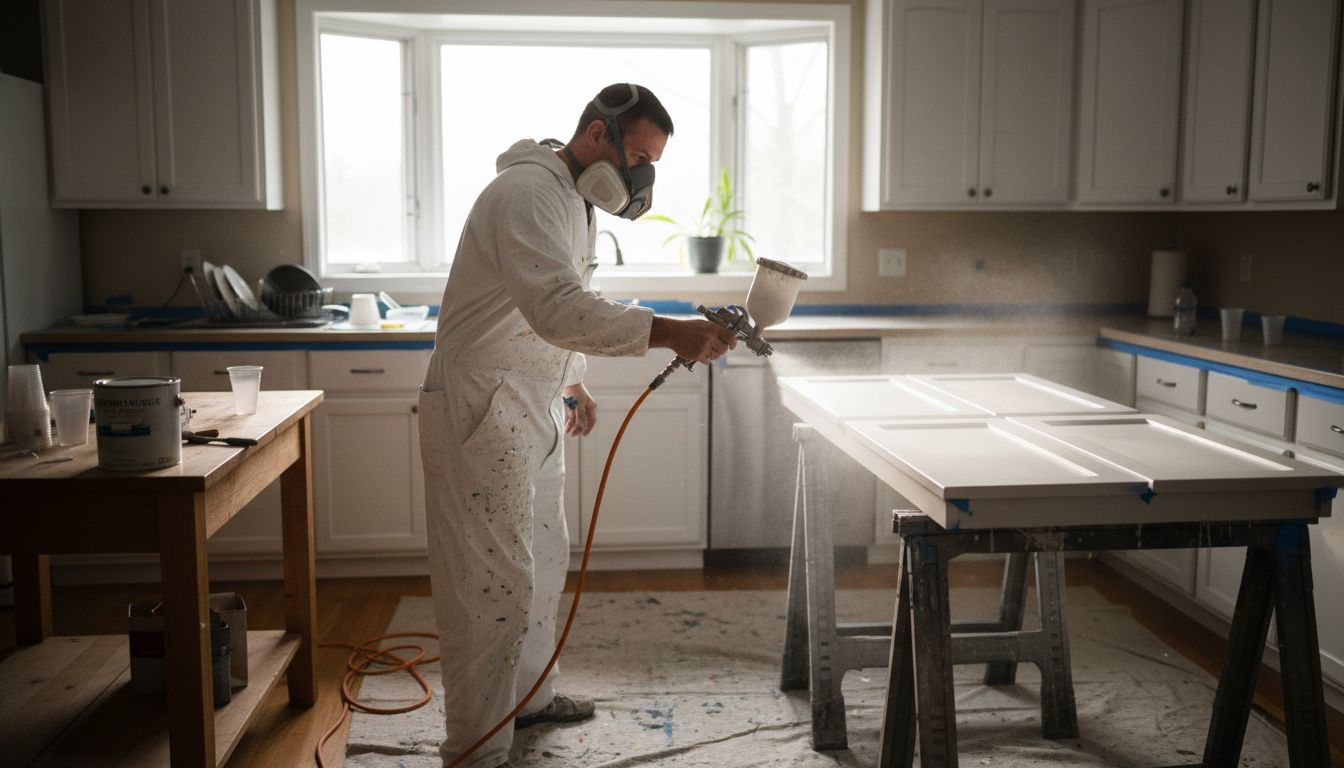
Step 4: Monitor the Cabinet Spraying Process
Monitoring the cabinet spraying process is crucial to ensuring a flawless finish that meets your highest expectations. Your active involvement and keen observation can make the difference between an average and an exceptional kitchen cabinet transformation.
As professionals work, pay close attention to their sterilizing practices and equipment monitoring. Watch for these critical performance indicators during the spraying process:
Consistent spray pattern and coverage
Even color application
Proper surface preparation techniques
Controlled spraying distance and angle
Smooth, streak-free finish
Observe the painting technique carefully, noting how professionals handle equipment and manage spray applications. Professional cabinet painters use specialized tools to achieve a factory-like finish, moving systematically across surfaces to ensure uniform coating.
Quality is in the details - your careful monitoring ensures a superior cabinet transformation.
Don’t hesitate to ask questions or seek clarification about their process. Open communication helps prevent misunderstandings and ensures your vision is being accurately executed.
Pro tip: Position yourself nearby during the spraying process, but avoid disrupting the painters’ workflow by creating unnecessary distractions or movements that could compromise the delicate painting environment.
Step 5: Inspect and Enjoy Your Sprayed Cabinets
With your beautifully transformed kitchen cabinets now complete, it’s time to conduct a thorough final inspection and start enjoying the remarkable results of your professional cabinet spraying service. This critical final stage ensures your investment meets the highest standards of quality and craftsmanship.
Begin by performing a comprehensive kitchen inspection process that covers every detail of your newly sprayed cabinets. Your systematic review should include:
Check for consistent color coverage
Examine edges and corners for smooth finish
Test cabinet door and drawer operation
Look for any uneven spray patterns
Verify hardware alignment and functionality
Examine the surface texture carefully under different lighting conditions. A professional cabinet spray should have a uniform, silky smooth appearance without drips, bubbles, or visible brush marks. Pay special attention to areas that receive more wear, such as handles and frequently opened sections.
A meticulous final inspection transforms a good painting job into an exceptional kitchen transformation.
Allow the cabinets a full 24-48 hours to completely cure before heavy use, which helps ensure the durability and longevity of your new finish.
Pro tip: Use soft microfiber cloths for initial cleaning and avoid harsh chemicals during the first month to protect the freshly sprayed surface and allow the paint to fully harden.
Achieve Flawless Kitchen Cabinet Spraying with Ottawa Experts
If you are overwhelmed by the detailed preparation and careful monitoring needed for perfect cabinet spraying as described in this guide you are not alone. Homeowners often struggle with cleaning, selecting the right finish, and ensuring a smooth application without disrupting daily life. The common goals are clear: protect your investment, enjoy a durable and elegant kitchen upgrade, and avoid the chaos of a full renovation.
Ottawa Cabinet Painting specializes in exactly these challenges by offering a proven solution that combines thorough surface preparation, premium paint finishes, and expert cabinet spraying. Our process guarantees a silky smooth, high-end result that transforms your kitchen while keeping disruptions minimal. With a reliable timeline of roughly ten days and a 6-year warranty your dream kitchen is closer than you think.
Ready to see how simple and rewarding professional cabinet refinishing can be? Visit Ottawa Cabinet Painting to explore our service details and customer stories. Take the next step now and request a personalized quote to start transforming your kitchen cabinets without replacing them at Ottawa Cabinet Painting. Your refreshed kitchen awaits.
Frequently Asked Questions
What should I do to prepare for kitchen cabinet spraying?
To prepare for kitchen cabinet spraying, empty your cabinets, clean surfaces thoroughly, and ensure proper workspace conditions. Create a checklist that includes removing cabinet hardware and protecting surrounding areas with painter’s tape.
How can I choose the right color and finish for my kitchen cabinets?
Selecting the right color and finish involves evaluating your kitchen’s existing color scheme and considering how light affects color perception. Test multiple paint samples and create large patches to see how colors appear in different lighting throughout the day.
How long does a professional cabinet spraying service usually take?
A professional cabinet spraying service typically requires 3-5 days to complete, depending on the size and complexity of your project. Schedule your service during a less busy time to minimize disruption to your household.
What should I look for while monitoring the cabinet spraying process?
While monitoring the spraying process, check for consistent spray patterns, even color application, and proper surface preparation. Observing these details ensures a high-quality finish that meets your expectations.
How do I conduct a final inspection of my newly sprayed cabinets?
To conduct a final inspection, systematically check for consistent color coverage, smooth finishes on edges and corners, and proper operation of your cabinet doors and drawers. Make sure to allow 24-48 hours for the finish to cure completely before heavy use.
Recommended

Comments