How to prep cabinets for a lasting kitchen upgrade
- Axcell Painting

- 1 hour ago
- 8 min read
TL;DR:
Proper surface preparation, including cleaning, sanding, and priming, is essential for durable cabinet finishes.
Skipping or rushing prep steps often leads to peeling, uneven sheen, and early failure of paint.
Investing time and effort into prep ensures long-lasting, professional-looking results in Ottawa kitchens.
Your kitchen cabinets take a beating every single day. Grease, steam, fingerprints, and years of use leave them looking tired and worn. But here’s the thing: you don’t need a full renovation to get a kitchen that looks brand new. The real secret to a stunning, durable cabinet finish isn’t the paint color you choose or the brush you use. It’s the prep work underneath. In this guide, we’ll walk you through every tool you need, every cleaning and sanding step that matters, and the common mistakes that turn a promising DIY project into a frustrating do-over.
Table of Contents
Key Takeaways
Point | Details |
Solid prep is essential | Thorough preparation is the main reason a kitchen upgrade lasts and looks professionally finished. |
Right tools, right results | Having all necessary materials on hand ensures a smooth cabinet prep process and great outcomes. |
Attention to details prevents issues | Inspecting and fixing small mistakes before painting saves time and prevents costly redos. |
Expert tips make DIY easier | Pro strategies and checklists from Ottawa experts help you avoid common pitfalls and achieve a flawless finish. |
Gather your tools and materials
Now that you’re inspired to update your kitchen, let’s make sure you’re fully equipped. Walking into this project without the right supplies is a recipe for delays, poor adhesion, and a finish that won’t last. Good cabinet prep essentials start with having everything on hand before you remove a single door.
Here’s what you’ll need:
TSP cleaner or kitchen degreaser for cutting through grease and residue
Sandpaper in 120-grit and 220-grit for initial scuffing and final smoothing
Sanding block or orbital sander depending on surface size
Shellac-based or bonding primer for stain blocking and adhesion
Wood filler or spackling compound for chips and gouges
Painter’s tape to protect walls, countertops, and hinges you’re keeping
Drop cloths to protect floors and appliances
Tack cloth to pick up fine dust before priming
Screwdrivers (flathead and Phillips) for hardware removal
Zip-lock bags and a marker for organizing screws and hardware
Dust mask and safety glasses for sanding protection
Clean, lint-free rags for wiping surfaces
For Ottawa homeowners, budget roughly $80 to $150 CAD for supplies if you’re starting from scratch. Time-wise, gathering and staging materials takes about two to three hours.
Supply category | Estimated cost (CAD) | Time to source |
Cleaning supplies | $15-$25 | 30 min |
Sandpaper and blocks | $20-$35 | 30 min |
Primer and wood filler | $30-$55 | 45 min |
Tape, cloths, hardware bags | $15-$35 | 30 min |
Pro Tip: Don’t skip the tack cloth. A regular rag leaves micro-fibers behind that show up under your primer coat. Tack cloth is specifically designed to grab fine sanding dust without leaving residue. It costs under $5 and saves you a full re-sand. When you’re also thinking ahead about cleanup, knowing how to care for your cleaning brushes properly extends their life and keeps your finish quality consistent throughout the project.
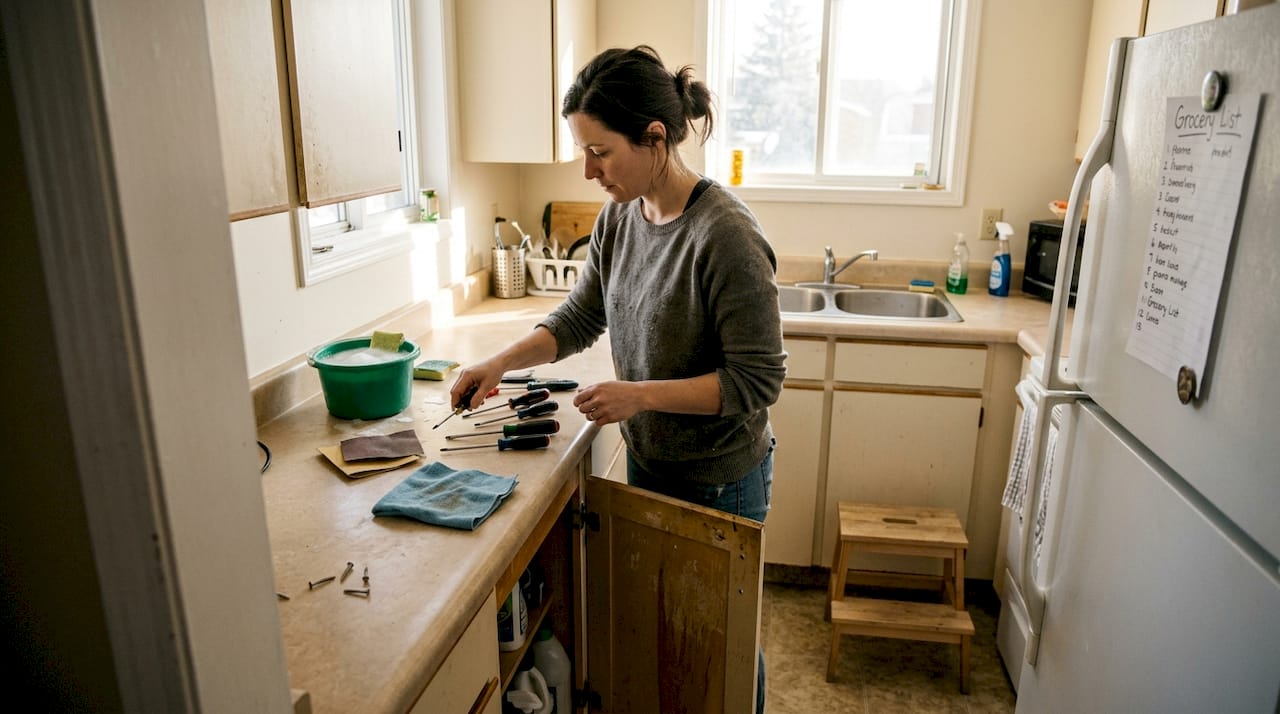
Clean and clear your cabinets for prep
With tools ready, start by giving your cabinets a clean slate for lasting results. Skipping this step is one of the most common reasons paint peels within the first year. Paint simply will not bond to grease, wax, or grime, no matter how good your primer is. Solid cabinet refinishing basics always start with a thorough clean and full disassembly.
Follow these steps in order:
Empty all cabinets and remove everything from the surrounding area.
Remove all doors and drawer faces using your screwdriver. Work methodically from top to bottom.
Remove all hardware including hinges, handles, and knobs. Place each set in a labeled zip-lock bag.
Degrease all surfaces using TSP cleaner or a kitchen-specific degreaser. Wipe down every surface, inside and out.
Rinse with clean water and a damp cloth to remove any cleaner residue.
Allow surfaces to dry completely before moving forward. At least two hours, preferably overnight.
Set up your workspace by laying drop cloths and staging doors flat on sawhorses or a clean surface.
Common mistakes to avoid:
Leaving hardware attached while painting (creates uneven surfaces and missed spots)
Using a wet cloth without rinsing away cleaner residue (causes adhesion failure)
Rushing the drying step (moisture trapped under primer leads to bubbling)
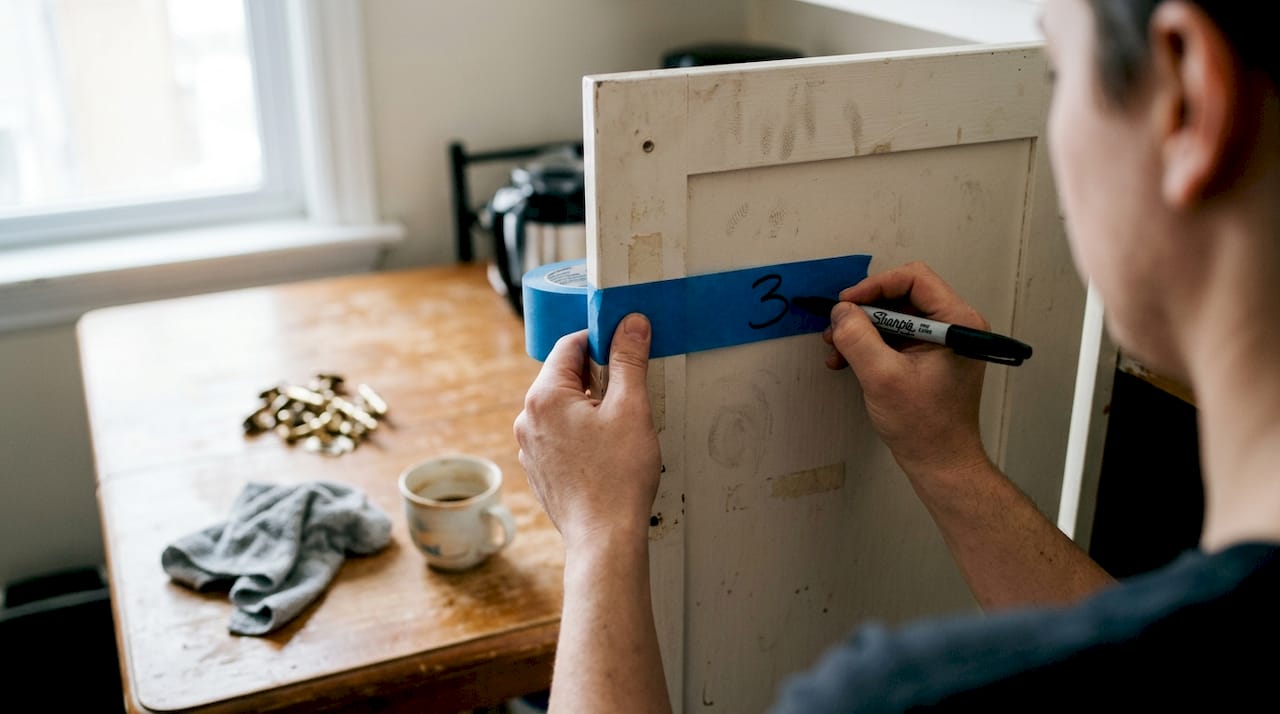
Pro Tip: Before removing each door, use a piece of painter’s tape on the inside and write a number with a marker. Then write the matching number on the cabinet frame opening. This makes reassembly completely stress-free, especially if you have multiple doors that look similar. A modern cabinet redo always goes smoother when your disassembly is organized from the start.
Sand, repair, and prime for a flawless finish
With clean and organized cabinets, you’re ready for hands-on surface prep. This is where most DIYers either nail it or fall short. Proper sanding and surface repair are essential for paint adhesion and durability, and there’s no shortcut that delivers the same result.
Follow these steps:
Sand all surfaces with 120-grit sandpaper to scuff the existing finish and open up the wood grain for better primer grip.
Wipe away all dust with a tack cloth. Don’t use a damp cloth here as it raises the grain.
Inspect for chips, gouges, and dents. Apply wood filler or spackling compound to any damaged areas. Learning how to repair paint chips properly makes a visible difference in your final result.
Let filler dry completely, then sand smooth with 220-grit sandpaper.
Wipe again with tack cloth to remove all fine dust.
Apply your primer coat evenly. Use a shellac-based primer for stained wood or cabinets with knots, as it blocks bleed-through that latex primers can’t stop.
Let primer cure fully before moving to paint.
Situation | Hand sanding | Power sander |
Flat door panels | Good option | Faster and more even |
Detailed molding or edges | Best choice | Too aggressive, risks damage |
Large frame sections | Works but slow | Recommended for efficiency |
Final smoothing pass | Always use by hand | Not recommended |
Some homeowners wonder about painting without sanding entirely. It’s possible with bonding primers in specific situations, but light sanding always gives you a more reliable, longer-lasting result.
Pro Tip: Always wear a dust mask rated N95 or better when sanding. Cabinet finishes often contain old lacquers or lead-based compounds in older Ottawa homes. Protecting your lungs costs nothing compared to the risk.
Safety note: Work in a well-ventilated space when sanding and priming. Open windows, use a fan to push air outward, and take breaks every 30 minutes. This is especially important in Ottawa’s colder months when you may be tempted to keep windows closed.
Final inspection and troubleshooting before painting
Before you grab your paint, pause for a quick inspection and some expert troubleshooting. This step takes less than 30 minutes, but it can save you hours of rework. Painting kitchen cabinets over an improperly prepped surface is one of the most common and preventable DIY mistakes out there.
Here’s what to check:
Run your hand over every primed surface. You should feel nothing but smooth. Any roughness means you need another light 220-grit pass.
Look at corners and edges under direct light. These spots collect dust and often get missed during sanding.
Check hardware holes. If you’re moving hardware placement, fill old holes with wood filler now and sand flush.
Look for any drips or uneven primer coverage. Sand these flat before painting.
Confirm all surfaces are fully dry. Press your fingernail lightly into the primer. It should feel hard with no give.
Poor prep is responsible for the vast majority of cabinet painting problems that homeowners run into after the job is done. Brush marks, peeling, and uneven sheen almost always trace back to a skipped or rushed prep step, not the paint itself.
For Ottawa homes specifically, ventilation during painting matters more than many people realize. Our winters mean sealed-up houses with low airflow. Open at least two windows to create cross-ventilation, and use a box fan to move air out of the room. This protects your family from fumes and helps your paint cure evenly.
Why Ottawa cabinet prep is your kitchen’s smartest investment
Let’s step back and reconsider the real driver of kitchen transformation. We’ve seen hundreds of cabinet projects over the years, and the pattern is always the same. When a finish fails early, it’s almost never the paint’s fault. It’s the prep that was skipped, rushed, or done halfway.
Ottawa kitchens face real challenges. Humidity in summer, dry forced-air heat in winter, and heavy daily use put serious stress on cabinet finishes. A coat of paint over a poorly prepped surface might look fine for a few months. But by the time Ottawa’s freeze-thaw cycle runs its course, you’ll see cracking, peeling, and lifting at the edges.
We’ve seen homeowners spend $300 on premium paint and $10 on prep supplies. The result is always disappointing. Flip that ratio, invest in proper Ottawa sanding insights and thorough cleaning, and even mid-range paint performs beautifully for years. The prep is not the boring part of the project. It IS the project. Everything else is just the reward for doing it right.
Upgrade your kitchen confidently with Ottawa experts
Ready to achieve stunning, durable results? Here’s how to take the next step. Now that you understand what solid cabinet prep actually involves, you can see why professional results require professional attention to detail. If your schedule, tools, or confidence level make a full DIY prep feel overwhelming, we’re here to help.
At Ottawa Cabinet Painting, we handle every step of this process with the same care we’d give our own kitchens. From meticulous surface prep to a seamless, factory-finished topcoat, our work is backed by a 6-year warranty. Explore our before and after projects to see what a properly prepped and painted cabinet looks like in real Ottawa homes. You can also browse our full Ottawa interior painting services or request cabinet painting quotes directly. We’d love to show you what your kitchen can look like.
Frequently asked questions
How long does cabinet prep take for a standard Ottawa kitchen?
Most Ottawa kitchens need one to two days of prep, depending on cabinet size, existing finish, and necessary repairs. Larger kitchens with more surface damage naturally take longer to clean, sand, and prime properly.
Can I skip sanding if my cabinets are in good condition?
You may sometimes use bonding primers as an alternative in certain situations, but even light sanding gives the most reliable, long-lasting results. Skipping it entirely is a risk that often shows up months later as peeling or poor adhesion.
What’s the best cleaner for removing grease from kitchen cabinets?
A kitchen-specific degreaser is safest and most effective, ensuring proper paint adhesion. TSP cleaner is a reliable choice for heavy grease buildup on older cabinet surfaces.
How do I avoid visible brush strokes or roller marks after painting?
Proper prep with sanding and priming is the key to a smooth, professional-looking finish. Dust left on the surface before painting is one of the most common causes of texture problems in the final coat.
Recommended
Comments