How to Fix Paint Chips for Flawless Cabinet Surfaces
- demoore5506
- Nov 7, 2025
- 7 min read

Chipped or worn cabinet paint can make even the most beautiful kitchen feel tired. Studies show that more than 60 percent of homeowners notice visible paint imperfections within five years. The good news is, you do not need to replace your cabinets to restore their appeal. With a thoughtful step-by-step approach, you can repair paint chips and achieve a result that looks fresh from the showroom. Get ready to learn how small repairs can make a big impact.
Table of Contents
Quick Summary
Key Point | Explanation |
1. Assess Damage Thoroughly | Inspect for chips and scratches under good lighting to understand the extent of repairs needed. |
2. Clean and Prepare Surfaces | Remove hardware and clean with mild detergent; sand lightly to ensure paint adhesion. |
3. Use Quality Filler for Chips | Choose color-matched wood filler and sand after drying for a smooth finish. |
4. Prime for Durability | Apply a suitable primer according to cabinet material for better paint adhesion and finish. |
5. Inspect Final Results Meticulously | Check for imperfections after painting, as thorough inspection is key to a flawless finish. |
Step 1: Assess Damaged Areas Carefully
Before diving into cabinet paint chip repairs, you need a careful and systematic evaluation of the damaged surfaces. Understanding the extent and nature of paint damage will help you determine the right repair strategy. According to research from arxiv.org, surface damage detection requires meticulous visual inspection and precise classification of damage patterns.
Start by cleaning the cabinet surface thoroughly with a soft cloth and mild cleaner. Examine each cabinet door and panel under good lighting conditions. Look closely for paint chips, scratches, and areas where the paint has separated from the underlying wood. Pay special attention to high traffic zones and edges where cabinets experience more wear and tear. As insights from surface damage analysis research suggest, capturing the structural organization of damage is crucial for effective repair arxiv.org.
Warning: Not all paint chips are created equal. Some might indicate deeper wood damage or structural issues that require professional assessment. If you notice extensive chipping or underlying wood deterioration, consider consulting a professional cabinet painting service before attempting repairs. This careful initial assessment will set the foundation for a successful paint chip restoration process and ensure your cabinets look seamless and professionally refinished.
Step 2: Clean and Prep Cabinet Surfaces
With your initial damage assessment complete, it is time to transform your cabinets through thorough cleaning and preparation. As guidelines from GSA recommend, proper surface preparation is critical for achieving a professional finish.
Begin by removing all cabinet hardware such as knobs and handles. Clean the surfaces comprehensively using a degreasing cleaner or mild detergent solution. According to British Paints, using sugar soap can effectively remove years of accumulated grime and create an ideal surface for painting. After cleaning, allow the surfaces to dry completely. Next, lightly sand the entire surface with fine grit sandpaper to create a slightly rough texture that helps primer and paint adhere better.
Warning: Avoid oversaturating the wood during cleaning. Excessive moisture can cause wood swelling or warping. Use a damp cloth rather than a soaking wet one, and always dry surfaces immediately after cleaning. Check out our guide on prepping cabinets for paint for more detailed instructions on creating the perfect surface for a flawless cabinet makeover.
Step 3: Fill and Sand Paint Chips Smooth
Now comes the critical repair process of transforming those unsightly paint chips into a smooth surface ready for a flawless finish. As recommended by Missouri Career Education, proper surface preparation is essential for achieving a professional looking result that will stand the test of time.
Select a high quality wood filler that matches the color of your cabinet surface. Apply the filler carefully using a plastic putty knife, pressing it firmly into each paint chip and ensuring you overfill slightly to account for shrinkage. Allow the filler to dry completely according to the manufacturer instructions typically 2 to 4 hours. Once dry, use progressively finer grit sandpaper starting with 120 grit and moving to 220 grit to create an ultra smooth surface. Sand gently and evenly to blend the filled areas seamlessly with the surrounding wood surface.
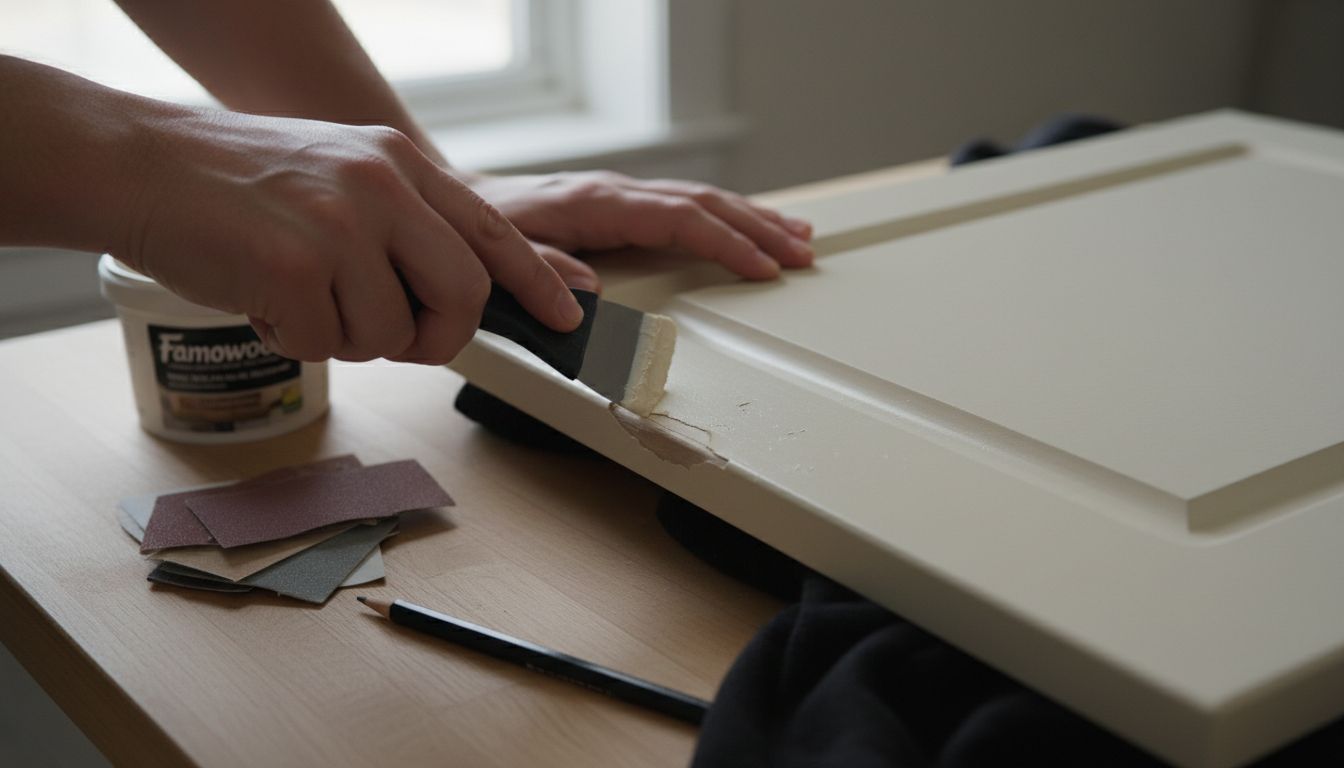
Warning: Less is more when sanding. Apply light pressure and keep the sandpaper moving to prevent creating uneven spots or accidentally removing too much filler. For more detailed guidance on perfecting your cabinet surface, check out our tutorial on sanding cabinets for paint that will walk you through each step of achieving that showroom quality finish.
Step 4: Prime and Match Cabinet Colour
With your surface repaired and prepared, it is time to prime and color match your cabinets for a professional finish. As recommended by GSA, selecting an appropriate primer is crucial for ensuring paint adhesion and durability on your cabinet surfaces.
Choose a high quality primer that matches your specific cabinet material wood, laminate, or MDF. Apply the primer using a foam roller or high quality synthetic brush for an even coat. According to British Paints, matching primers and topcoats are essential for achieving a seamless professional appearance. After the primer dries completely, lightly sand with 220 grit sandpaper to create a smooth surface. When selecting your paint color, bring a paint sample or color chip to a professional paint store for precise color matching to ensure consistency across all cabinet surfaces.
Warning: Lighting can dramatically alter color perception. Test your color in different lighting conditions before committing to the entire project. For more insights on selecting the perfect cabinet colors, explore our guide on choosing kitchen cabinet colors that will help you make a confident decision for your kitchen transformation.
Step 5: Apply Paint for Seamless Results
With your surface primed and color matched, you are ready to transform your cabinets with a professional paint application. According to GSA, achieving a flawless finish requires carefully spreading each coat of paint without skips or runs.
Begin by using a high quality synthetic angled brush to cut in edges and corners precisely. As recommended by British Paints, start in the top corner and work systematically across cabinet surfaces. Use smooth even strokes with a foam roller for larger flat areas to create a uniform finish. Apply two thin coats rather than one thick coat allowing each layer to dry completely between applications. This technique ensures better coverage and a more professional looking result.
Warning: Always paint in a well ventilated area with consistent temperature and minimal dust. Avoid painting in direct sunlight or high humidity conditions that can compromise your finish. For those seeking additional insights into achieving a perfect paint application, review our guide on house painting techniques to elevate your painting skills and ensure stunning results.
Step 6: Inspect Repairs for a Flawless Finish
After applying paint to your cabinet surfaces, a meticulous final inspection is crucial to ensure a professional looking result. As recommended by GSA, thoroughly examining painted areas and correcting any defects will help you achieve a truly flawless finish.
Allow the paint to dry completely between coats and under various lighting conditions. According to British Paints, waiting at least two hours between topcoats ensures proper paint adhesion and uniform coverage. Inspect the surface carefully from multiple angles using natural and artificial light to identify any uneven spots, missed areas, or subtle imperfections. Run your hand gently over the surface to feel for any rough patches or inconsistencies that might not be immediately visible.
Warning: Rush this final inspection, and you risk compromising the entire paint job. Take your time to review each cabinet door and panel meticulously.

For more detailed guidance on achieving a professional touch up, explore our tutorial on refinishing wooden cabinets to ensure your kitchen surfaces look showroom perfect.
Achieve Flawless Cabinet Surfaces with Expert Help
Fixing paint chips can feel overwhelming when trying to restore your cabinets to a smooth, high-end look. The challenge lies not only in repairing damaged surfaces carefully but also in matching colors perfectly and applying paint without imperfections. If you are looking to avoid costly replacements, messy renovations, or disappointing finishes, understanding the importance of thorough prep work and quality materials is key. Your kitchen deserves a transformation that reflects care and durability while preserving its warm, inviting atmosphere.
Ottawa Cabinet Painting specializes in tackling exactly these common homeowner concerns. With a meticulous approach that follows the critical steps like cleaning, sanding, and priming outlined in the article, we deliver a silky smooth, long-lasting finish. Our professional application techniques minimize disruption and save you money compared to a full cabinet replacement. Ready for your kitchen cabinets to look flawless without the stress? Visit Ottawa Cabinet Painting to learn more about our services. Discover how our cabinet refinishing process transforms surfaces with precision and care. Don’t wait until chips worsen or your space feels worn down. Contact us now and take the first step to a beautiful, refreshed kitchen that will be the heart of your home again.
Frequently Asked Questions
How do I assess paint chips on my cabinets before repair?
Start by doing a thorough visual inspection of the cabinet surfaces under good lighting. Clean the area with a soft cloth to better identify the extent of the paint damage and any underlying issues.
What should I use to clean cabinet surfaces before fixing paint chips?
Use a degreasing cleaner or a mild detergent solution to thoroughly clean your cabinets. Apply the cleaner with a damp cloth, avoiding oversaturation, and ensure surfaces are dry before proceeding with repairs.
How do I fill paint chips to create a smooth surface?
Select a high-quality wood filler that matches your cabinet color and apply it using a plastic putty knife, slightly overfilling the chip. Allow the filler to dry completely, then sand it with progressively finer grit sandpaper for a seamless finish.
What type of primer should I use on repaired cabinet surfaces?
Choose a high-quality primer that matches the material of your cabinets, such as wood, laminate, or MDF. Apply one even coat of primer before sanding lightly to enhance the adhesion of your topcoat.
How can I ensure my cabinet paint application is flawless?
To achieve a seamless result, apply two thin coats of paint rather than one thick coat, letting each layer dry completely. Use smooth strokes with a high-quality synthetic brush for edges and a foam roller for flat areas to eliminate skips or runs.
What should I do after painting to inspect for flaws?
Wait until the paint dries completely, then inspect the surface from multiple angles under different lighting conditions. Check for missed spots or uneven textures, and correct any imperfections for a polished finish.
Recommended
Comments