How to choose the right gloss level for your cabinets
- Axcell Painting
- May 15
- 10 min read
TL;DR:
Choosing the right gloss level for kitchen cabinets depends on balancing durability, appearance, and maintenance needs. Satin finishes are recommended for most kitchens due to their versatility, ease of cleaning, and ability to hide imperfections. Proper application, surface preparation, and modern high-quality paints are essential for achieving a flawless, long-lasting finish regardless of chosen sheen.
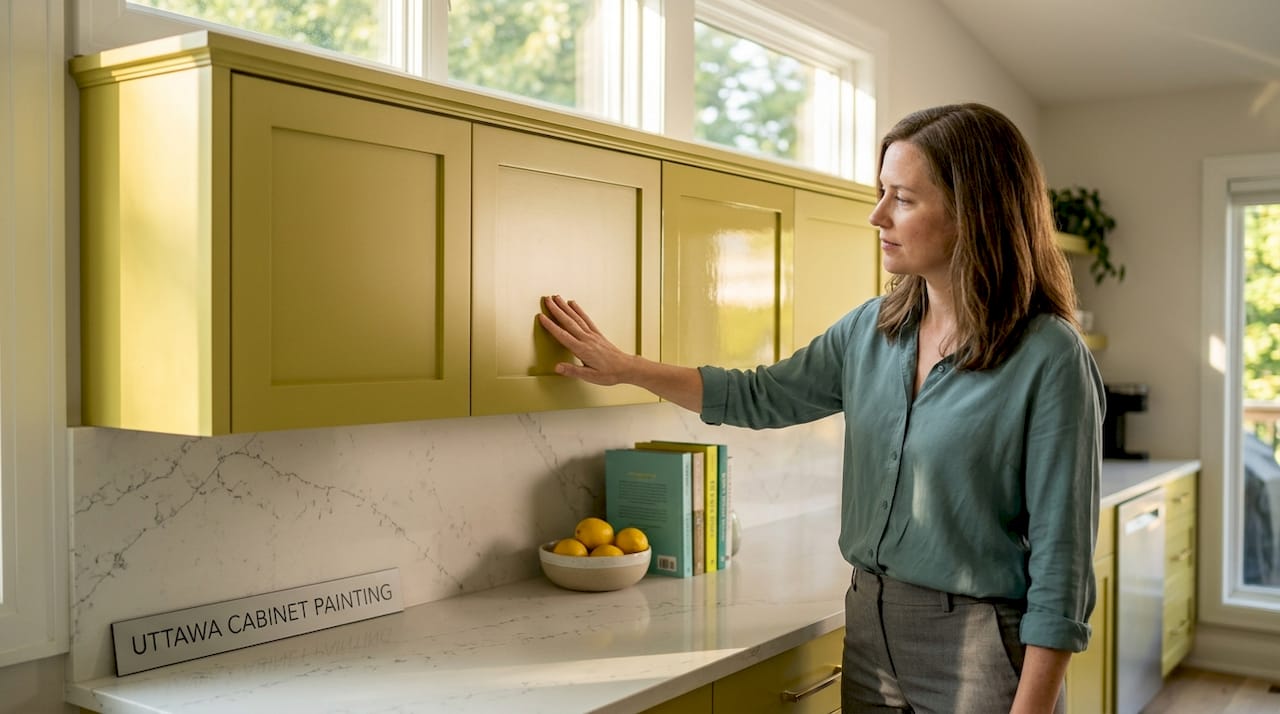
Most homeowners assume that glossier paint means better quality. It’s an easy conclusion to reach, and paint store displays don’t exactly discourage it. But when it comes to kitchen cabinet painting, that assumption can lead you toward a finish that shows every fingerprint, highlights every tiny surface flaw, and turns your renovation into an ongoing cleaning chore. Gloss level affects far more than shine. It shapes how durable your cabinets are, how forgiving they look over time, and how much weekly maintenance you’re actually signing up for. This guide gives you a clear, practical path to choosing the right sheen for your kitchen and your lifestyle.
Table of Contents
Key Takeaways
Point | Details |
Gloss level basics | Gloss is measured by light reflectance and affects both appearance and performance of cabinet paint. |
Satin is preferred | Satin finishes are the top choice for Ottawa kitchens, balancing durability, style, and maintenance. |
Surface prep matters | Proper preparation is just as important as gloss level for achieving a flawless cabinet finish. |
Modern paint advances | Today’s pro-grade paints offer lasting durability at a variety of sheen levels, not just gloss. |
What are gloss levels in cabinet painting?
Let’s start with the basics, because this is where a lot of confusion begins. Gloss level refers to how much light a painted surface reflects back at you. The more light it bounces, the glossier it appears. That reflectance is measured scientifically using a 60° angle, and it produces a number that paint manufacturers use to define distinct finish categories.
According to industry measurement standards, gloss levels are measured by reflectance at a 60° angle, with Flat or Matte registering below 5%, Eggshell at 10 to 25%, Satin at 25 to 35%, Semi-Gloss at 35 to 70%, and Gloss or High-Gloss above 70%. Each category creates a noticeably different look and behaves differently in daily kitchen use.
Here’s a quick-reference table to make those distinctions easy to visualize:
Finish type | 60° reflectance | Visual appearance | Common use |
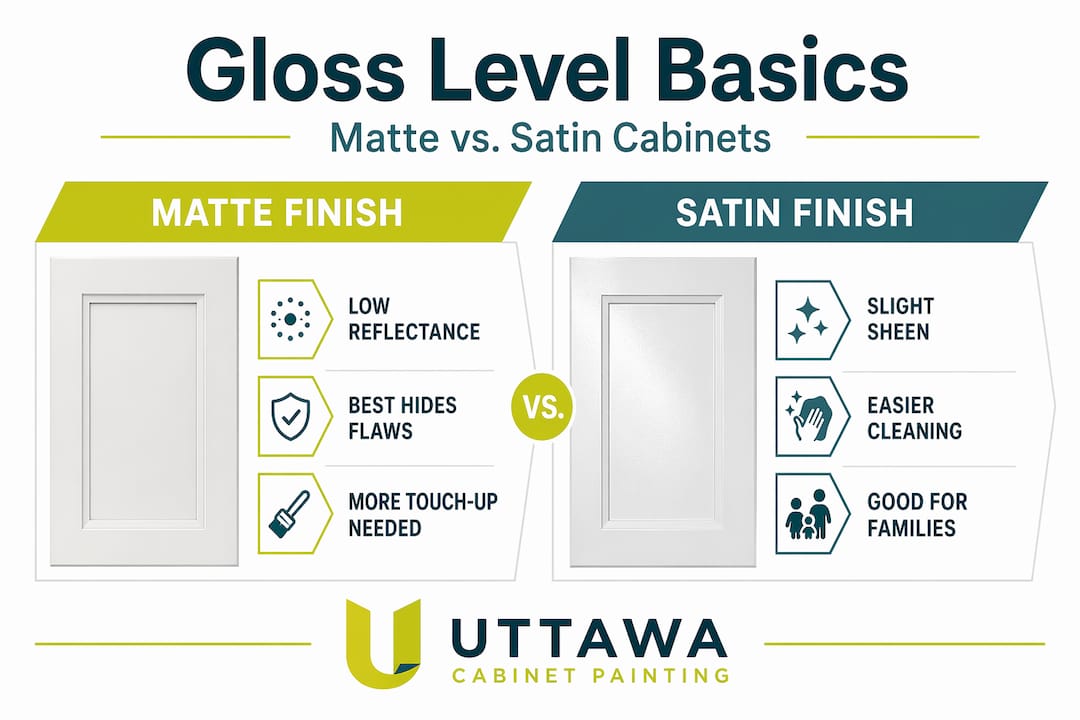
Flat/Matte | Below 5% | Chalky, no shine | Accent walls, low-traffic areas |
Eggshell | 10 to 25% | Soft, subtle glow | Living rooms, bedrooms |
Satin | 25 to 35% | Smooth, light sheen | Kitchens, cabinets, trim |
Semi-Gloss | 35 to 70% | Noticeable shine | Cabinets, doors, bathrooms |
Gloss/High-Gloss | Above 70% | Mirror-like, very bright | Feature cabinets, furniture |
“Not every sheen is created equal. The right gloss level for your kitchen cabinets depends on your lifestyle, your style preferences, and how much surface prep you’re willing to invest in upfront.”
When you understand how these categories are defined, choosing between them becomes much less intimidating. We see homeowners explore their kitchen paint finish options and quickly realize that most of their confusion came from treating gloss as a single sliding scale of “better or worse” rather than a set of trade-offs worth understanding.
Each finish category exists because it solves a real problem for a specific situation. Flat works beautifully on low-traffic ceilings and accent walls where nobody is wiping down surfaces. But put a flat finish on kitchen cabinet doors, and you’ll be repainting within a year. The cabinet paint finish options that actually perform in a busy Ottawa kitchen are a much narrower group, and that’s what we’ll focus on from here.
How gloss levels affect cabinet durability and appearance
Once you understand the definitions, it’s important to consider how your choice impacts everyday living and maintenance. This is where things get genuinely interesting, because the relationship between gloss and durability is more nuanced than it looks.
Higher gloss levels provide greater durability, moisture resistance, and ease of cleaning because of higher binder content that forms harder surfaces. But they also show imperfections far more prominently, which means your surface prep needs to be close to flawless before you ever open a can of paint. This is a critical trade-off that most paint store advice glosses over.
Here’s what that means practically for your cabinets:
High-gloss finishes resist grease and moisture extremely well and are simple to wipe clean, but every fingerprint, light scratch, and surface ding catches the light and becomes visible from across the room.
Semi-gloss finishes offer strong durability and are easier to clean than satin, but they still highlight imperfections on older cabinet doors that haven’t been perfectly sanded and filled.
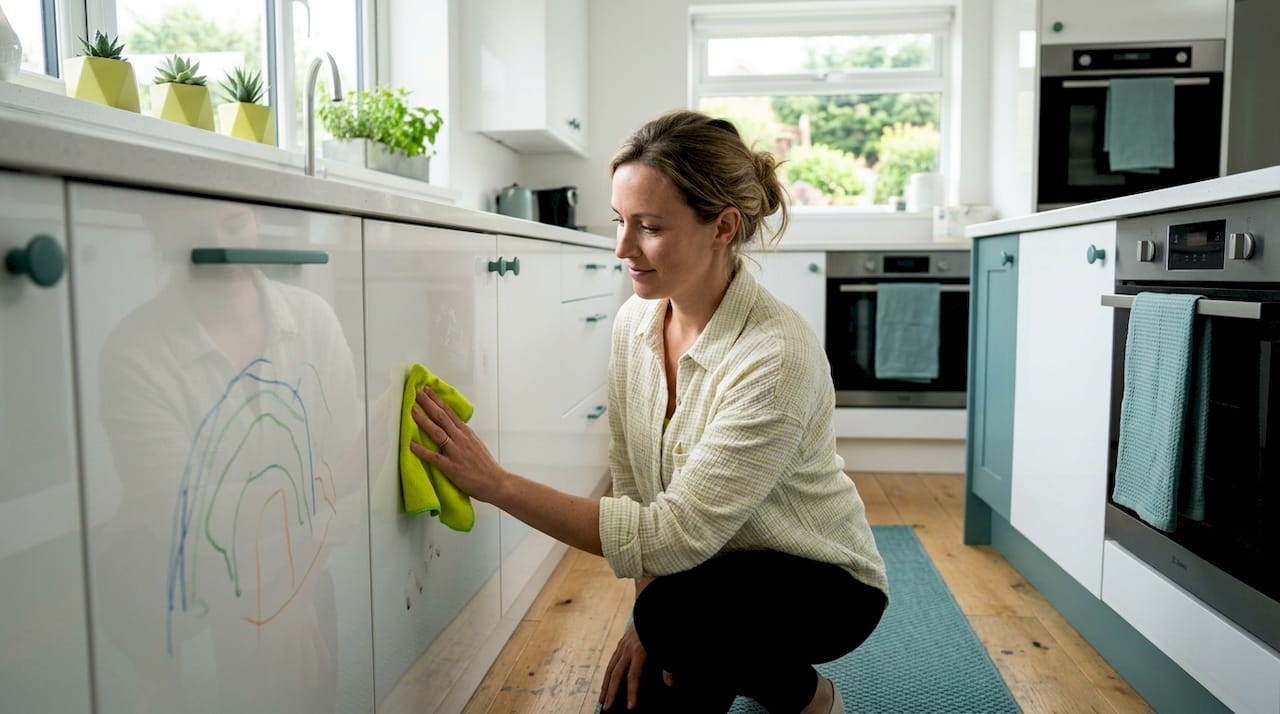
Satin finishes strike a balance by providing enough sheen for regular cleaning while being far more forgiving on surfaces that aren’t absolutely perfect.
Eggshell and matte finishes hide surface flaws well, but they absorb moisture and grease rather than repelling it, making them a poor fit for a high-use kitchen environment.
One thing we want to highlight specifically is how important paint sheen durability becomes in Ottawa’s climate. Our winters are long, our kitchens run hot, and humidity levels shift dramatically between seasons. A finish that can’t handle that range of conditions will start to fail well before its time.
Pro Tip: If you’re drawn to a high-gloss look, don’t try to rush the prep phase. Any surface imperfection you skip over will be far more visible under that high-gloss paint than it ever was with the original stained wood finish. Budget the extra time upfront and your result will actually look as good as you’re imagining.
Modern professional-grade paints have changed the conversation around durability significantly. For years, homeowners were told they needed maximum gloss for maximum durability. Today, that’s simply not accurate. Top-tier paints formulated specifically for modern Ottawa kitchen finishes now deliver excellent hardness, adhesion, and moisture resistance even at a satin sheen level. The binder technology has improved enough that durability is no longer tightly chained to shine.
Which gloss level is best for kitchen cabinets?
Understanding the trade-offs leads us to the most practical question homeowners ask: which gloss actually works best in real kitchens?
The answer, for the vast majority of Ottawa kitchens, is satin. Satin with a 25 to 35% sheen is recommended for most kitchen cabinets because it balances durability, hides fingerprints and minor flaws, and suits both traditional and modern styles. It’s used in approximately 85% of professional refinishing projects for good reason.
Here’s a side-by-side comparison to put that in context:
Finish | Pros for kitchens | Cons for kitchens | Best for |
Matte | Hides flaws, soft look | Hard to clean, absorbs grease | Low-traffic display cabinets |
Satin | Durable, easy to clean, hides minor flaws | Moderate sheen may not suit all styles | Most Ottawa kitchen cabinets |
Semi-Gloss | Very easy to clean, moisture resistant | Shows surface flaws and fingerprints | Well-prepped modern kitchens |
To pick the right sheen for your specific situation, follow these steps:
Assess your surface condition. Run your hand over your cabinet doors. Are there dents, scratches, or old wood grain showing through previous finishes? If yes, satin is the safer choice. Semi-gloss will make those imperfections very visible.
Think about your household. Do you have kids or pets? High-touch surfaces need a finish that cleans easily without becoming a fingerprint magnet.
Consider your kitchen style. Satin suits farmhouse, traditional, transitional, and modern styles equally well. Semi-gloss can look stunning in a very clean, contemporary kitchen with perfectly smooth cabinet doors.
Look at your lighting. Kitchens with a lot of natural light or under-cabinet lighting will amplify any sheen level. A semi-gloss in a bright kitchen can feel overwhelming. Satin handles varied lighting conditions gracefully.
Talk to a professional. A short conversation with someone who has painted hundreds of Ottawa kitchens will tell you more than any online quiz. Every kitchen is different, and an experienced eye catches things that a checklist can’t.
If you’re also thinking about other spaces in the home, the same decision-making process applies to painting bathroom cabinets, where moisture resistance becomes even more critical than in the kitchen.
Pro Tip: Households with kids or pets should default to satin over matte every single time. The ease of wiping crayon marks or paw prints off a satin surface versus scrubbing them out of a matte finish is not a small difference. It’s a difference you’ll feel every week for years.
How to achieve a flawless cabinet finish with the right gloss
Feeling confident about your gloss choice? Here’s exactly how the pros turn that sheen level into a flawless kitchen transformation, and how they keep disruption to an absolute minimum while doing it.
The single biggest factor separating a showroom finish from a disappointing result isn’t the paint brand or even the gloss level. It’s the application methodology. Specifically, whether cabinet doors are removed before painting and whether a proper sprayer is used.
Remove the doors. Painting cabinets in place is a recipe for runs, drips, and brush marks that show badly under any sheen level above matte. Removing doors allows each surface to be painted horizontally, which is how you get a smooth, factory-finished look.
Degrease thoroughly. Kitchen cabinets collect grease and cooking residue over years of use. Paint will not bond properly to a greasy surface, no matter how good the primer is. TSP (trisodium phosphate) or a dedicated degreaser clears the way for proper adhesion.
Sand before priming. Light sanding with 120 to 150 grit paper scuffs the existing surface so the primer has something to grip. This is non-negotiable for durability, especially on previously finished or laminate surfaces.
Apply a quality primer. A shellac-based primer is our go-to for previously stained wood cabinets because it seals tannins and prevents bleed-through that would discolor a light topcoat.
Spray your topcoat. The proper process calls for degreasing and sanding cabinets, then applying 2 to 3 thin coats with an HVLP sprayer or foam roller, with light sanding at 320 to 400 grit between coats, and allowing a full cure of 7 to 30 days. An HVLP (high-volume, low-pressure) sprayer produces the smoothest results by far.
Sand lightly between coats. 320 to 400 grit between coats knocks down any dust nibs or minor texture, so each layer goes on smoother than the last. This is what creates that seamless, glass-like finish.
Allow proper cure time. Paint can feel dry to the touch within hours, but it doesn’t reach full hardness for 7 to 30 days depending on the product and temperature. Rushing this period by closing cabinet doors too early causes the paint to stick and peel.
Choosing the best sprayer for cabinets makes a real difference in the final result, and it’s also one of the reasons professional results consistently outperform DIY attempts. HVLP sprayers require practice, proper masking, and the right paint viscosity to work correctly.
If you’d like to understand more about what products professionals actually use in Ottawa kitchens, our guide to understanding durable paint covers the key differences between builder-grade and professional-grade formulations. If you’re considering doing some of this work yourself, our practical guide on painting cabinets economically walks through the process with real cost comparisons.
Pro Tip: Avoid cheap paints, full stop. The old high-gloss paints that gave cabinet painting a reputation for looking plasticky and cheap were exactly that: cheap. Modern pro-grade products have completely decoupled sheen from that artificial look. Spend more on paint upfront and you will absolutely see and feel the difference for years.
A practical perspective: What most homeowners miss about gloss levels
We’ve seen hundreds of Ottawa kitchens transformed through cabinet painting, and there’s a pattern we notice consistently. Homeowners spend a lot of time agonizing over gloss level as if it’s the key decision, when the real driver of results is almost always the preparation and application process.
The spray application approach minimizes disruption and can achieve exceptional results even within tight timelines, while modern pro-grade paints have fully decoupled sheen from durability. That’s a significant shift from even ten years ago, when choosing a lower sheen genuinely meant accepting a less durable surface.
What we’ve learned is this: a satin finish applied with excellent prep work, quality primer, and professional spraying will outlast and outperform a high-gloss finish that was rushed over poor prep. Every time. The traditional shortcut of “just go glossier for more durability” is outdated advice, and following it without addressing your surface condition first is a genuine recipe for disappointment.
We also think homeowners underestimate how much the disruption of a renovation affects their daily life. Kitchens are the heart of the home. When you’re choosing your gloss level and process, also ask yourself how many days you can live without a functional kitchen. Professional cabinet painting, done right, can be completed with minimal downtime compared to full replacement. Our approach to refinishing wooden cabinets is built around that reality.
The bottom line: stop treating gloss as the headline decision and start treating prep and application as the non-negotiables they actually are. Choose satin unless you have a compelling reason to go higher, invest in quality product and process, and your cabinets will look and perform beautifully for years.
Ready for a flawless cabinet upgrade?
If reading this guide has you thinking seriously about transforming your kitchen cabinets, we’d love to show you what professional results actually look like. At Ottawa Cabinet Painting, we specialize in exactly this kind of work, and our process is built to deliver a seamless, factory-finished result with minimal disruption to your home. Browse our before and after results to see real Ottawa kitchens that have been through our process, and you’ll quickly understand the difference that proper prep, premium paint, and professional application make. When you’re ready to take the next step, get a free cabinet painting quote or explore our full range of interior painting services. We’re here to make this easy for you.
Frequently asked questions
Does a higher gloss level always mean a more durable cabinet finish?
Not anymore. Higher gloss does form harder surfaces with more moisture resistance, but modern professional-grade paints now deliver strong durability even at satin sheen levels, so gloss alone is no longer the defining durability factor.
How long does cabinet paint take to fully cure?
Cabinet paint typically feels dry within hours but reaches full cure in 7 to 30 days, depending on the specific paint formula, humidity, and temperature in your home. Avoid closing cabinet doors firmly during this window.
Which gloss level hides fingerprints and minor flaws best?
Satin is the strongest performer for this. Satin’s 25 to 35% sheen effectively hides fingerprints and minor surface imperfections while still being easy to wipe clean, which is why professionals use it in the vast majority of kitchen refinishing projects.
Can I use a foam roller instead of a sprayer for cabinet painting?
Yes, a foam roller can work, particularly on flat cabinet doors for smaller projects. But applying coats with an HVLP sprayer consistently produces a smoother, more uniform finish with fewer visible texture marks than rolling alone can achieve.
Recommended