Can You Paint Thermofoil Cabinets A Step by Step DIY Guide

Thermofoil cabinets can look flawless for years, then suddenly feel dated, yellowed, or out of step with the rest of the kitchen. The good news is that you can paint thermofoil cabinets, but the job only works if you respect what thermofoil is: a slick vinyl surface that does not behave like bare wood.
Paint will not grab onto thermofoil on its own. It needs cleaning, sanding, bonding primer, and enough curing time. Skip those steps and the finish may scratch, peel, or chip around handles within weeks. Do the prep properly and a DIY paint project can give tired cabinets a fresh, durable new look without replacing the whole kitchen.

What thermofoil cabinets are made of
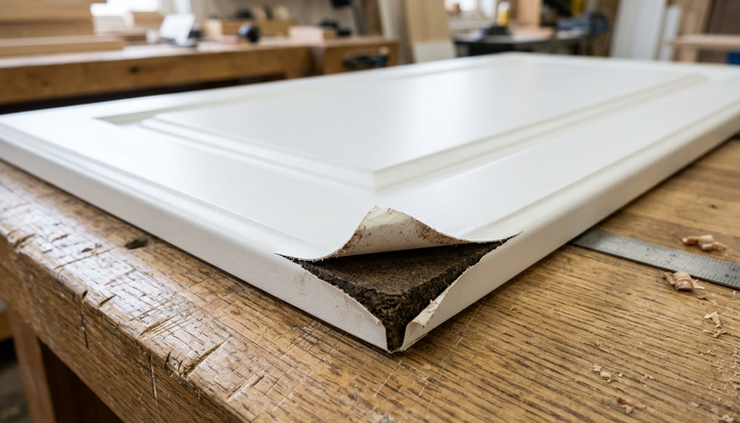
Thermofoil cabinets are usually made from medium-density fibreboard, often called MDF, covered with a thin layer of vinyl. The vinyl is heated and vacuum-pressed onto the cabinet door or drawer front, creating a smooth, seamless-looking surface.
Despite the name, thermofoil does not contain metal foil. It is a plastic-like film.
Thermofoil became popular because it offers several practical benefits:
A smooth factory finish
The surface often looks clean and consistent, especially in white, cream, grey, or wood-look finishes.
Good everyday durability
Thermofoil resists many common kitchen splashes and wipes clean easily.
Lower cost than solid wood
It can give cabinets a polished look at a more affordable price.
No visible brush marks or wood grain
This makes it appealing in modern or simple kitchens.
The same qualities that make thermofoil easy to clean also make it hard to paint. Its smooth, non-porous surface does not absorb paint the way wood does. Paint needs something to grip, which is why scuff-sanding and primer matter so much.
Thermofoil also has one major weakness: heat. Near ovens, kettles, dishwashers, and toasters, the vinyl can loosen or bubble over time. Once peeling starts, paint alone will not fix the underlying bond.
When painting thermofoil is a good idea
Painting is a smart option when the cabinet boxes and doors are structurally sound, but the finish looks worn or outdated. It works best when the thermofoil is still well-adhered to the MDF underneath.
Good candidates for painting usually have:
Smooth doors with no major bubbling
Corners that are still sealed
Minimal peeling around edges
No water-swollen MDF
Stable cabinet boxes and hinges
If only the colour is the problem, paint can be a satisfying upgrade. A dated glossy white can become a soft warm grey. A yellowed cream can become a fresh off-white. A dark kitchen can feel lighter with a satin cabinet enamel.
Painting is not the best choice when the thermofoil is badly peeling, cracked, or lifting across large areas. If the MDF underneath has swollen from water, it will not sand back to a perfect factory surface. In those cases, refacing or replacing damaged doors may be a better use of time.
Paint can improve the look of thermofoil, but it cannot make loose vinyl stick permanently again unless the damaged areas are repaired first.
Tools and materials you will need
A smooth finish depends far more on prep than on painting talent. Gather everything before removing the doors.
You will need:
Screwdriver or drill
Painter’s tape
Drop cloths
Marker and small bags for hardware
Degreasing cleaner
Clean microfibre cloths
Fine-grit sandpaper, around 220 grit
Sanding sponge for edges and profiles
Tack cloth or vacuum with brush attachment
High-adhesion bonding primer
Cabinet-grade paint or enamel
Quality synthetic brush
High-density foam roller or microfibre mini roller
Paint tray
Wood filler or adhesive for minor repairs
Caulk for small seams, if needed
Respirator or mask, especially while sanding
Nitrile gloves
For paint, look for products meant for cabinets, trim, or doors. These paints cure harder than basic wall paint and stand up better to daily handling.
Good options include:
Acrylic urethane enamel
Alkyd enamel
Water-based cabinet and trim paint
A satin or semi-gloss finish is usually practical for kitchens because it is easier to wipe than matte paint. Gloss can look sharp, but it shows flaws more readily. If this is a first cabinet painting project, satin is often the more forgiving choice.
How to paint thermofoil cabinets step by step
1. Remove the doors, drawers, and hardware
Take off cabinet doors and drawer fronts if possible. Remove knobs, pulls, hinges, and bumpers. Label each door and its hardware so everything goes back in the same spot.
A simple system works well. Write a number on a piece of painter’s tape and place it inside the hinge cup or on the back of the door. Put the matching screws in a small labelled bag.
Removing the doors may feel like extra work, but it makes painting easier and cleaner. It also helps avoid drips along edges.
2. Clean every surface thoroughly
Kitchen cabinets collect grease, steam residue, fingerprints, and cooking oils. Paint cannot stick well to any of that.
Use a degreasing cleaner and wipe every paintable surface, including edges and areas around handles. Rinse with a clean damp cloth if the cleaner requires it, then let everything dry fully.
Pay extra attention to:
Cabinet doors near the stove
Drawer fronts near cooking zones
Upper cabinet bottoms
Handle and pull areas
Edges where hands often touch
Do not rush this step. If the surface still feels slick or greasy after one pass, clean it again.
3. Repair peeling or damaged thermofoil
Check every door carefully before sanding. If you find small loose spots, glue them down with a suitable adhesive and clamp them until dry. Follow the adhesive directions and avoid using too much, since squeeze-out can create bumps.
For edges where the vinyl is missing, you can sometimes feather the transition with filler, then sand it smooth. This works for small damaged areas, not large sheets of peeling thermofoil.
If a whole door is delaminating, paint will not save it for long. Replace that door or remove the thermofoil completely before refinishing.
4. Scuff-sand the surface
Thermofoil is too slick for primer unless you dull the finish. Use 220-grit sandpaper or a sanding sponge and lightly sand all surfaces you plan to paint.
The goal is not to remove the thermofoil. You only want to create a fine scratch pattern so primer can grip.
Sand:
Fronts and backs of doors
Drawer fronts
Edges and corners
Detailed profiles
Cabinet face frames, if painting them too
After sanding, the surface should look dull rather than shiny. Wipe away dust with a vacuum brush attachment, then use a tack cloth or damp microfibre cloth. Let the surface dry before priming.

5. Apply a bonding primer
Primer is the make-or-break product for painting thermofoil. Use a high-adhesion bonding primer designed for slick surfaces such as laminate, melamine, PVC, or glossy finishes.
Apply a thin, even coat with a synthetic brush for corners and a foam or microfibre mini roller for flat areas. Avoid heavy coats. Thick primer can stay soft, show roller texture, or peel more easily.
Let the primer dry for the full time listed on the can. In cooler or humid conditions, which are common in many Canadian homes during spring and fall, drying can take longer. If the primer feels tacky, give it more time.
Some primers recommend a second coat. If so, apply it lightly and let it dry fully.
6. Sand the primer lightly
Once the primer is dry, lightly sand it with fine-grit sandpaper. This knocks down bumps, dust nibs, and roller marks.
Use a gentle hand. You are smoothing the primer, not removing it.
Wipe off all dust before painting. Any grit left behind will show in the final finish, especially on darker colours or glossier sheens.
7. Paint the cabinets in thin coats
Apply the first coat of cabinet paint using the same method as the primer. Brush corners, edges, and profiles first, then roll the flat areas.
Work in good light so you can see ridges and missed spots. Keep coats thin. A thin coat may not cover perfectly at first, and that is normal.
Let the first coat dry according to the paint instructions. Then sand very lightly if the surface feels rough. Wipe clean and apply a second thin coat.
Most thermofoil cabinets need two coats of paint after primer. A third coat may be needed when changing from a dark colour to a light one, or when using deep colours like navy, charcoal, or forest green.
8. Let the paint cure before reinstalling
Dry paint and cured paint are not the same. Paint may feel dry after a few hours, but it can take days or longer to harden enough for daily kitchen use.
If possible, wait at least a couple of days before reinstalling doors and hardware. Be gentle for the first few weeks. Avoid scrubbing, slamming doors, or hanging damp towels over drawer fronts.
Add new cabinet bumpers before reinstalling doors. They help prevent painted surfaces from sticking or chipping when doors close.
Choosing the right paint and primer
The best products for thermofoil have strong adhesion and a hard finish. Wall paint is not ideal because cabinet surfaces get touched, wiped, and bumped every day.
Look for these words on the label:
Bonding primer
High adhesion
Cabinet and trim paint
Urethane enamel
Alkyd enamel
Scrubbable or washable finish
Water-based products are popular because they have lower odour, clean up with soap and water, and dry faster than many oil-based coatings. Oil-based or hybrid alkyd paints can level beautifully and cure hard, but they may smell stronger and take longer to dry.
Choose tools that reduce texture. A cheap brush can leave bristles and streaks. A rough roller can leave an orange-peel finish.
For best results, use:
A high-quality angled synthetic brush for edges
A high-density foam roller for very smooth doors
A short-nap microfibre roller for slightly better paint pickup
Painter’s pyramids or small blocks to lift doors while drying
Spraying can create the smoothest finish, but it takes more setup, masking, ventilation, and skill. Brushing and rolling can still look excellent if you use thin coats and sand lightly between stages.
Common problems and how to fix them
Paint is peeling after drying
Peeling usually points to poor adhesion. The surface may have been greasy, too glossy, dusty, or primed with the wrong product.
To fix it, scrape or sand away loose paint, clean the area, scuff-sand again, spot-prime with bonding primer, then repaint.
Brush marks are showing
Brush marks happen when paint is too thick, overworked, or drying too quickly.
Use a better brush, apply thinner coats, and avoid brushing back into paint that has started to set. Roll flat areas right after brushing the edges so the finish blends.
Roller texture looks bumpy
A heavy coat or the wrong roller can leave texture. Let the coat dry, sand it smooth, wipe the dust, and apply a thinner coat with a foam or fine microfibre roller.
Thermofoil keeps lifting near heat
Paint will not stop heat damage if the vinyl is already releasing. Repair small lifted areas before painting. For cabinets beside ovens or appliances that vent heat, consider adding a heat shield if appropriate for the setup.
Doors stick after reinstalling
Paint that has not cured can stick to painted frames. Let the doors cure longer, install bumpers, and avoid closing them tightly for the first few days after reinstalling.

Final tips for a finish you will be proud of
A good thermofoil cabinet paint job is mostly patience. Set up a clean work area, keep dust down, and give each coat enough time to dry. If the project feels large, start with one bathroom vanity or a small bank of cabinets before tackling a full kitchen.
Keep these final tips in mind:
Test your primer and paint on the back of one door first.
Take before photos so you can see the progress.
Paint both sides of doors for a balanced finish.
Keep a small jar of leftover paint for touch-ups.
Clean painted cabinets with mild soap and water, not harsh abrasives.
Yes, painting thermofoil takes more prep than painting wood. It also rewards careful work. With the right primer, a cabinet-grade paint, and a few patient days, those glossy or faded cabinet doors can become a fresh feature rather than something you keep wishing you could replace.
Comments