Best cabinet painting techniques for kitchen upgrades 2026
- Axcell Painting

- Mar 18
- 9 min read
Nearly one-third of DIY cabinet painting projects fail within the first year due to inadequate surface preparation, not poor paint choice. This surprising reality reveals a critical insight: transforming your kitchen cabinets affordably requires mastering proven techniques that professionals use daily. Whether you’re considering a DIY approach or hiring experts, understanding the methods behind durable, beautiful cabinet finishes empowers you to make informed decisions. This guide breaks down the essential cabinet painting techniques that deliver professional results without the cost of full kitchen renovations, helping Ottawa homeowners achieve stunning upgrades while minimizing disruption and maximizing value.
Table of Contents
Why Surface Preparation Is The Foundation Of Successful Cabinet Painting
Choosing The Right Painting Techniques And Materials For Lasting Results
Minimizing Disruption And Ensuring Quality When Painting Kitchen Cabinets In Your Home
Comparing Professional Cabinet Painting Techniques For Ottawa Homeowners
Transform Your Kitchen Affordably With Expert Cabinet Painting In Ottawa
Key takeaways
Point | Details |
Preparation dominates project time | Surface preparation accounts for 50-70% of work and prevents most common failures |
Paint selection impacts longevity | High-quality primers and cabinet-specific paints extend finish life by years |
Application method affects results | Spray techniques provide the smoothest finish while brushing offers detailed control |
Professional planning reduces disruption | Strategic staging keeps kitchens functional during multi-day projects |
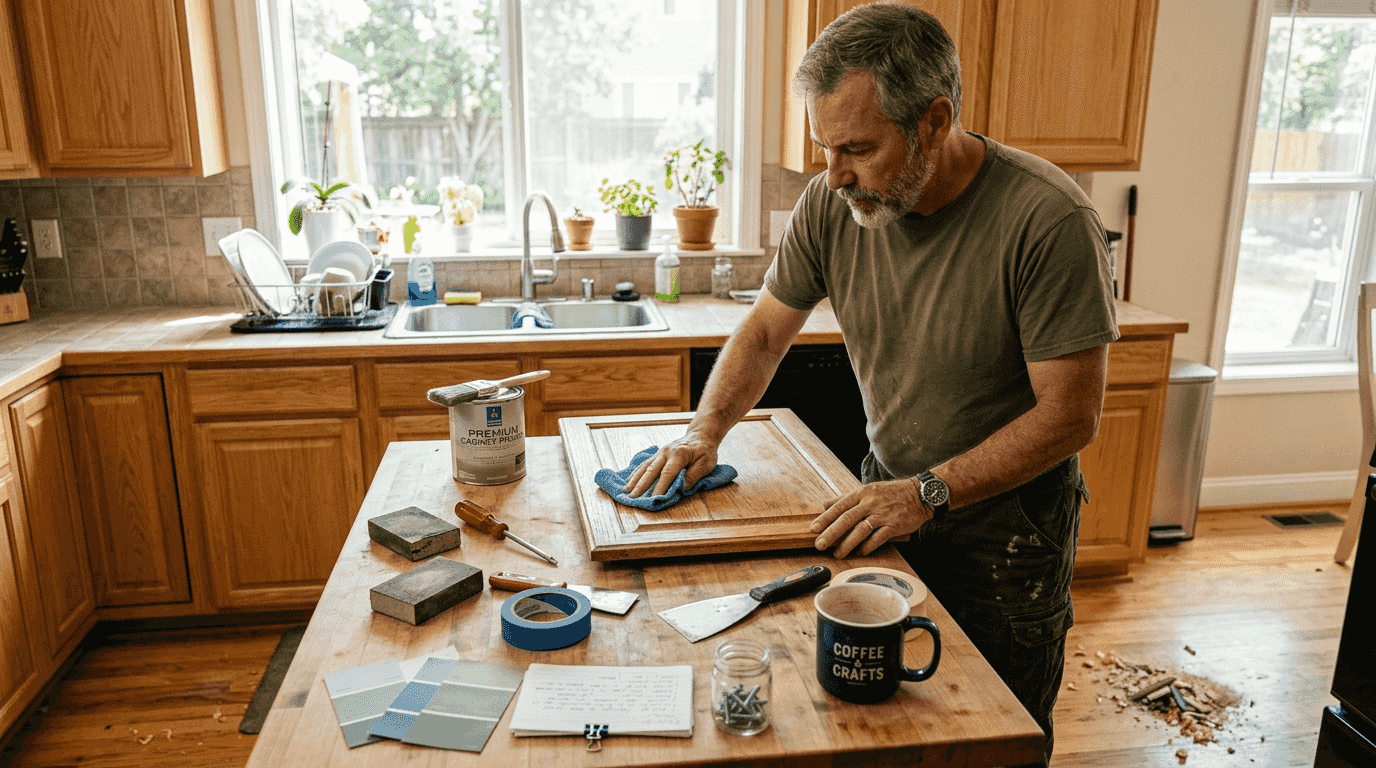
Why surface preparation is the foundation of successful cabinet painting
Most homeowners dramatically underestimate the time and effort required for proper surface preparation. Surface preparation is the most critical step, accounting for 50-70% of project time and preventing 30% of DIY failures like peeling and bubbling. This phase involves far more than a quick wipe-down. It requires methodical cleaning to remove years of grease buildup, strategic sanding to create tooth for paint adhesion, and careful priming to seal wood and create a uniform base.
Skipping or rushing preparation creates a cascade of problems. Paint adheres to whatever surface exists beneath it. If that surface contains oils, dust, or glossy finishes, the new paint has nothing to grip. Within months, you’ll notice edges lifting, bubbles forming, or entire sections peeling away. These failures waste both money and time, often requiring complete stripping and restarting.
Effective preparation follows a systematic approach:
Remove all cabinet doors, drawers, and hardware to access every surface
Clean thoroughly with degreasing agents designed for kitchen environments
Sand existing finishes to remove gloss and create mechanical adhesion
Fill nail holes, dents, and imperfections with wood filler
Prime all surfaces with products matched to your topcoat choice
Control dust between steps to prevent contamination
Pro Tip: Label each door and its corresponding hinge location with painter’s tape before removal. This simple step saves hours during reinstallation and prevents frustrating misalignments.
“The difference between amateur and professional results comes down to patience during prep. Rushing this phase guarantees disappointment, while investing time here ensures satisfaction for years.” This mindset separates successful projects from costly mistakes.
Understanding cabinet painting services reveals why professionals allocate most project time to preparation rather than actual painting. The visible transformation happens quickly once surfaces are properly prepared, but that foundation work determines whether your investment lasts six months or six years.
Choosing the right painting techniques and materials for lasting results
Once surfaces are prepared, selecting appropriate application methods and materials becomes crucial. Professional cabinet painting relies on specific techniques matched to materials to ensure smooth, durable finishes. Each method offers distinct advantages and limitations that affect both appearance and longevity.
Brush painting provides exceptional control for detailed areas like cabinet frames, corners, and decorative elements. Quality brushes with fine bristles minimize stroke marks, though complete elimination requires skill and patience. This method works well for small projects or touch-ups but becomes tedious for large cabinet sets. Brushing also takes longer to achieve smooth coverage compared to other techniques.
Roller application excels on flat cabinet doors and drawer fronts. High-density foam rollers create remarkably smooth surfaces without the texture typical of traditional nap rollers. This method balances efficiency with quality, making it popular for homeowners tackling their own projects. However, rollers struggle with intricate details and require careful technique to avoid creating orange-peel texture.

Spray painting delivers the most uniform, factory-like finish available. Professional-grade sprayers atomize paint into fine particles that settle evenly without brush marks or roller stipple. This technique requires significant equipment investment, protective gear, and extensive masking to protect surrounding areas. The learning curve is steep, but results justify the effort for those seeking flawless appearance.
Technique | Best For | Finish Quality | Skill Required | Equipment Cost |
Brush | Details, frames, touch-ups | Good with practice | Moderate | Low |
Roller | Flat doors, drawer fronts | Very good | Low to moderate | Low |
Spray | Complete cabinet sets | Excellent | High | High |
Paint selection matters as much as application method. Water-based paints dry faster, emit fewer odors, and clean up easily with soap and water. Modern formulations rival oil-based products in durability while offering superior color retention. Oil-based paints provide slightly harder finishes and self-level better, but extended drying times and strong fumes make them less practical for occupied homes.
Pro Tip: Always apply at least two topcoats regardless of method. Single coats rarely provide adequate coverage or durability, especially on high-traffic kitchen cabinets that endure daily wear.
Exploring painting technique options helps homeowners understand which approach fits their skill level, budget, and desired outcome. Professional residential cabinet painting services typically combine multiple techniques, using spray for main surfaces and brush for detailed areas to optimize both efficiency and quality.
Minimizing disruption and ensuring quality when painting kitchen cabinets in your home
Painting cabinets in an occupied home presents unique challenges that require strategic planning. Surface preparation and careful process planning help homeowners avoid common disruptions and delays. The kitchen serves as the heart of most homes, making extended downtime particularly problematic for families.
Successful on-site projects follow structured approaches that balance progress with livability:
Create a temporary kitchen setup in another room with essentials like microwave, coffee maker, and paper goods
Remove and paint upper cabinets first, allowing continued use of lower storage and countertops
Complete lower cabinets in a second phase once uppers are reinstalled and cured
Schedule painting during periods when household disruption matters least
Plan for adequate drying time between coats, typically 4-6 hours for water-based products
Allow 24-48 hours before reinstalling hardware and returning items to cabinets
Protecting your home from paint damage requires thorough containment measures. Cover floors with rosin paper or canvas drop cloths rather than plastic sheeting, which becomes slippery and tears easily. Use painter’s tape and plastic to shield appliances, countertops, and walls. Remove or cover light fixtures and outlets in the work area.
Dust control separates amateur from professional execution. Sanding generates fine particles that settle everywhere, contaminating wet paint and creating rough finishes. Seal doorways with plastic sheeting and tape. Run box fans pointed outward through windows to create negative pressure that pulls dust away from work areas. Vacuum thoroughly between each preparation step using HEPA filters that capture fine particles.
Ventilation becomes critical when working with any paint products indoors. Open windows and run fans to maintain fresh air circulation. This practice reduces fume exposure, accelerates drying, and improves working conditions. Even low-VOC paints benefit from good airflow, particularly in enclosed spaces like kitchens.
Quality control throughout the process prevents disappointments at completion:
Inspect each coat under bright lighting before proceeding to the next
Address drips, sags, or thin spots immediately while paint remains workable
Sand lightly between topcoats with fine-grit paper for optimal adhesion
Touch up any imperfections before final curing occurs
Test hardware installation in a few locations before committing to all cabinets
Understanding why choose professional painters often comes down to their ability to maintain quality while minimizing household disruption through experience and systematic processes that homeowners must learn through trial and error.
Comparing professional cabinet painting techniques for Ottawa homeowners
Ottawa homeowners evaluating cabinet painting options benefit from understanding how different professional techniques compare in practical terms. Professional cabinet painting techniques vary widely in tools, cost, finish quality, and time investment. This comparison helps you match methods to your priorities, whether that’s budget, appearance, or project timeline.
Hand brushing represents the most accessible technique for professionals and skilled DIYers alike. It requires minimal equipment investment and works in any space without extensive containment. However, achieving truly smooth finishes demands significant skill and patience. Brush marks, though minimized with quality tools and technique, remain visible under certain lighting. This method suits smaller projects, vintage cabinets where slight texture adds character, or situations where spray equipment cannot be used.
Roller application offers a middle ground between accessibility and finish quality. Professionals often combine rolling with brushing, using rollers for flat surfaces and brushes for details. This hybrid approach balances efficiency with results, completing projects faster than brushing alone while maintaining good quality. The technique works well for painted cabinets but struggles with stained finishes requiring perfect smoothness.
Spray application delivers the highest quality finish available, creating surfaces indistinguishable from factory-applied coatings. Professional sprayers produce ultra-fine atomization that eliminates texture entirely. This method also proves fastest for large projects, applying even coats in fraction of the time required for brushing or rolling. However, spray painting demands significant setup, including extensive masking, ventilation equipment, and containment systems. The equipment investment and learning curve place this technique firmly in professional territory for most homeowners.
Method | Finish Quality | Project Speed | Equipment Cost | Best Application |
Hand Brush | Good | Slow | $50-200 | Small projects, details, vintage cabinets |
Roller & Brush | Very Good | Moderate | $100-300 | Medium projects, DIY-friendly approaches |
Professional Spray | Excellent | Fast | $500-3000+ | Large projects, flawless finishes required |

Cost considerations extend beyond equipment to include time investment and potential mistakes. Spray equipment rental runs $50-100 daily, but the learning curve often results in wasted paint and suboptimal results for first-time users. Professional services bundle expertise, equipment, and efficiency into pricing that often proves competitive with DIY attempts once all factors are considered.
Durability depends less on application method than on preparation quality and paint selection. A properly prepared surface painted with quality products lasts years regardless of whether brush, roller, or spray applied it. However, spray application’s uniform coverage eliminates thin spots and missed areas that compromise longevity in hand-applied finishes.
Pro Tip: Request samples showing each technique’s results on similar cabinet materials before committing. Seeing actual finishes helps set realistic expectations and confirms which method delivers the appearance you envision.
Exploring affordable cabinet painting options reveals how local professionals structure pricing around technique selection, allowing homeowners to balance budget constraints against desired outcomes while ensuring quality results.
Transform your kitchen affordably with expert cabinet painting in Ottawa
Mastering cabinet painting techniques empowers informed decisions, but executing them flawlessly requires experience most homeowners lack. Professional services in Ottawa combine the preparation rigor, technique expertise, and quality materials discussed throughout this guide into cohesive processes that deliver reliable results. Local specialists understand regional climate factors affecting drying times and product performance, ensuring finishes cure properly despite Ottawa’s temperature and humidity variations.
Professional interior cabinet painting services eliminate the guesswork and physical demands of DIY projects while maintaining affordability compared to cabinet replacement. Experienced teams complete in days what takes homeowners weeks, minimizing kitchen downtime and household disruption. They bring professional-grade equipment, proven processes, and warranties backing their work, providing peace of mind that DIY approaches cannot match.
Exploring Ottawa cabinet painting quotes reveals transparent pricing tailored to your specific cabinet configuration and desired outcomes. Reviewing kitchen cabinet painting before and after examples demonstrates the transformative potential of professional techniques applied to real Ottawa homes, helping you envision possibilities for your own space.
What are the best cabinet painting techniques for durable kitchen upgrades?
How long does professional cabinet painting typically take?
Most professional cabinet painting projects require 7-10 days from start to finish, though actual work spans 3-5 days. This timeline includes thorough surface preparation, primer application, multiple topcoats, and adequate curing time between steps. Larger kitchens with extensive cabinetry may extend to two weeks, while smaller projects sometimes complete faster.
Can I paint cabinets myself or should I hire a professional?
DIY cabinet painting saves money upfront but risks poor results without proper preparation, technique, and patience. Most homeowners underestimate the time commitment and skill required, leading to finishes that peel, chip, or look amateurish within months. Professionals deliver durable, smooth results with less household disruption and typically include warranties. Evaluate your skill level, available time, and tolerance for potential mistakes honestly before deciding.
What paint finishes work best for kitchen cabinets?
Semi-gloss and satin finishes dominate professional cabinet painting due to their durability and cleanability. Semi-gloss offers superior stain resistance and wipes clean easily, making it ideal for busy kitchens. Satin provides a softer appearance while maintaining good durability. Flat or matte finishes show every fingerprint and stain, making them impractical for kitchen applications despite their aesthetic appeal.
Do I need to remove cabinet doors for painting?
Removing doors, drawers, and hardware is essential for professional results. Painting cabinets in place inevitably creates drips, missed areas, and uneven coverage on edges and backs. Removal allows proper surface preparation, even paint application on all sides, and horizontal drying that prevents sags. Label each piece during removal to ensure correct reinstallation, saving hours of frustration during final assembly.
Recommended

Comments